
Get your files back. Step by step, screen by screen.
Every recovery feature - what it is for, the exact menu path, every option and what to choose, the modals you will meet, and ten real situations each. Recover, image, RAID, CCTV, ransomware, databases, mail, encrypted volumes and disposal.
Get deleted and lost files back from a disk, card or image
The core of the product. It reads the filesystem for named files and carves free space for the rest, byte-exact, always read-only against your source.
1How to get there
Home opens on Recover a drive. Everything below happens in that one workspace.
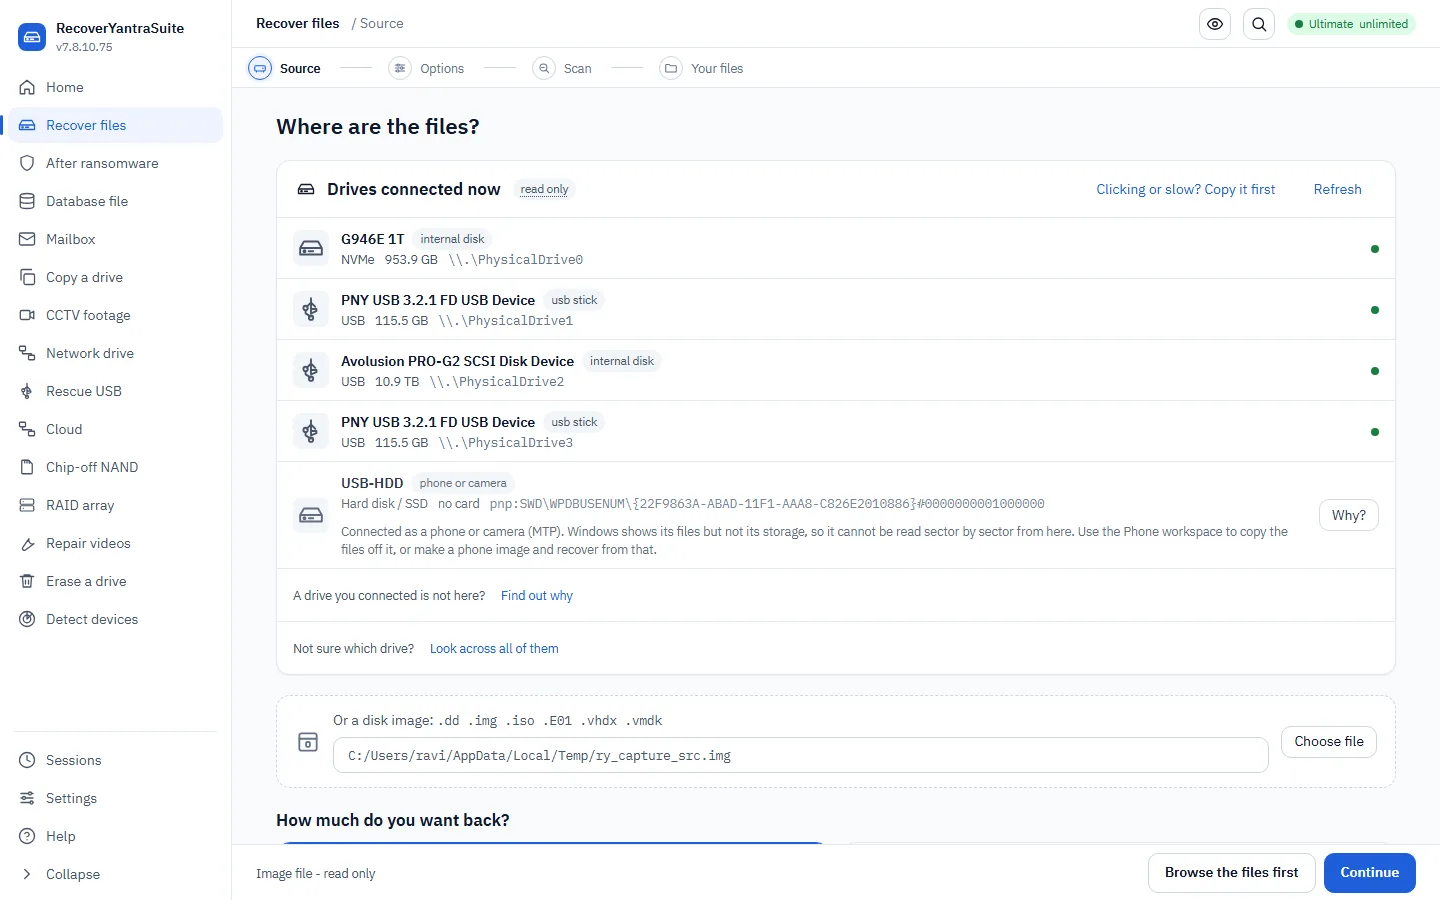
- 1Source the drive or image you are recovering from - opened read-only.
- 2What to look for pick the kinds to show first; the scan still recovers everything.
- 3Progress ring live percentage, phase and time remaining.
- 4Found so far the running count and breakdown while the scan runs.
- 5Browse first read the index first and recover only what you tick.
2Which mode do I choose?
The one decision that shapes the whole recovery.
3The options, and what to set them to
| Option | What it does | What to choose |
|---|---|---|
| Output folder | Where recovered files are written. Always a different drive from the source. | Always: a separate disk with room for the whole recovery. The pre-flight refuses the source drive. |
| Recover selected only | Reads the index and writes only the files you tick. | When you need one folder, not the whole drive - saves hours and space. |
| Include intact files | Also copies files that were never deleted. | For a full clone of what is there; leave off when you only want deleted items. |
| Original dates | Restores each file's created / modified times. | On for evidence and for keeping a photo library in order (it is on by default). |
Good to know. Nothing you tick under “What to look for” narrows the scan - it only changes what is shown first. The scan always recovers everything, so you can never lose a file by choosing the wrong category.
4Step by step
- Stop using the driveEvery write can overwrite what you are trying to get back. If it is the system disk, image it first (see Copy a failing drive).
- Choose the sourcePick the drive, or point at a .dd/.img/.E01 image. It opens read-only.
- Choose what to VIEW, not what to recoverTicking Photos shows photos first; the scan still recovers everything so a stray PDF is never lost.
- Set a separate output folderThe pre-flight checks free space and refuses to write onto the drive being recovered.
- Start the scan, or Browse firstBrowse reads the index in seconds so you can recover a single folder instead of the whole disk.
- Preview, then exportLook at a file before you trust it. Export is where a licence use is spent, once per source drive.
Do not do this. Never install this tool onto, or recover onto, the drive you are rescuing. Writing to it can overwrite the very files you want back. The pre-flight refuses the source drive as a destination for exactly this reason.
5Ten situations, and exactly what to do
Emptied the Recycle Bin
Files were deleted and the bin emptied an hour ago on an NTFS disk still in use.
Smart mode, recover selected. The MFT still holds the names.
- Stop writing to the disk
- Source = the disk, Browse first
- Tick the folder, Recover selected
- Preview a file, then export
Card says it needs formatting
A camera SD card prompts Windows to format it; the photos are still on it.
Carving - the filesystem header is gone, so recover by signature.
- Do NOT format
- Source = the card (SDXC reader)
- Carving mode, Photos + Videos
- Export to a folder on the PC
USB stick shows as RAW
A stick that used to open now shows 0 bytes / RAW in Explorer.
Smart - the tool reads the backup boot sector the OS ignored.
- Source = the stick
- Smart mode
- If it reads, Browse first; else full scan
- Export
Windows was reinstalled
A fresh Windows sits on top of the old files.
Smart, full recovery - old files live in what is now free space.
- Image the disk first (it is the system disk)
- Recover from the image
- Full recovery, all types
- Sort the output by type
Only one file matters
A single spreadsheet was deleted from a 2 TB drive.
Browse first + Find by mask - do not scan 2 TB for one file.
- Source = the drive, Browse first
- Filter *.xlsx, deleted-only
- Tick the one file
- Recover selected
The recovered file will not open
A recovered .docx opens as garbage.
It was in reused space - let the tool try the other route (rescue) or repair.
- Recover with Smart mode
- Check the MISMATCH note on the file
- Use Repair on a copy
- If still broken, the bytes are gone - honest limit
A whole drive, sorted
Return everything from a failed laptop disk, organised.
Smart, recovery profile - output sorted into Photos / Documents / Video.
- Image if it is failing
- Recover from image/drive
- Recovery profile (sorts by type)
- Export
Byte-exact, for proceedings
The files may be used in a dispute.
Forensic profile - flat layout, SHA-256 per file, chain-of-custody manifest.
- Image to E01 first, verify
- Recover from the verified image
- Forensic profile
- Keep the manifest
Two partitions, both have Photos
A drive with two volumes each holding a /Photos/ folder.
Browse first and scope by volume - 1:/Photos/ is partition 1 only.
- Source = the drive, Browse first
- Expand each volume
- Tick 1:/Photos/ only
- Recover selected
CHKDSK was already run
Someone ran CHKDSK and now files are in FOUND.000 or gone.
Smart + carving - CHKDSK moves fragments, so the index is unreliable; carve recovers content.
- Source = the drive
- Smart mode (carve fallback on)
- Recover all types
- Check FOUND.* against the carve results
6The same job at the command line
recoveryantra recover --device \\.\PhysicalDrive2 -o D:\Recovered --mode smartImage a drive before it gets worse
Gentle, ddrescue-style imaging: the feasibility check measures a drive before anything is copied, the easy data comes first, and every later step runs against the copy - never the original again.
1How to get there
Home → Copy a drive opens on this workspace directly.
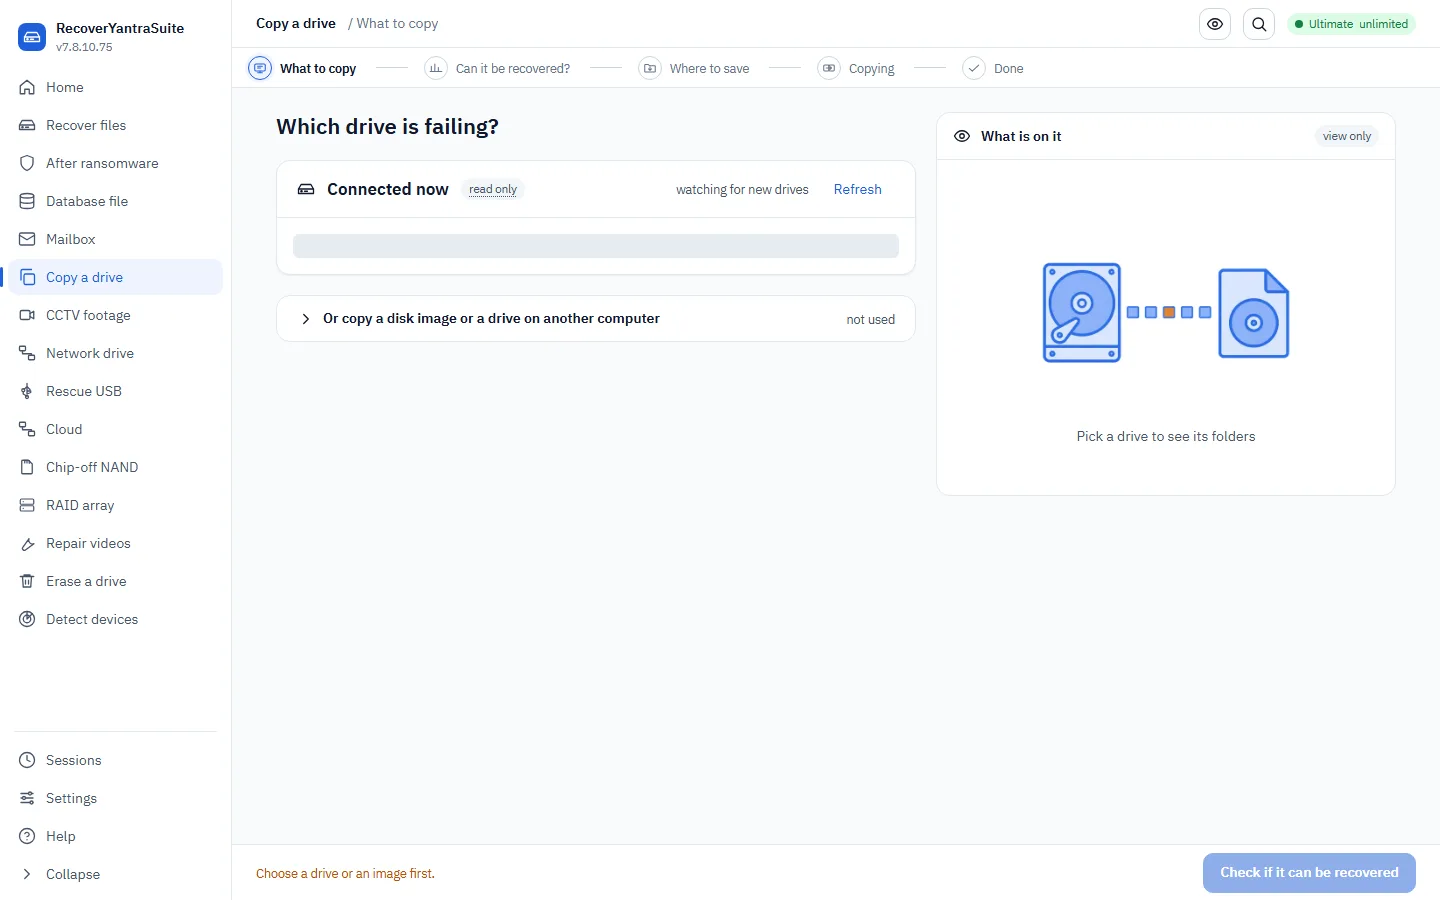
- 1Refresh re-reads the attached drives, in case one was just plugged in.
- 2Image an existing file opens to re-image an existing file instead of a physical drive, or reach a network drive or a phone.
- 3What is on it (view only) a read-only preview of the chosen drive's folders.
- 4Pick a drive to see its folders prompts you to choose a drive before the preview can show anything.
- 5Check if it can be recovered moves to the feasibility check, the crucial step before any copying starts.
2Check first, always
The feasibility check is the crucial first step - it measures before it promises.
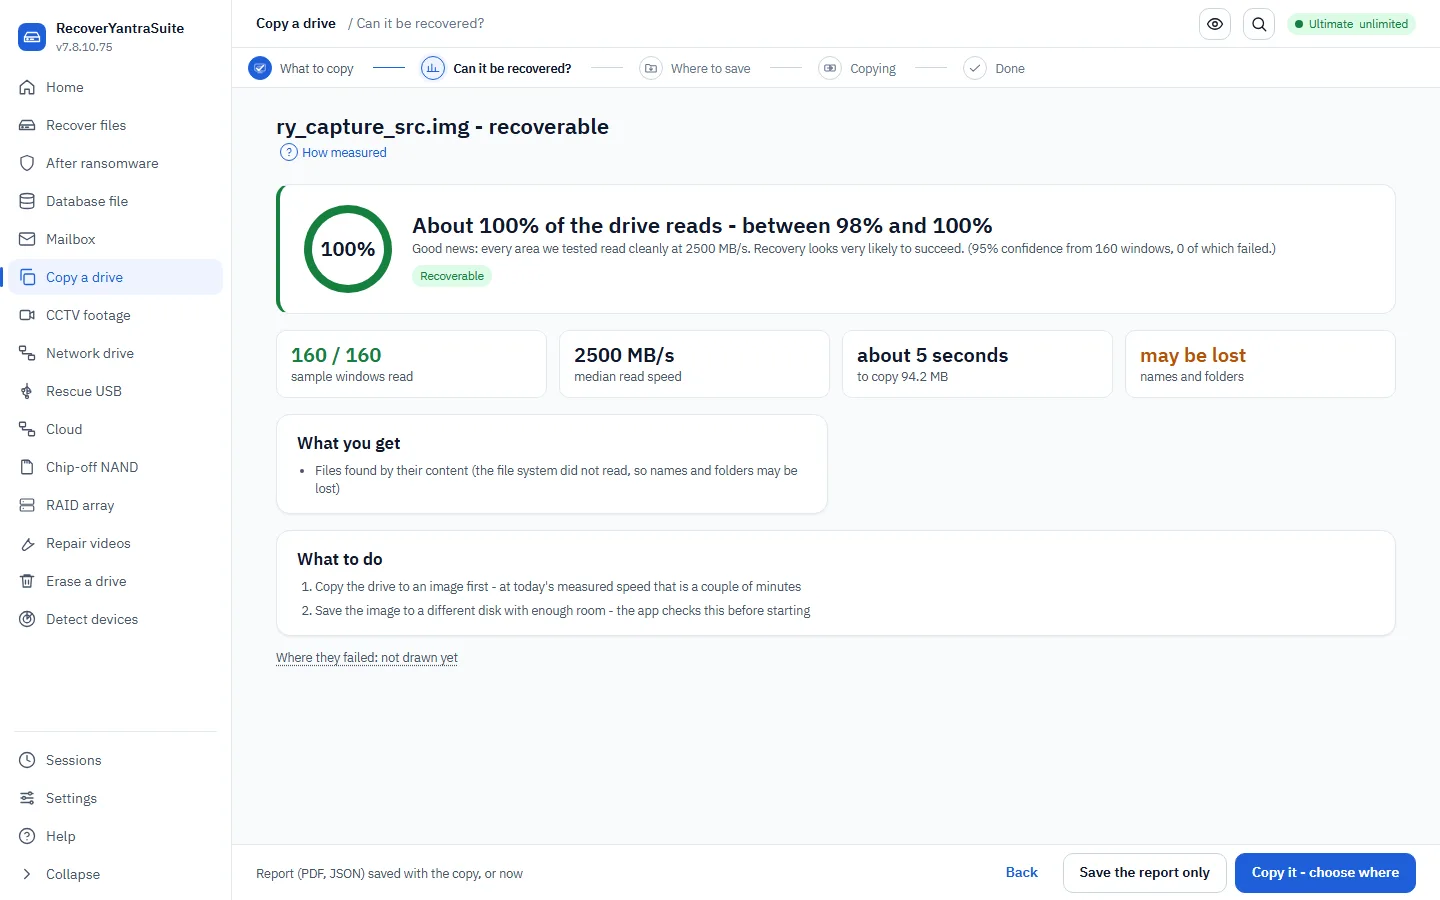
- 1What to copy confirms the source you chose.
- 2How measured explains the sampling method behind the stated range.
3Full image, or targeted?
4The options, and what to set them to
| Option | What it does | What to choose |
|---|---|---|
| --format | raw (.img, resumable) or e01 (compressed evidence container). | Evidential work: e01. A working copy for this bench only: raw - it is resumable if the copy stops. |
| --targeted | Filesystem-aware, read-once imaging - free space is never read. | A large or failing drive where deleted data in free space is not the priority. Omit it whenever deleted files matter. |
| --entropy-map | Records which spans are high-entropy as the copy runs, in the image's .map.json. | To see at a glance whether a drive is encrypted before spending hours recovering from it. It cannot tell encryption from compression on its own. |
| --retries | Retry attempts for a bad sector before moving on. | Lower it on a drive that is actively dying - every retry is another read of a failing surface. Raise it only on a marginal drive the case justifies a slow pass on. |
| check --samples | How many areas of the drive the feasibility check reads. | The default suits a first assessment. Raise it only when the estimate must be tighter than a few percent, and only on a drive that is not clearly failing. |
| --force | Starts even when the pre-flight objects (too little room, or the same drive as the destination). | Only after reading the objection and confirming it does not apply. A refusal you have not read is not one you can override safely. |
5Step by step
- Check first“Can it be recovered?” measures the drive without copying it and states the chances before you promise a client anything.
- Choose the sourceA physical drive from the list, or an existing image file to re-image - for example to convert raw to E01.
- Choose the formatraw for a resumable working copy on this bench, E01 for evidential work.
- Choose the destinationSeparate storage with room for the whole source. The pre-flight refuses the drive being imaged as its own destination.
- Start the copyThe easy data comes first; the difficult areas are swept afterwards. Saved bytes, speed and unreadable-so-far update live, and Stop is real.
- Recover from the imageEvery later step - scanning, RAID assembly, CCTV, database work - runs against the image, never the original drive again.
Do not do this. Do not run a normal scan, CHKDSK or a repair tool on a drive that is clicking or failing. A scan reads the surface repeatedly and can be the thing that finishes it off; CHKDSK and repair tools WRITE to a drive that is already dying. Image first, always.
6Ten situations, and exactly what to do
A drive is clicking
A 2 TB drive with a clicking head needs its files back before it stops for good.
Image first, full raw copy. Do not run a normal scan - repeated full-surface reads can be what finishes a failing drive off.
- Do NOT run CHKDSK or a repair tool on it
- Check first, then image the whole drive
- Recover from the image afterwards
- Keep the drive powered down between attempts
Going to a lab or to proceedings
The copy may need to be examined by someone else, or produced.
E01 format - compressed and carries acquisition metadata other forensic tools expect.
- Check first
- Image to E01, not raw
- Verify the image reads cleanly
- Keep the certificate/manifest with it
A huge, slow external drive
A 10 TB drive is failing gently; only deleted files matter far less than time.
Targeted / read-once - only the space filesystems say holds data is read.
- Check first
- Image with --targeted
- Recover from the image
- State plainly that free space was not imaged
Possibly encrypted, not sure
A seized laptop's disk may or may not be BitLocker-protected.
Full image with --entropy-map - see at a glance which spans are high-entropy before committing hours to recovery.
- Image the whole drive with --entropy-map
- Read the .map.json
- Treat high-entropy spans as possibly encrypted, not proven so
- Continue to Recover a drive once unlocked
A client needs the answer in writing before you quote
Nobody wants an open-ended promise on a drive nobody has tested yet.
Check, with a PDF - the verdict is stated as a range, based on a stated sample.
- Run check against the drive
- Write the PDF verdict
- Quote against the stated chances, not a guess
- Image only once the client has agreed
An image arrived from another lab
A copy was handed over and needs confirming before billing continues against it.
Check --image - the same feasibility test run against a file instead of hardware.
- Run check --image against the received file
- Confirm it reads cleanly
- Only then continue recovery work against it
Deleted photos and the card is also unreliable
The customer deleted a folder and the card is now intermittent.
Full image, not targeted - a targeted image skips the free space the deleted photos are sitting in.
- Check first
- Full image, not --targeted
- Recover from the image with Smart mode
- Photos come back from free space
Feeding a CCTV recovery
A recorder disk needs to go through CCTV recovery, and the recorder must not be run again.
Image the recorder disk once, then run the CCTV workspace against the image, never the disk again.
- Power the recorder down and remove the disk
- Image the whole disk
- Open CCTV footage against the image, not --device
The pre-flight objects to the destination
A refusal names too little room, or the same physical drive as the source.
Read the objection first. Change the destination if it is genuinely wrong; use --force only once you have confirmed it does not apply.
- Read the stated reason
- Fix the destination if the reason is real
- Only force past a check you have read and understood
A marginal drive that is not actively dying
Reads are slow but the drive is stable, and every sector matters.
Raise --retries - a slow, thorough pass is justified because the drive is not deteriorating further.
- Check first to confirm it is stable, not failing
- Image with a higher --retries
- Recover from the image
7The same job at the command line
recoveryantra check --device \\.\PhysicalDrive2 && recoveryantra image --device \\.\PhysicalDrive2 -o D:\Case\drive.imgRebuild a RAID or NAS array from its member disks
Reads the array's own layout - level, chunk size, disk order, parity rotation - from the members' metadata, so the original controller is never needed. Every member is only ever read.
1How to get there
Home → RAID array. Assembly always works from IMAGES of the members, never the physical disks directly.
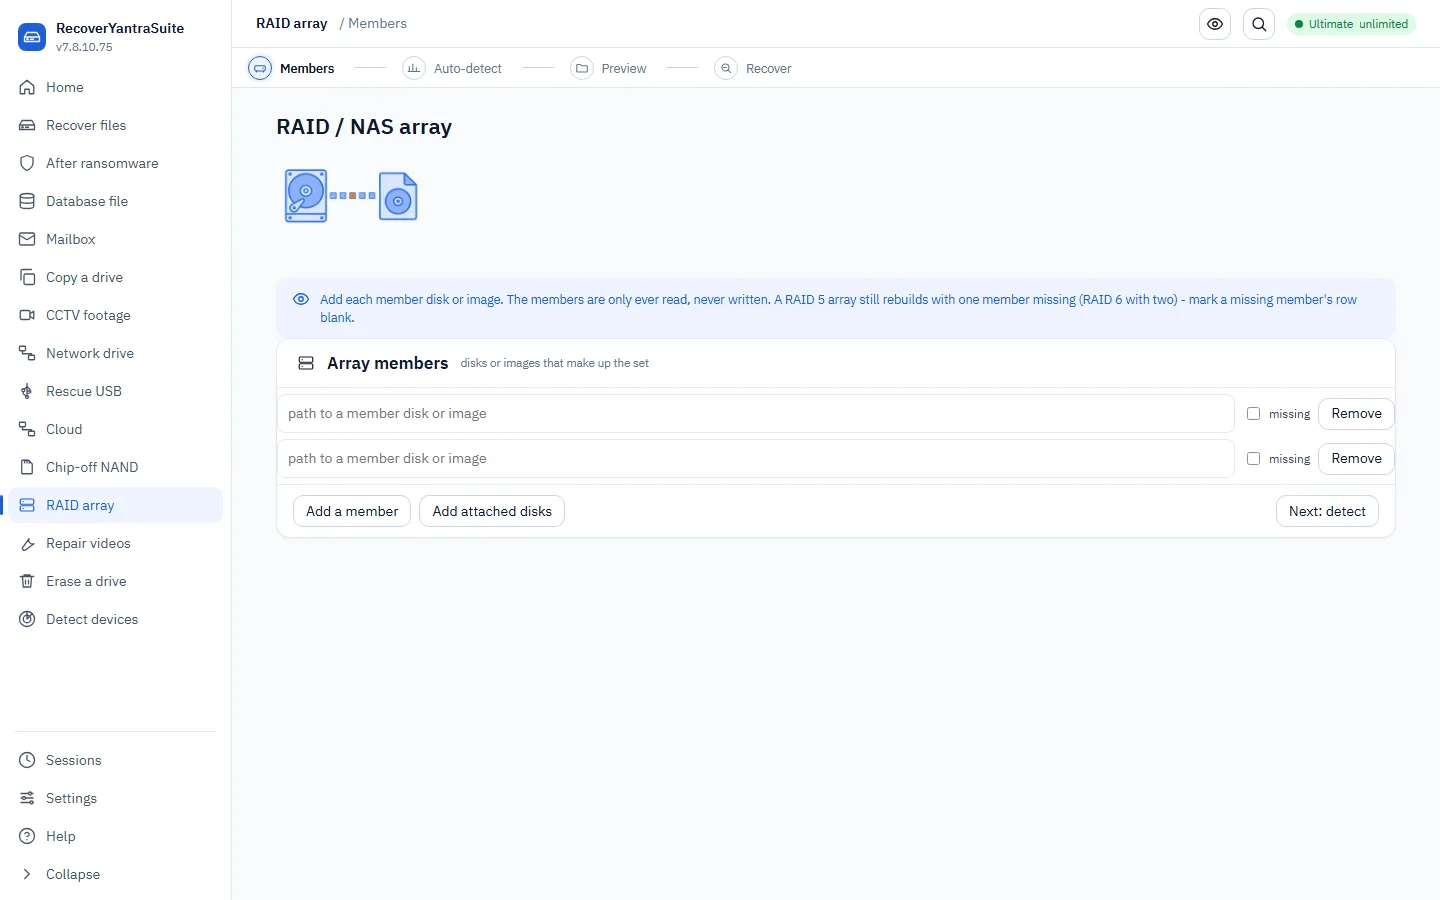
- 1Member path the path to one member image, in the array's own order.
- 2on / off whether this member is present; a missing disk still has a slot.
- 3Remove removes a member slot.
- 4Add a member adds another member slot to the array.
2Auto-detect, or state the layout?
3The options, and what to set them to
| Option | What it does | What to choose |
|---|---|---|
| --members | The member images, in array order; a dash marks a missing or failed member. | Order matters more than anything else here. Getting it wrong assembles a volume that looks plausible and holds scrambled files. |
| --auto | Detects level, chunk and layout from the members' own metadata. | Try this first, always. Fall back to stating the level and chunk only when the metadata did not survive. |
| --level / --chunk / --layout | The RAID level, stripe size and parity layout, stated by hand. | Only when --auto cannot read the metadata. The chunk size is the value most often recorded wrongly in site documentation - verify by checking that recovered files open. |
| --list-volumes / --volume | Lists, then selects, one of several volumes on Windows dynamic disks. | Run --list-volumes first on any dynamic-disk set. Then name the volume from that list. |
| --sector-size | The sector size used to find the volume (default 512). | Change it only for arrays built on 4K-native drives; leaving it wrong can prevent the volume being found at all. |
| --include-intact | Recovers the whole volume, not only what was deleted. | The normal case for a failed array - nothing was deleted, the array simply stopped assembling, so you want everything. |
4Step by step
- Image every member firstNever assemble from the physical disks directly - work from images, so a mistake in assembly never touches the originals.
- Add a slot per member, in orderIncluding a slot for any disk that failed or is missing - mark it off rather than leaving it out.
- Try Auto-detectIt reads the level, chunk and disk order from the members' own metadata. Fall back to stating them by hand only if this fails.
- List volumes on dynamic disksWindows dynamic disks can carry several volumes on one set of disks - select the one you need by name.
- Recover with Smart modeOn a correctly reassembled array the filesystem is usually intact, so Smart mode is almost always right.
- VerifyOpen a sample of recovered files. A wrong chunk size or disk order produces a volume that mounts and returns corrupt files - opening files is the check.
Do not do this. Never let the NAS rebuild onto a replacement disk before imaging the members. A rebuild made on the wrong assumption overwrites parity and can destroy what was recoverable. Never change the disk order in the enclosure before imaging.
5Ten situations, and exactly what to do
NAS controller died
A 4-disk NAS lost its controller and the enclosure will not power on.
Auto-detect - the stripe size, disk order and parity pattern come from the members' own metadata, so the original controller is not needed.
- Image all 4 disks first
- Add 4 member slots in the disks' physical order
- Auto-detect
- Recover with Smart mode, include intact files
One disk in a RAID 5 has failed
Three of four disks are readable; the fourth will not spin up.
Mark the failed member with a dash - RAID 5 reconstructs one missing member from parity.
- Image the three readable disks
- List members with '-' for the failed disk
- Auto-detect or state level 5
Site documentation gives the layout, metadata is gone
The array was reformatted before anyone realised the data was needed.
Manual level/chunk/layout, taken from the site documentation or the controller's own label.
- Image every member
- State --level, --chunk and --layout from documentation
- Verify recovered files open before trusting the layout
Windows dynamic disks with two volumes
One set of two disks turns out to hold two separate volumes.
--list-volumes first, then recover the one volume by name.
- Image both disks
- Run --list-volumes
- Recover the named volume with --volume
A Synology or QNAP volume pool
A Synology SHR or a plain md array with LVM on top needs assembling.
Auto-detect reads the md superblocks; the LVM layer on top is walked automatically.
- Image every bay
- Add member slots in bay order
- Auto-detect, recover with Smart mode
The disk order in the enclosure was changed
A well-meaning colleague reseated the disks before calling.
Auto-detect from metadata rather than trusting the current physical order - the member order on the command line still has to match the array's own order, not the enclosure's current slots.
- Do NOT assume the enclosure order is the array order
- Auto-detect first; it reads the order from the metadata itself
- Confirm with a small recovered file before the full run
RAID 6, two disks down
A larger array tolerates two failed members at once.
Mark both missing members with dashes; RAID 6 reconstructs from double parity.
- Image the four readable disks
- List six members with two dashes for the failed ones
- State --level 6
Nested RAID 10 across four disks
Two mirrored pairs striped together, common on a small business server.
Auto-detect handles nested arrays the same way, reading the layout from metadata.
- Image all four disks
- Add slots in order
- Auto-detect
A Drobo enclosure
A small-business Drobo will not power on and the data is needed.
This is the honest limit - Drobo uses BeyondRAID, a proprietary layer with no mdadm-style striping. --auto will scan for hours and find nothing.
- Do NOT expect --auto to detect BeyondRAID
- Check the hardware-help entry for what to procure instead
- State the limit to the client before starting
Recovering from a JBOD, not a striped array
The disks were simply concatenated, not striped.
State --level jbod - files may sit whole on one member, which JBOD assembly preserves.
- Image every disk
- State --level jbod
- Recover with Smart mode
6The same job at the command line
recoveryantra raid --members d1.img d2.img d3.img d4.img --auto -o D:\Recovered --include-intactRecover surveillance video that a PC calls unformatted
Recorders write their own disk layout, which is why Windows offers to format the disk. This finds the video by its structure instead, reads the recorder's own camera x time index when one survives, and writes every clip so it will actually play.
1How to get there
Home → CCTV footage.
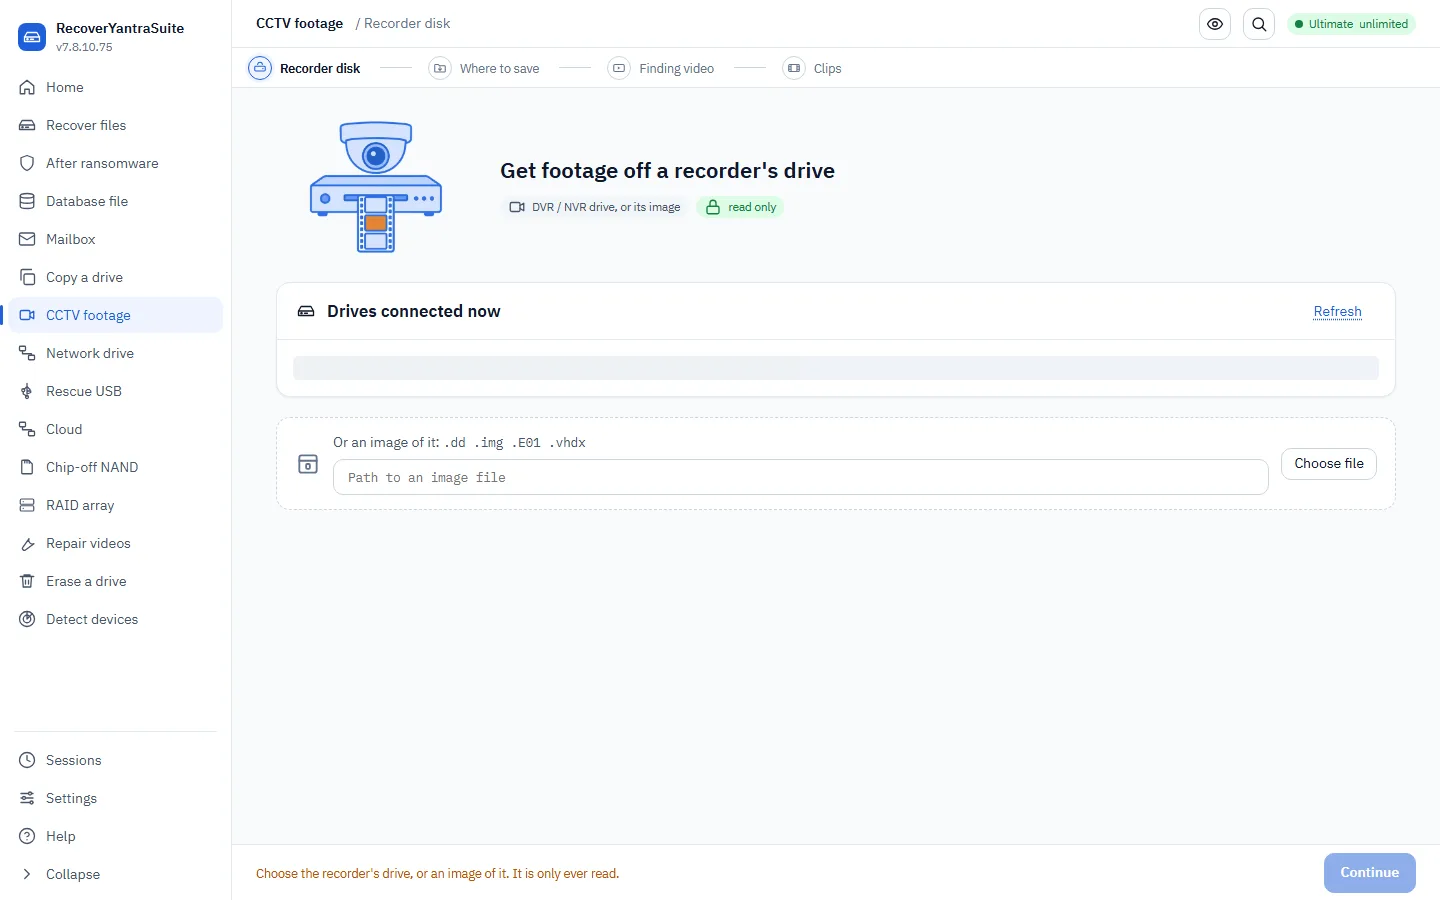
- 1Refresh re-reads attached drives after connecting the recorder's disk.
- 2Path to an image an image of the recorder disk, preferred over the disk itself for anything that may be produced.
- 3Choose file browse to the image file named above.
2Read the index, or carve?
3The options, and what to set them to
| Option | What it does | What to choose |
|---|---|---|
| --device / --image | The recorder's own disk, or an image of it. | Image first for anything that may be produced - a running recorder overwrites the oldest footage, so power it down and remove the disk before it is imaged. |
| --min-clip | Ignores fragments smaller than this many bytes. | Raise it when a sweep returns very short fragments and the incident is minutes long; lower it when the event of interest is only a few seconds. |
| --identify-only | Reports which recorder wrote the disk, extracts nothing. | Run first on any unfamiliar recorder disk. It tells you how long the real job will take and whether the format is supported. |
| cctv index | Reads the recorder's own camera x time index without extracting anything. | Before a full carve, always. On a table-less disk it says “time unknown” rather than inventing a channel. |
| cctv cut | Cuts a time range off one camera using the recorder's own index, remuxed losslessly by default. | You know the camera and the window - avoids carving the whole disk for a few minutes of footage. |
| cctv extract | Copies clips out of a scan's output folder, or a whole camera off a disk/image. | After a full carve, to pull just one camera's or one clip's worth out for handover. |
4Step by step
- Do not leave the disk in the recorderA running recorder keeps recording and overwrites the oldest footage first - exactly the footage you usually want.
- Image the disk oncePower the recorder down, remove the disk, image it. Every later step then runs against the image.
- Read the index firstcctv index reads the recorder's own camera x time table in seconds and writes nothing.
- Cut or scanIf the index is real, cut the exact camera and range you need. If it is gone, scan the whole disk by structure.
- Check a clip before deciding what to do with itcctv play summarises the timeline; the app's player shows it directly.
- Extract, enhance or reportCopy clips out byte-exact, sharpen a frame for the report, or build the media report - each keeps the original untouched.
Do not do this. Never leave the disk in the recorder while you decide what to do. A running recorder keeps recording and overwrites the oldest footage first - which is usually the footage you need. Power it down and image the disk once.
5Ten situations, and exactly what to do
Shop DVR shows as unformatted
A shop's DVR disk will not mount in a PC and Windows offers to format it.
Do NOT format. Full carve - recorders use their own layout, which is why a PC calls the disk unformatted.
- Do NOT let Windows format the disk
- Power down the recorder, image the disk
- Scan the image with cctv
- Extract the clips found
One camera, one hour, a 4 TB disk
A car-park camera is needed between two times on a disk holding weeks of footage.
Read the index first, then cut just that camera and range - the rest of the disk is never touched.
- cctv index on the image
- Find the camera id
- cctv cut with --camera and --from/--to
- Hand over the single clip
Unfamiliar recorder brand
The recorder's make is unknown and nobody wants to commit to a long carve blind.
--identify-only first - reports which recorder wrote the disk without extracting anything.
- Run cctv --identify-only against the image
- Confirm the format is supported
- Then run the full carve
The disk holds mostly padding between clips
A first pass returns thousands of very short fragments.
Raise --min-clip to discard fragments below a sensible length for the incident.
- Run an initial carve
- Raise --min-clip for a second pass
- Compare clip counts before deciding
Handing one clip to an insurer
A single incident clip needs to leave the building, verified byte-exact.
cctv download - copies one clip out, SHA-256 verified.
- Identify the clip with cctv clips
- Download it with cctv download
- Hand over the file and its hash
A frame for the incident report
One clear frame is needed as a still image for a written report.
cctv frames captures a frame pack; the frame carries its own timestamp and hash.
- Play the clip to find the frame ordinal
- cctv frames with --from/--to around it
- Attach the frame pack to the report
A dark, grainy frame needs sharpening
A face or plate is barely readable in the recovered footage.
cctv enhance runs a stated filter chain and keeps the original alongside it.
- Identify the frame or range
- Run enhance with a filter chain
- Report both the original and the enhanced frame, with the chain stated
The whole disk needs a media report
A summary of every clip - times, codecs, hashes - is needed for the case file.
cctv report over the scan's output folder.
- Complete the carve
- Run cctv report against the output folder
- File the report with the case
Several clips from one camera, in bulk
One camera's whole day is needed, not the entire recorder.
cctv extract with --camera on the disk/image form, selecting one camera's clips by id.
- cctv index to find the camera id
- cctv extract with --camera
- Verify the clip count against the index
A table-less disk with no camera labels
The recorder's index is gone and channels cannot be named with certainty.
Trust only what the disk gives. A carved disk with no table shows clips as inferred, never an invented channel number or a guessed clock time.
- Run cctv index; note it returns nothing usable
- Full carve instead
- Report times as unknown where the table does not say otherwise
6The same job at the command line
recoveryantra cctv index recorder.dd && recoveryantra cctv --image recorder.dd -o D:\ClipsSee every device this computer can reach, and why one cannot be used
Lists everything the operating system can see - usable or not - with the real reason: rights, a driver fault, a busy handle, media a reader cannot address. Being listed is never taken as proof of being readable.
1How to get there
Home → Detect devices - one screen with everything.
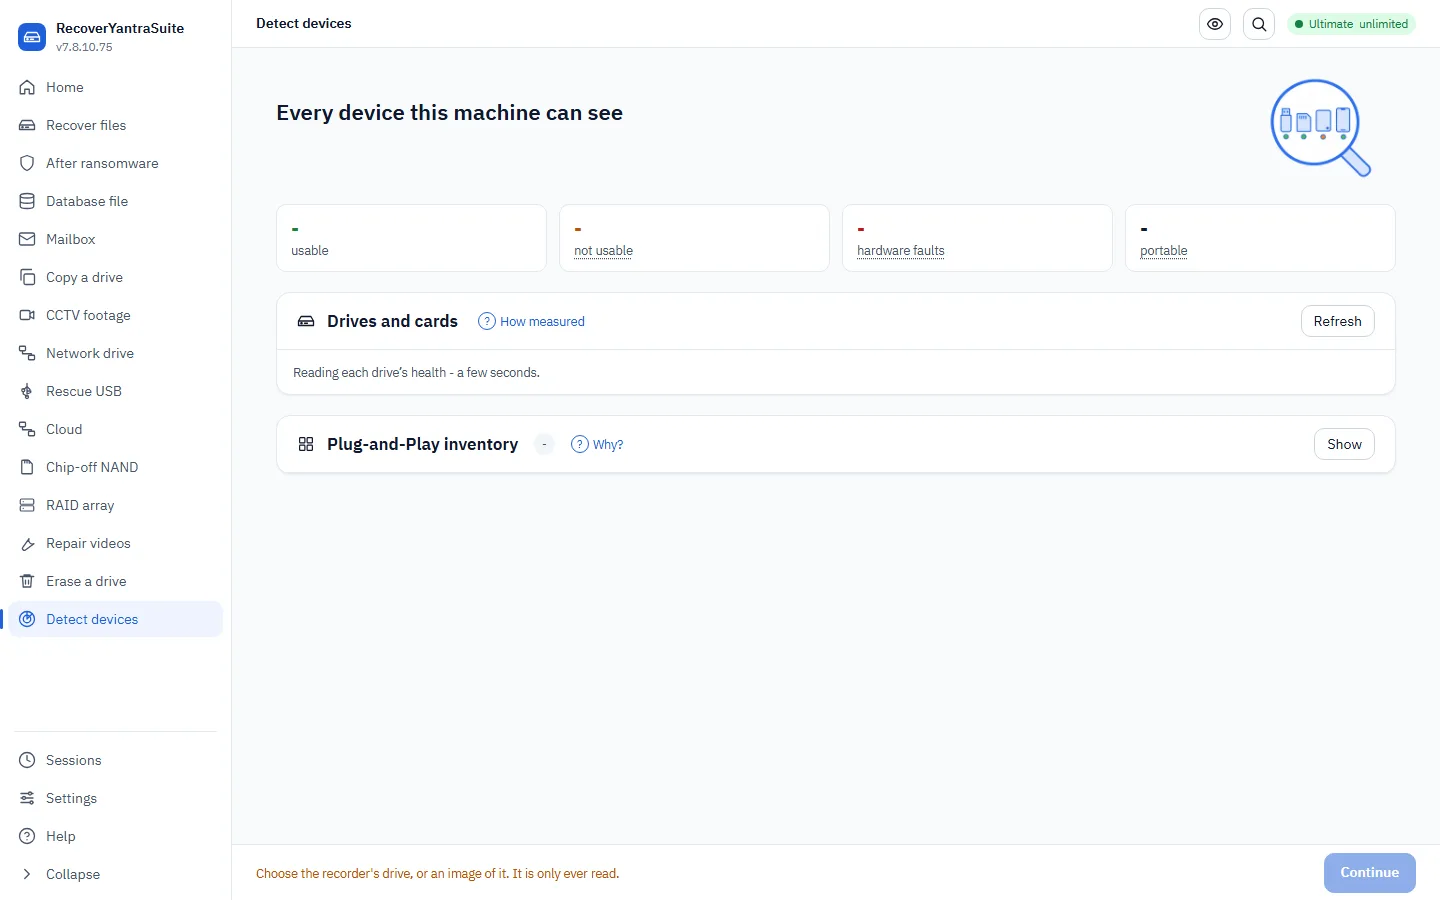
- 1How measured explains how state, bus, serial and health were measured.
- 2Refresh re-reads every attached device.
- 3Why? the reason a non-usable device is not selectable, in plain words.
- 4Show expands the device's full detail.
2What each state means
3The options, and what to set them to
| Option | What it does | What to choose |
|---|---|---|
| --report DIR | Writes the detection report - HTML, PDF and JSON - into the folder. | Whenever the finding needs to be kept or handed over. The report is small, so only rights and a full disk stop it. |
| --no-health | Skips the health read of each usable drive. | A machine with many drives, for speed; or a drive already known to be failing, to avoid even a test read of it. |
| --force | Writes the report even when the pre-flight objects to the destination. | Only after reading the objection and confirming it does not apply. |
4Step by step
- Connect the devicePlug it in, or point the check at the machine holding it.
- Read what the computer seesEvery device is listed with its state and the reason - usable, unreadable, needs-admin, in-use, driver-failed, or portable (a phone).
- Do what the row saysEach non-usable state carries its own numbered advice - a card reader needing SDXC support, a driver to reinstall, rights to elevate.
- Save the reportHTML, PDF and JSON, with the full Plug-and-Play inventory, for the client file or an insurer.
Good to know. Being LISTED is never proof of being READABLE. Detect actually reads a sector at each end of a usable drive rather than trusting that it appears in the list - flash media in particular can die from one region outward.
5Ten situations, and exactly what to do
A 1 TB SD card is not showing up
A card reader that only supports SDHC cannot address a card over 32 GB at all.
Detect reads the Windows error code, not just “no media” - a media-unreadable code points at an SDXC-capable reader, not a dead card.
- Run Detect devices
- Read the Why? explanation for the card's row
- Buy or borrow an SDXC reader if that is the reason
A drive needs administrator rights
A raw physical drive will not open for a standard user account at all.
The row is marked needs-admin, not silently dropped from the list.
- Run Detect devices
- See the needs-admin state
- Relaunch as Administrator
A USB bridge Windows cannot start
A 4 TB drive's UAS bridge fails with a Code 10 in Device Manager.
Detect lists it under driver-failed with the code and the fix, instead of just omitting it from a list that shows two other drives.
- Run Detect devices
- Read the driver-failed row and its code
- Follow the numbered fix, or try a different cable/port
A drive is in use by another program
A sharing violation is stopping the drive from being opened.
The row is marked in-use rather than absent - close the other program first.
- Run Detect devices
- See the in-use state
- Close the program holding the drive, then refresh
A phone is connected in MTP mode
A phone shows up but is not a drive to recover from directly.
Detect lists it as portable and points at the phone workspace, rather than treating it as a missing disk.
- Run Detect devices
- See the portable state for the phone
- Open the phone recovery workspace instead
A machine's built-in card reader
A laptop's SD slot is an SD host controller, not a USB device, and can be missed by a USB-only scan.
Detect's Plug-and-Play query covers SD host / SD bus controllers as well as USB, so the built-in slot is listed too.
- Run Detect devices
- Check the PnP inventory for the SD host controller
- Insert the card and refresh
One drive is failing among several healthy ones
You do not want a health probe touching the failing drive again.
--no-health gives a listing-only pass, so the failing drive is not even test-read.
- Run Detect with --no-health
- Identify the failing drive by its listed state alone
- Move straight to imaging it
A client needs the finding in writing
An insurer wants proof a drive genuinely was not accessible.
--report writes HTML, PDF and JSON into a folder for the case file.
- Run Detect with --report
- Attach the PDF to the case notes
- Keep the JSON for the record
An optical drive with a disc inserted
A CD or DVD needs to be listed alongside the hard drives.
Detect enumerates optical drives when a disc is present, using the same drive-type check as everything else.
- Insert the disc
- Run Detect devices
- Confirm the optical drive is listed as usable
A PnP device that never became a disk
Device Manager shows an unfamiliar entry with a driver problem, and it is unclear if it is storage at all.
Detect's PnP inventory distinguishes real storage services from something unrelated (like a mouse with a driver fault) before calling it a missing drive.
- Run Detect devices
- Check whether the PnP entry is under a storage service
- Follow the fix only if it genuinely is storage
6The same job at the command line
recoveryantra detect --report D:\Case\detectCarry the tool to a machine, or make it boot again
Three honest choices, never blurred into one “bootable” button: a portable kit that erases nothing, a real bootable stick that writes a boot image and erases the target, and adding this tool's ISO onto an existing Ventoy stick.
1How to get there
Home → Rescue USB.
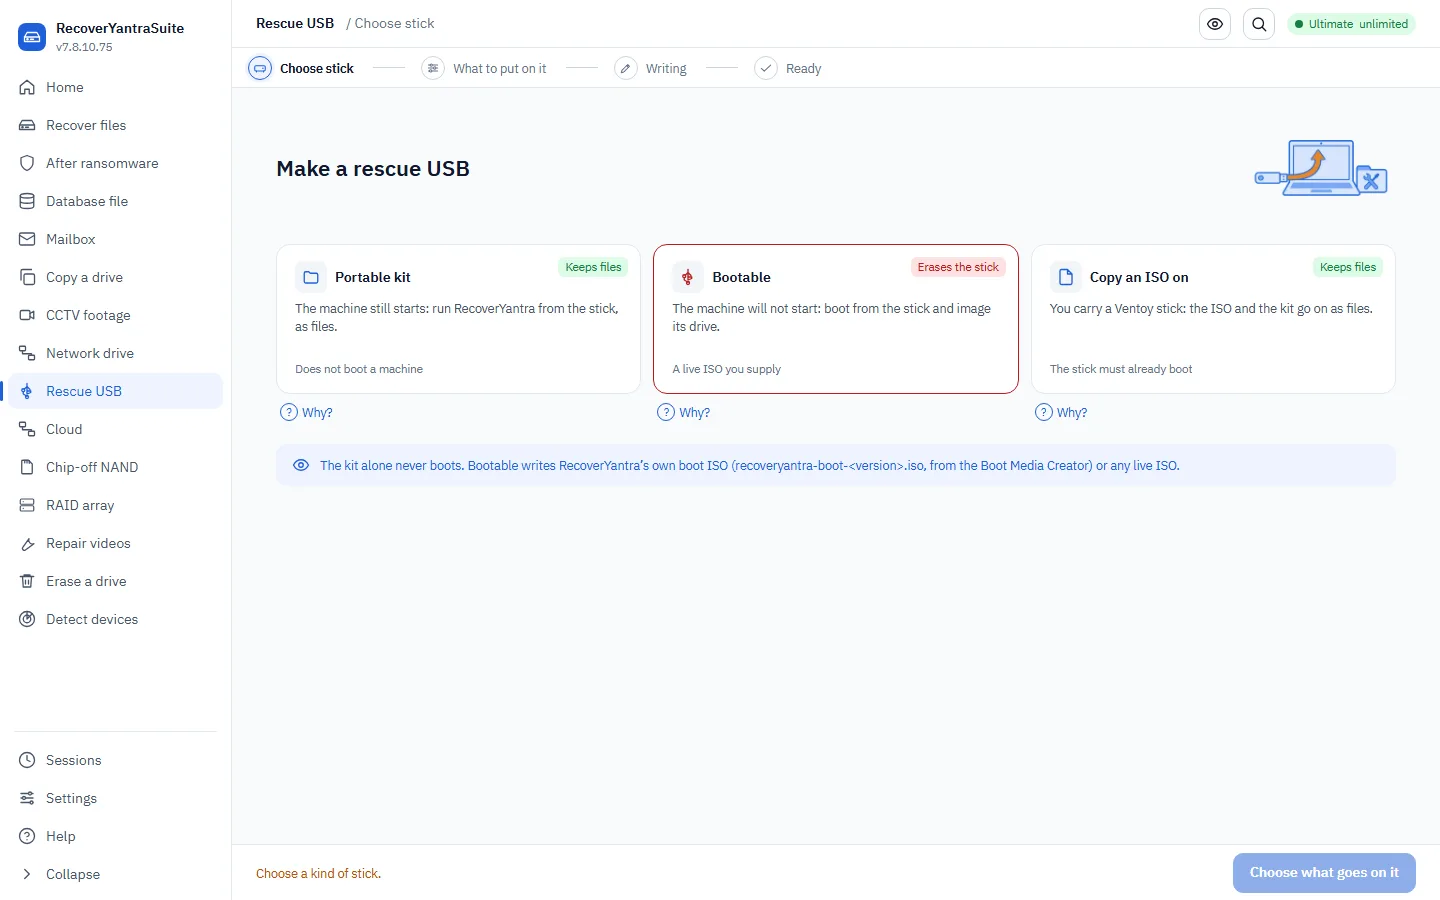
- 1Portable kit keeps files on the stick; the machine still starts from its own disk.
- 2Bootable erases the stick and writes a real boot image, for a machine that will not start.
- 3Copy an ISO on keeps files on a Ventoy-style stick that boots by menu.
- 4Why? explains what each option really does before you commit to it.
2Three honest choices
3The options, and what to set them to
| Option | What it does | What to choose |
|---|---|---|
| --target | The mounted USB stick to write to. | Confirm you have chosen the rescue stick, never an external evidence drive - existing files on it are left alone by the portable-kit route, but Bootable erases whatever is there. |
| --payload-iso | A live Linux ISO, to make the stick actually bootable. | Supply this when the target machine will not start, so the stick can boot the ISO and read the drive in place. |
| --payload-dir | An extracted WinPE or live-Linux tree instead of an ISO. | Your organisation maintains its own validated boot environment instead of the bundled ISO. |
| --tool | A specific build of the CLI to copy onto the stick. | Preparing a stick for a machine that must run a version already validated for the case. |
4Step by step
- Choose the stickThe write refuses anything that does not report itself as removable hardware - the system disk can never be a target.
- Choose what goes on itPortable kit (files only), Bootable (erases, writes a real boot image), or Copy an ISO on (Ventoy, keeps files).
- ConfirmBootable requires an explicit confirmation before anything is erased - the choice is never made silently.
- Write, then verifyA Bootable write is read back and compared by SHA-256, because dying flash can report a happy write and store something else.
Do not do this. Bootable ERASES the stick. The write refuses a target that does not report itself as removable hardware, and the system disk can never be chosen - but confirm by hand that the stick holds nothing you need before writing.
5Ten situations, and exactly what to do
A laptop will not get past the logo
Windows update failed half way and the machine will not boot at all.
Bootable USB - the disk is usually healthy; it is the machine that will not start.
- Do NOT run Windows recovery or “reset this PC” first - both write to the disk
- Prepare a Bootable rescue stick
- Boot the failing machine from it
- Recover the documents and photos onto separate storage
Carrying the tool to a machine that must not be touched
The machine's own disk must stay exactly as found.
Portable kit - files only, the machine still starts from its own disk, nothing is erased.
- Prepare a Portable kit on a spare stick
- Run the tool from the stick on the target machine
- Nothing is written to the stick's existing contents
You already carry a Ventoy stick
A multi-boot Ventoy stick already holds several rescue ISOs.
Copy an ISO on - adds this build's boot image without erasing what is already there.
- Confirm the stick is Ventoy-formatted
- Copy the ISO on
- Boot it and choose the new entry from Ventoy's menu
A machine with no Windows install left to fall back on
A wipe or a failed reinstall has left nothing bootable.
Bootable, then use the guided acquire command on the booted stick to image the drive.
- Prepare a Bootable stick with the live payload
- Boot the target machine from it
- Run the guided acquire, numbered drives, no path-typing
The organisation maintains its own boot environment
A validated WinPE tree already exists internally.
--payload-dir instead of the bundled ISO.
- Point --payload-dir at the extracted WinPE tree
- Confirm and write
- Boot and validate against the known environment
Wrong stick nearly chosen
Two USB drives are attached: the rescue stick and an evidence drive from another case.
The write refuses anything reporting as the system disk, but the operator still has to confirm the right removable target by hand.
- Check the drive letter and size before confirming
- Never proceed on “probably the right one”
- Confirm only once the target is verified
The stick needs to boot on old BIOS and new UEFI machines
Field machines are a mix of old and new hardware.
The bootable payload is written to boot both BIOS and UEFI, so one stick covers the fleet.
- Prepare the Bootable stick once
- Test on one BIOS machine and one UEFI machine before a field trip
- Carry the same stick to both
A specific validated CLI build must be on the stick
The case requires a version already proven for that matter.
--tool names the exact build to copy instead of the one running now.
- Locate the validated build
- Prepare with --tool pointing at it
- Confirm the version on the stick before use
A stick that looks fine but will not actually boot
An ISO lacking a USB boot record gets written perfectly and still will not start the machine.
The write checks the ISO for a boot record before writing, so this is caught before it is discovered at the customer's site.
- Prepare the Bootable stick
- Read the pre-write check
- Choose a different ISO if it warns there is no boot record
A wiped, unrelated stick found on the bench
An old stick is picked up without checking what is already on it.
Bootable ERASES the target entirely - confirm nothing needed is on it before writing.
- Check the stick's current contents first
- Confirm it can be erased
- Only then run Bootable
6The same job at the command line
recoveryantra bootusb --target E:\ --payload-iso rescue.isoFind what survived without paying, and say honestly what did not
Some of what looks encrypted is not: renamed-only files, partial encryption, and originals still sitting in free space, temp copies or shadow copies. Those come back with no key. What is genuinely encrypted is stated as encrypted.
1How to get there
Home → After ransomware.
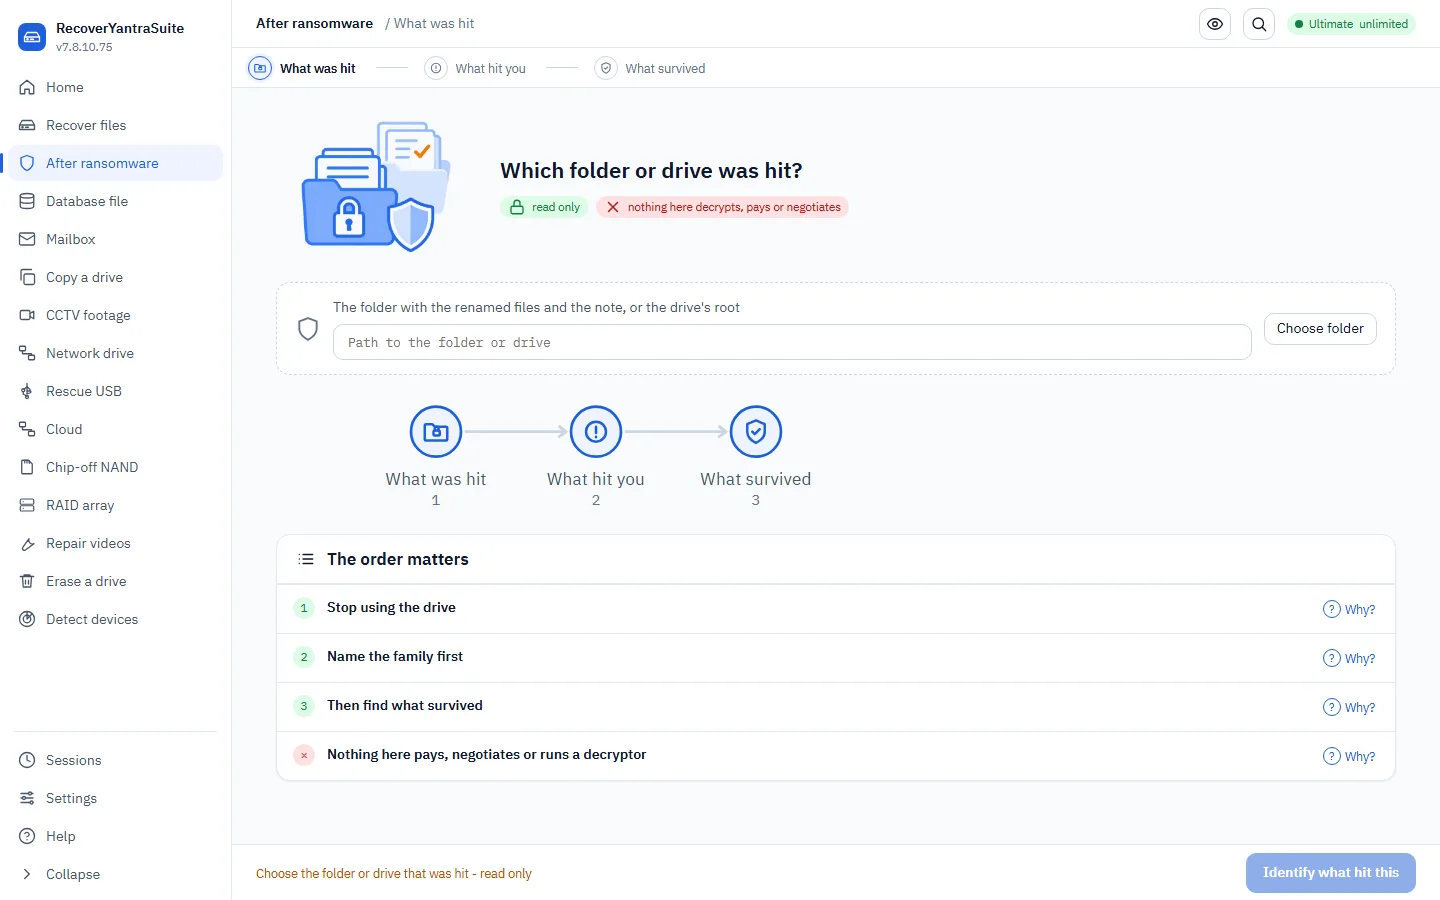
- 1Path to the folder or drive the affected folder or drive, holding encrypted files and the ransom note.
- 2Choose folder browse to the affected location.
- 3Why? explains what the first check does.
- 4Why? explains what the free-recovery step looks for.
2Triage, decryptor, or the full verdict?
3The options, and what to set them to
| Option | What it does | What to choose |
|---|---|---|
| --triage | Reports how many files are recoverable with no key, salvageable, or genuinely encrypted. | Run early, before anyone commits to a recovery plan or a payment discussion. |
| --recover-originals | Finds decryption-free originals - free space, temp/autosave, Recycle Bin, cloud caches, DB sidecars. | Run on every incident. The highest-value step, and time-critical - stop using the machine first. |
| --decryptor FAMILY | Shows the offline decryptor index for the identified family, or that none exists. | Always check before assuming a payment is the only route. Never substitute a tool found by searching. |
| --verify-tool | Hashes a downloaded decryptor and checks it against the catalog. | Always, before running any downloaded decryptor against client data - an unverified executable is a second incident waiting to happen. |
| --verdict | The full flow fused into one outcome: triage + identification + originals recovery. | The single command to run for a client- or insurer-facing answer. |
| --esxi FAMILY / --rebuild-vmdk | The hypervisor-specific playbook, and rebuilding a VMDK descriptor when only it was encrypted. | A hypervisor or Linux estate rather than a workstation - the descriptor is small and often the only thing actually encrypted. |
| --lotl | Scans recovered scripts, registry exports and memory strings for a BitLocker key or archive password the attacker left behind. | A living-off-the-land case that abused BitLocker, EFS or a bundled 7-Zip - the secret is often still on the machine. |
4Step by step
- Stop using the machineContinued use overwrites the free space where the free wins are sitting. This is the single most time-critical step.
- Point at the affected filesA folder or drive of encrypted files and the ransom note, or just the observed filenames and note text if the machine cannot be reached.
- Identify the strainThe family decides what is realistically recoverable, and whether a published decryptor exists.
- Find the free winsDeleted originals in free space, temp/autosave copies, shadow copies, NAS snapshots - recovered with no key and no payment.
- Check for a legitimate decryptorVerified against the catalog by hash before it ever touches client data.
- State the recovery planWhat came back for free, what a decryptor can reach, and what is genuinely gone - stated honestly, not implied.
Do not do this. Do not delete the encrypted files - a decryptor may be published later, and without the files it will be useless to you. Do not reinstall or wipe the machine yet; it holds the evidence of how the attacker got in. Do not pay before checking - a good proportion is often recoverable for nothing.
5Ten situations, and exactly what to do
A file server hit overnight
190,000 files renamed with an unfamiliar extension and a ransom note in every folder.
--verdict - triage, identification and originals recovery fused into one stated outcome.
- Stop using the server
- Run the full verdict
- Report what came back with no key, and what genuinely needs one
Deciding whether to pay
The attacker is demanding payment and a decision is needed within hours.
--triage first, always - many files come back for nothing before payment is even discussed.
- Do NOT pay before checking
- Run triage over the affected folder
- Weigh the free recovery against the demand
Only a photo of the ransom note exists
The affected machine cannot be reached directly; a client emailed a screenshot.
--names / --note-file - identify from observed filenames and the note text alone.
- Type the observed filenames
- Supply the note text as a file
- Identify the family from those alone
Deleted originals may still be in free space
The strain renames and re-writes files, deleting the originals.
--recover-originals, with the USN journal if available for the original paths as well as content.
- Run --recover-originals on the affected volume
- Add --usnjrnl for original paths where available
- This is the highest-value, most time-critical step
A downloaded decryptor needs checking
A tool claiming to be the family's legitimate decryptor was found online.
--verify-tool - hash it against the catalog before it ever runs against client data.
- Do NOT run an unverified decryptor on the only copy
- Hash it with --verify-tool
- Only proceed if it matches the catalog entry
An ESXi host was hit
A hypervisor's datastore shows encrypted VMDK descriptors overnight.
--esxi playbook - descriptor rebuild, intermittent-encryption damage map, keystream reuse specific to the family.
- Identify the strain first
- Run the --esxi playbook for that family
- Rebuild descriptors for intact flat-VMDKs
Only the VMDK descriptor was encrypted
The flat data file is intact but its small descriptor was hit.
--rebuild-vmdk with the flat file's exact byte size makes the intact data readable again.
- Get the exact size of the -flat.vmdk itself, not the datastore listing
- Rebuild the descriptor
- Mount the VM from the rebuilt descriptor
A QNAP or Synology NAS was hit
The visible backups were deleted by the attacker before encrypting.
--nas-snapshots - enumerates snapshots from the volume's own LVM metadata, often the fastest complete recovery.
- Export the LVM2 metadata from the NAS
- Run --nas-snapshots against it
- Restore from the earliest pre-attack snapshot found
BitLocker was abused to lock the drive
A living-off-the-land attack turned on BitLocker with the attacker's own key.
--lotl - scans recovered scripts, registry exports and memory strings for the recovery key the abuse left behind.
- Recover scripts, registry exports and memory strings first
- Run --lotl over them
- The secret is often still on the machine, not an exfiltrated RSA key
A memory image was captured at the scene
The machine was still running when first responders arrived.
--verdict --memory - some strains leave key material in memory; it only helps if capture happened before shutdown.
- Capture memory before powering down, always
- Run --verdict with --memory pointed at the capture
- Report honestly if no key material was found
6The same job at the command line
recoveryantra ransomware --verdict D:\AffectedGet rows back when the server will not start
Rows are stored on pages inside the file, and those pages survive damage that stops the server. They are read straight out of them, deleted rows included - flagged, never mistaken for live data.
1How to get there
Home → Database file.
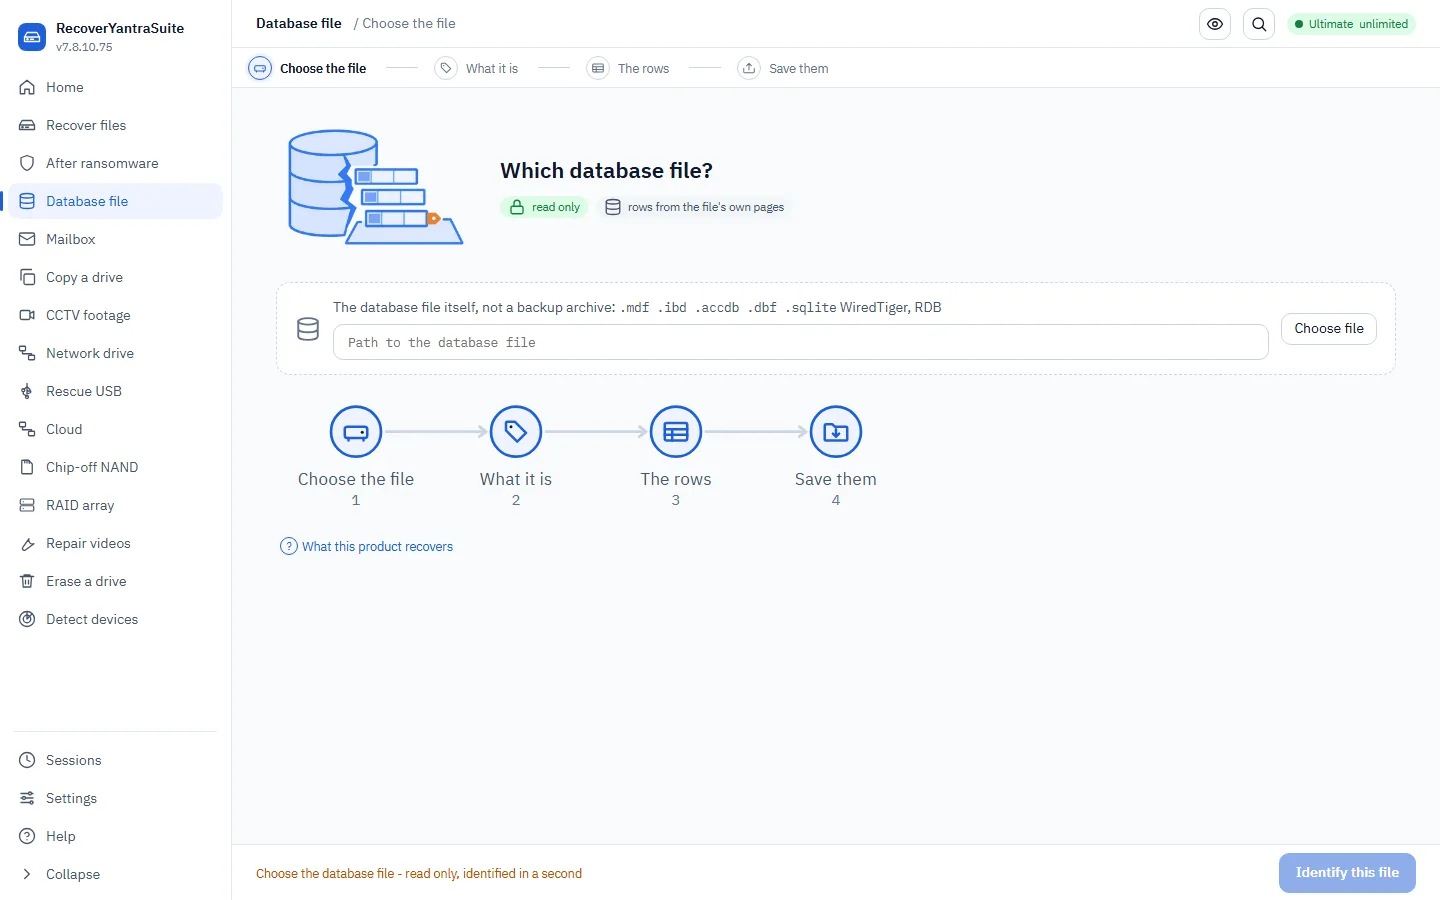
- 1Path to the database file the data file to read - engine identified automatically.
- 2Choose file browse to the database file.
- 3What this product recovers the coverage matrix: every database family this build covers, and its recovery tier.
2Identify, or recover directly?
3The options, and what to set them to
| Option | What it does | What to choose |
|---|---|---|
| --identify | Names the engine and the recovery method for a file, without recovering anything. | Run this first, on any database file, every time. |
| --coverage | Lists every database family covered and its recovery tier. | Scoping a job or quoting - quote against the tier a family is actually listed at. |
| --recover PATH | Recovers records from a database file straight off its own pages. | Work from a COPY, with the server instance offline. Extracting from a file a running engine is writing to produces rows from a moment that never existed as one consistent state. |
| --memo | The memo side-file (.dbt/.fpt) for a dBase .dbf whose long text fields live outside the main file. | Required whenever a .dbf has one - without it, long text fields come back empty. |
| --out CSV | Writes all records, deleted rows flagged, to CSV. | Whenever rows are going to be reviewed, handed to a client, or loaded into a working server. Preserve the deleted-flag column - an unflagged export presents recovered deleted rows as live data. |
4Step by step
- Is the server running or stopped?Take the instance offline first, or work from a copy - a running engine is still writing to the file.
- Identify the engineNames the database and the method that applies before you commit to anything.
- Check for a usable backupA recent, intact backup is always faster than page-level recovery - only recover from the raw file when it genuinely is not usable.
- Choose the destinationA folder off the affected drive with room for the CSV export.
- RecoverRows come off the file's own pages, including deleted ones, which are flagged rather than presented as live data.
Do not do this. Never run the vendor's repair-with-data-loss-allowed tool against the only copy of a database file. It works by DELETING what it cannot fix. Copy the file first and recover from the copy.
5Ten situations, and exactly what to do
SQL Server will not attach the MDF
A 40 GB MDF is refused by the instance after an unclean shutdown.
Identify first, then recover straight from the file - working from a copy, instance offline.
- Copy the MDF off the affected drive
- Identify it
- Recover with --recover, write to CSV
- Deleted rows arrive flagged
An unknown database file turns up in a recovery
A .db or .mdf file appears among recovered files and nobody is sure what it is.
--identify - names the engine and the method that applies before anything else is decided.
- Run --identify against the file
- Read the stated recovery tier
- Decide whether it is a quick job or a specialist one
A dBase point-of-sale file with long notes
A .dbf recovers but its comment fields come back empty.
Supply the memo side-file - --memo - alongside the .dbf.
- Locate the matching .dbt/.fpt file
- Recover with --memo pointed at it
- Confirm the long text fields are populated
Scoping a job before quoting
A client asks whether their Firebird database can be recovered at all.
--coverage - states the tier available for that family before any promise is made.
- Run --coverage
- Find the family and its listed tier
- Quote against the tier, not against “it is on the list”
The vendor's repair tool is the only other option offered
A forum suggests running the database's own repair-with-data-loss-allowed tool.
Do NOT run it on the only copy - it works by DELETING what it cannot fix. Recover from a copy of the raw file instead.
- Copy the file first, always
- Do NOT run vendor repair-with-data-loss on the only copy
- Recover from the copy
Rows will be reviewed by someone else
The recovered data is going to a client's accountant for review.
--out CSV, with the deleted-flag column kept - never strip it before handing rows over.
- Recover with --out to CSV
- Keep the deleted-flag column intact in the handover
- State plainly which rows are deleted
A SQLite app database with deleted rows
A small business app's SQLite file needs its deleted customer records back.
SQLite deleted-row recovery reads freeblocks, unallocated pages and the WAL - identify first to confirm the engine.
- Identify the file
- Recover, writing deleted rows flagged
- Check the WAL was included, not just the main file
The server keeps restarting on its own
Automatic recovery attempts are running every time the service starts.
Stop the service and work from a copy - each restart writes to the file you are trying to recover.
- Stop the database service
- Copy the data file off the drive
- Recover from the copy only
A backup exists but is also corrupt
The most recent nightly backup will not restore either.
Fall back to recovering straight from the live data file, once it is confirmed the backup genuinely cannot be used.
- Confirm the backup will not restore
- Copy the live data file
- Recover with --recover, --out to CSV
11.2 million rows across 63 tables
A 40 GB MDF that will not attach needs its entire contents out for review.
Recover the whole file to CSV per table; deleted rows are marked so nobody mistakes them for live data.
- Copy the MDF
- Identify to confirm the engine
- Recover the whole file, --out to CSV
- Confirm the flagged-deleted count matches expectations
6The same job at the command line
recoveryantra db --identify D:\Copy\data.mdf && recoveryantra db --recover D:\Copy\data.mdf --out D:\Out\data.csvRead a mailbox Outlook already gave up on
Outlook calling a file damaged means the structures a normal reader depends on are gone. This sweeps the file for the messages themselves and validates each one by its own contents, not by an index that no longer exists.
1How to get there
Home → Mailbox.
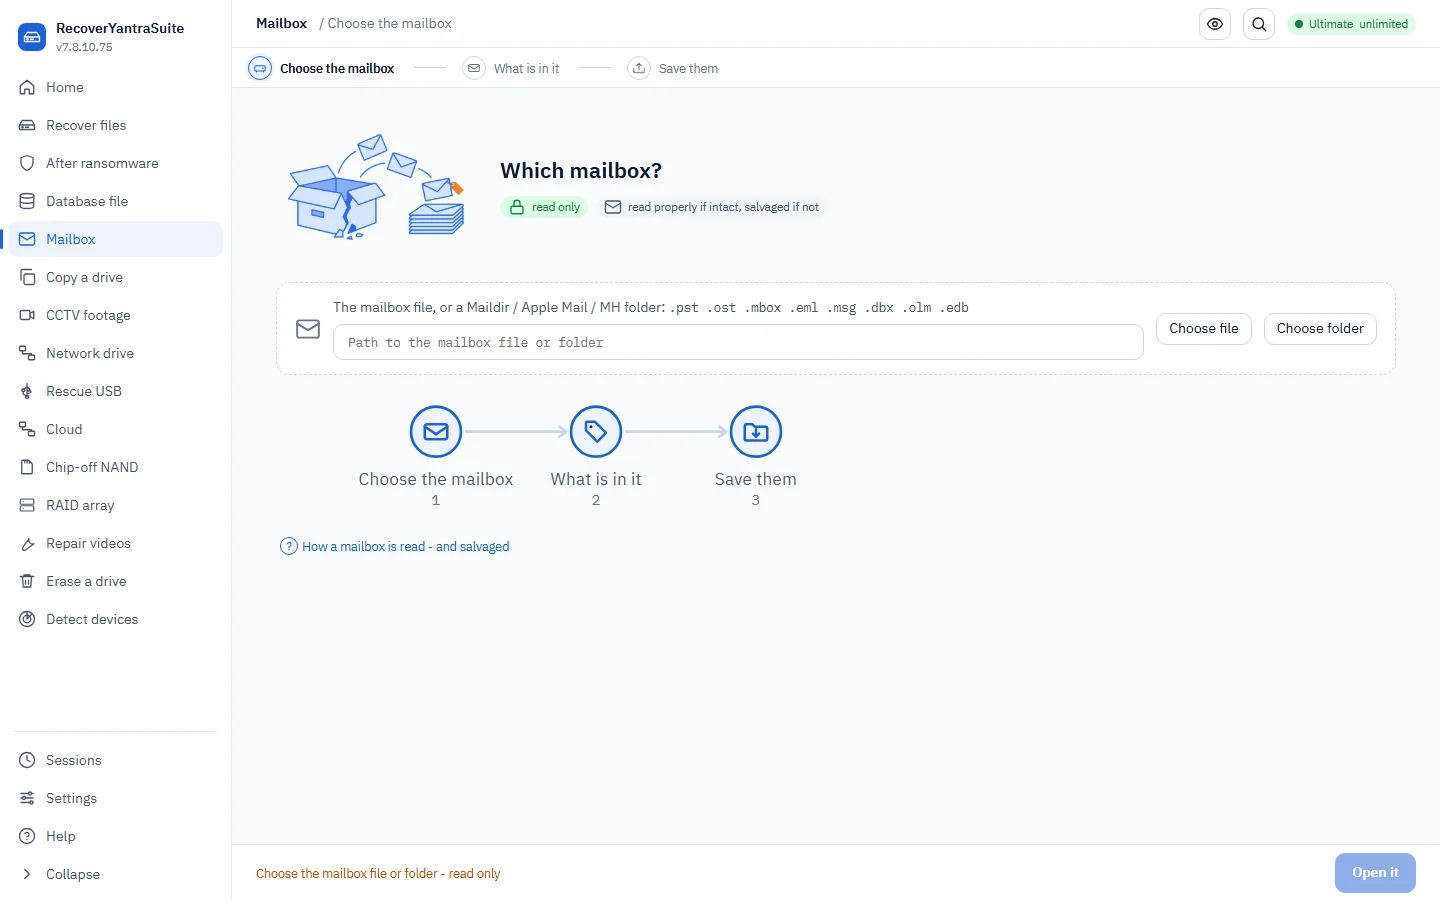
- 1Path to the mailbox the mailbox file or folder - PST/OST, mbox, Maildir or .eml.
- 2Choose file browse to a single-file mailbox.
- 3Choose folder browse to a Maildir-style folder of messages.
- 4How a mailbox is read - and salvaged explains the salvage route used when the store's own index is gone.
2eml, or mbox?
3The options, and what to set them to
| Option | What it does | What to choose |
|---|---|---|
| path | The mail store itself - PST/OST, mbox, Maildir or .eml, including a store the client refuses to open. | Take a copy first and work from the copy, always. |
| -o / --output | The folder recovered messages are written into. | Never the folder holding the store being read. |
| --list | Shows what is in the mailbox without exporting anything, and whether the store read cleanly or was salvaged. | Run first, every time. It tells you whether the folder structure will survive the export. |
| --format | eml (one file per message) or mbox (one file for the whole mailbox). | eml for Outlook or per-message review; mbox for Thunderbird, Apple Mail or a review platform. Neither is a .pst - this extracts messages, it does not rebuild an Outlook store file. |
4Step by step
- Do not run scanpst.exe on the only copyIt writes to the file, and on a badly damaged store it can make things worse.
- Copy the store firstWork on the copy, never the original.
- Choose the storePST/OST, mbox, Maildir or .eml - including a store Outlook calls damaged.
- List firstSee what is in it and whether it read cleanly or needed salvage, before anything is exported.
- Choose the destinationNever the folder holding the store being read.
- Save themExport to .eml (per message) or mbox (whole mailbox in one file).
Do not do this. Never run Outlook's scanpst.exe (or any repair tool) on the only copy of a damaged store. It writes to the file, and on a badly damaged store it can make things worse. Copy the file first, always.
5Ten situations, and exactly what to do
Outlook says the PST is damaged
Outlook refuses to open a client's PST and offers to run its repair tool.
Do NOT run scanpst.exe on the only copy. Copy the file first, then let this tool read it - the store is swept for messages by content, not by the index Outlook says is gone.
- Copy the PST
- Do NOT run scanpst.exe on the original
- List the store from the copy
- Export to .eml
The store's header and index pages are zeroed
A badly corrupted PST returns nothing to a normal reader at all.
The salvage sweep validates candidate messages by their own content, not by an index that no longer exists.
- Copy the file
- List it - the tool reports whether a normal or salvaged read was used
- Export whatever the sweep recovers
Messages are going back into Outlook
The client wants the recovered mail dragged straight back into their mailbox.
--format eml - one file per message, exactly what Outlook takes by drag-and-drop.
- List first
- Export with --format eml
- Drag the .eml files into Outlook
Migrating to Thunderbird
The recovered mailbox is going into Thunderbird as one import.
--format mbox - a single file Thunderbird imports directly.
- List first
- Export with --format mbox
- Import the single mbox file into Thunderbird
A Linux mail server's Maildir
A Maildir folder of individual message files needs recovering.
Point at the Maildir folder directly - it is read the same way as a single-file store.
- Copy the Maildir folder
- List it
- Export to .eml or mbox as needed
An OST that will not sync and Exchange is gone
The Exchange account no longer exists, and the local OST is the only copy.
OST is read the same as PST - list first, then export.
- Copy the OST
- List it to see what survived
- Export to .eml for review
The folder structure needs to survive the export
The client wants their folders, not one flat pile of messages.
List first and read whether the read was normal or salvaged - a salvaged read may not preserve folder structure, and that has to be said honestly.
- List first
- Check whether the read was normal or salvaged
- State plainly if folder structure did not survive
A single .eml needs re-checking
One suspicious message needs its own honest read, not a whole mailbox export.
Point the path directly at the .eml file - the same command reads a single message.
- Point mail at the single .eml
- List to confirm it reads cleanly
Comparing a salvaged read against a renamed image
Confirming the salvage sweep is not just finding noise.
The sweep validates by content, so a renamed non-mail file returns nothing - list shows 0 messages rather than false hits.
- Run --list against a known non-mail file renamed .pst
- Confirm 0 messages are found
- Trust the sweep's positive results accordingly
2,000 messages need to be one usable mailbox, not loose files
A large PST recovers a large number of individual messages.
Export to .eml with the index.csv that comes with it, or choose mbox for one file - either way it is a usable mailbox, not 2,000 unmanageable loose files.
- List first to see the count
- Choose eml (with index.csv) or mbox for the destination platform
- Hand over the export with the index
6The same job at the command line
recoveryantra mail D:\Copy\outlook.pst -o D:\Out --format emlAcquire mail the organisation owns and authorises
After an incident touching a largely virtual estate, the cloud is the estate. The organisation's own administrator authorises the collection, the scope is recorded before anything is taken, and mail arrives as .eml so it opens anywhere.
1How to get there
The cloud workflow runs from the CLI and the export-ingest screen; there is no numbered wizard for it yet.
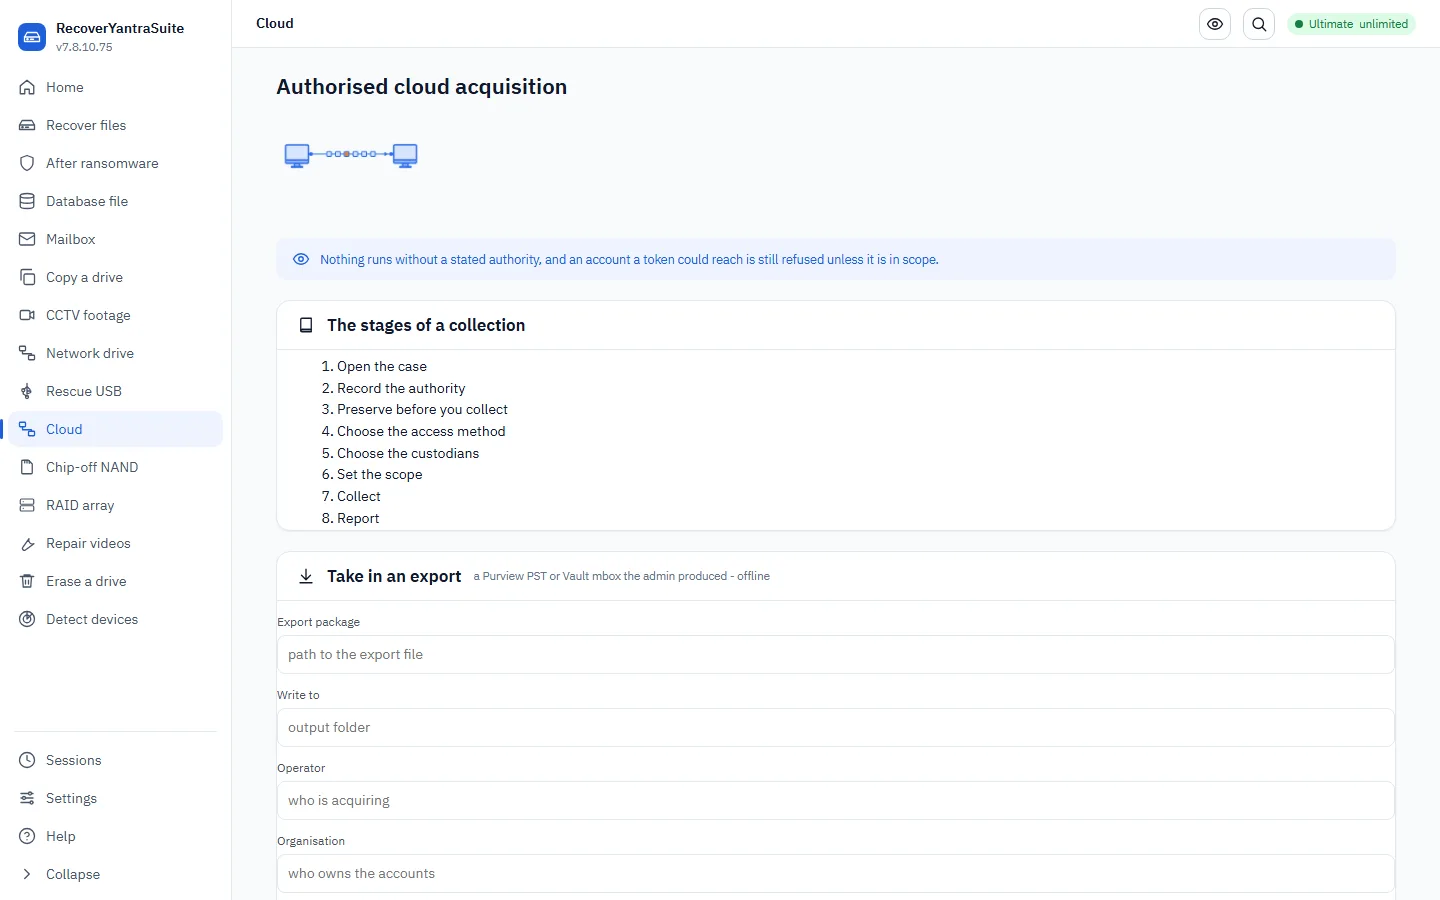
- 1The stages of a collection the eight published stages of an authorised collection, shown free, before anything is touched.
- 2Path to the export file the provider's own export package to ingest offline.
- 3Output folder where the .eml files, manifest and error report are written.
2Ingest, collect, or check caches?
3The options, and what to set them to
| Option | What it does | What to choose |
|---|---|---|
| --provider | The cloud provider (e.g. microsoft365). | Named to match the organisation's actual tenant. |
| --accounts | Accounts in scope, comma-separated. | State exactly what the authority covers - collecting a whole mailbox when the authority covers a date range is over-collection, and you answer for it. |
| --basis / --owns | The lawful authority for the acquisition, and an assertion the organisation owns the accounts. | Record the real basis - owner instruction, warrant, or a statutory power - every time. |
| ingest export | Reads a provider export package offline. | Whenever the organisation's admin has already produced the export - no live API call is needed or made. |
| collect --token | An OAuth access token for the tenant, for a live collection. | Only ever the organisation's own authorised token. A token found on a seized device is NEVER used here - that route is identify-and-report only. |
| caches root | A folder to scan for local provider caches. | A recovered tree, entirely offline, when local sync caches may hold copies no longer in the cloud. |
4Step by step
- See the stagescloud steps shows the industry-standard order before anything is touched, free.
- Record the authorityThe operator, the organisation, the accounts in scope and the lawful basis - before anything is collected.
- Ingest an export, or collect livePrefer an export the organisation's own admin already produced; collect live only when authorised and no export exists.
- Apply the scope preciselyThe date range is applied by the provider; keywords are matched against the DECODED message, not a truncated preview.
- Check local caches tooA recovered machine may hold OneDrive/Dropbox/Drive caches with copies the cloud itself no longer has.
- Review the error reportItems that did not come back are named separately, so a partial collection is never silently presented as complete.
Do not do this. Never collect a whole mailbox when the authority covers a date range - that is over-collection, and you answer for it. A token found on a seized device is never used to collect; that route is identify-and-report only.
5Ten situations, and exactly what to do
An admin already exported through Purview
The organisation's own administrator produced a Purview PST export.
ingest - reads the export package offline, no API call at all.
- Record the authority
- Ingest the export package
- Review the manifest and error report
One mailbox needs collecting live
No export exists and the organisation has authorised a live collection.
collect with the organisation's own token - never a token found on a seized device.
- Confirm the organisation owns the account
- Collect with an authorised token
- Scope to exactly the accounts named
The authority only covers a date range
The warrant or instruction names three months, not the whole mailbox.
Apply the date range through the provider's own filter - collecting the whole mailbox is over-collection.
- Record the exact date range in scope
- Collect only that range
- Do NOT collect the whole mailbox "to be safe"
A seized laptop has a stored cloud token
A recovered browser profile contains a saved OAuth token for the account.
That token is NEVER used to collect. This route is identify-and-report only.
- Report the token was found
- Do NOT use it to collect the mailbox
- Seek the organisation's own authorised route instead
A recovered laptop has a OneDrive cache
A recovered machine may hold local copies of files no longer in the cloud.
caches - entirely offline, no API access needed.
- Recover the machine's tree first
- Run caches against the recovered folder
- Check for files present locally but not in the live account
A client wants to see the procedure before agreeing to anything
Trust needs building before an authorisation is signed.
steps - the industry-standard stages, free, before any account is touched.
- Run cloud steps
- Walk the client through each stage
- Get the authorisation recorded before collecting
Keywords must match the real message, not a preview
The provider's own search only checks a truncated body preview.
Keyword filtering runs against the DECODED message here, because a truncated preview would silently under-collect.
- State keywords in scope
- Collect with the keyword filter applied
- Trust the match is against full decoded content
Some items fail to collect
A live collection over the API can fail on individual items.
The separate error report names every failed item - a failure buried in a manifest nobody opens is a silent under-delivery.
- Complete the collection
- Read the separate error report
- Report the named failures to the client, not just a total count
Output must be reviewable anywhere
The collected mail needs to open in an ordinary tool, not this product only.
Output is always .eml, never raw provider JSON.
- Ingest or collect as appropriate
- Confirm the output is .eml with a manifest
- Hand the .eml files and manifest to the reviewer
Custodians need to be picked before anything is taken
A directory lists many accounts; only some are in scope.
List custodians and flag each in or out of scope BEFORE anything is collected.
- List the directory of custodians
- Mark exactly which are in scope
- Collect only the flagged accounts
6The same job at the command line
recoveryantra cloud ingest export.pst -o D:\Out --provider microsoft365 --basis "owner instruction"Image a drive on another machine, without travelling to it
An agent on the far machine reports in and offers its disks read-only - it never takes orders from the console. A machine that cannot be switched off is frozen with a snapshot taken on that machine, so the copy is one instant, not a smear of a running system.
1How to get there
Home → Network drive.
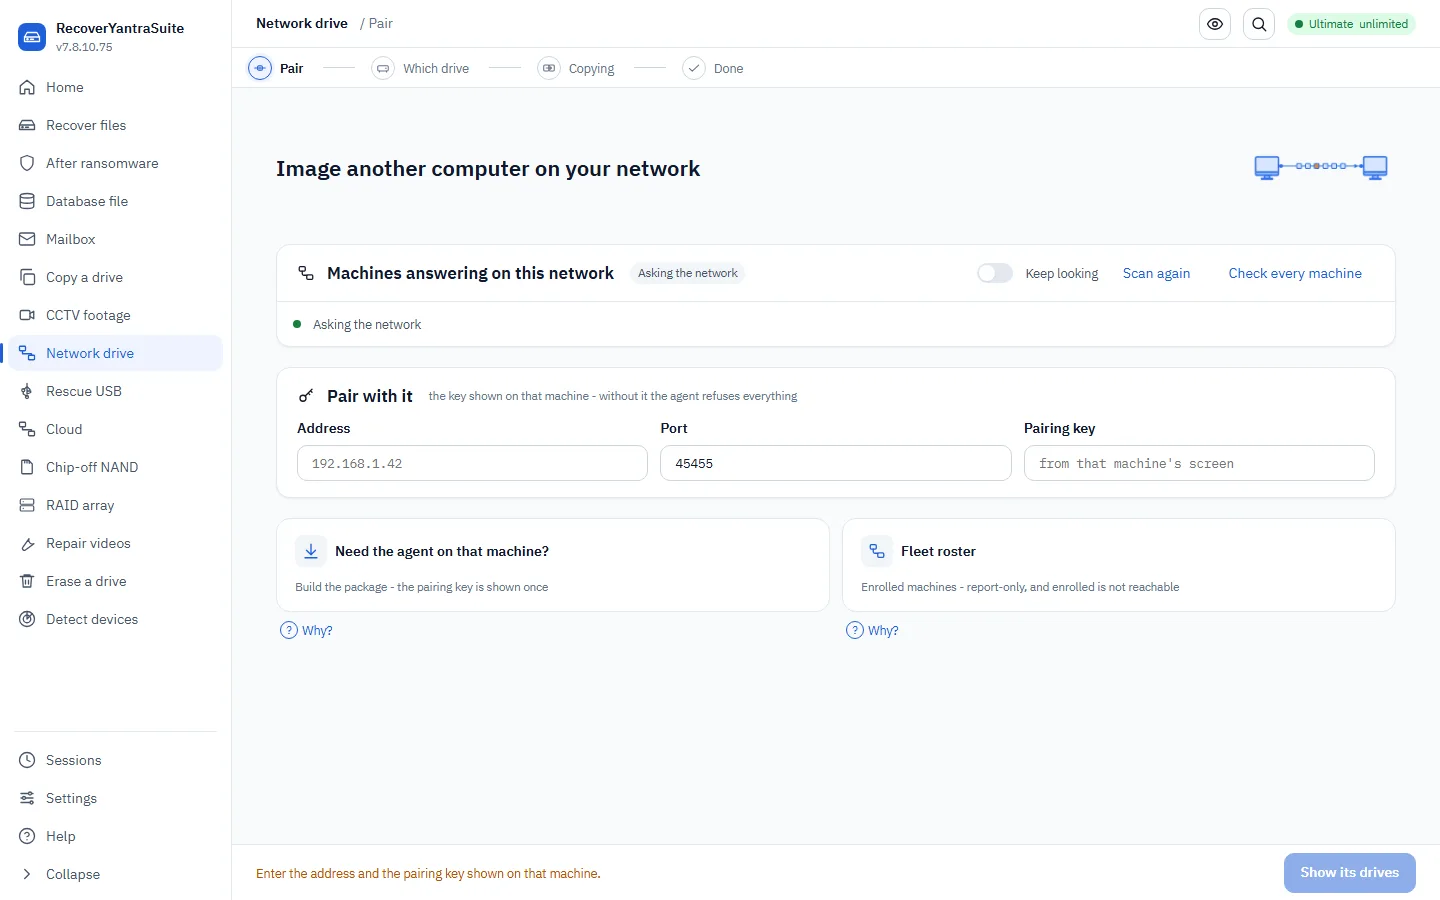
- 1Keep looking automatically keeps discovering agents on the network automatically.
- 2Scan again runs one more discovery pass.
- 3Check every machine tests whether every enrolled endpoint is currently reachable.
- 4Host address the target agent's address.
- 5Port the agent's listening port, 45455 by default.
2Discover, roster, or live?
3The options, and what to set them to
| Option | What it does | What to choose |
|---|---|---|
| remote agent | Runs on the target machine and offers its disks read-only. | The far machine, always - it never takes orders from the console, only reports in. |
| remote discover / list | Finds agents on the network, and lists the disks one is offering. | No fleet enrolment yet - discovery works without it, on the same network segment. |
| remote image | Copies a disk that is not in use, from the target agent to a local file. | The far machine's disk is idle - a spare drive, a machine already powered off but network-reachable via a live boot. |
| remote roster / sweep | Lists enrolled endpoints and whether each is currently reachable; sweep asks every endpoint one question at once. | A fleet with the agent already deployed - pick the machine from a list instead of scanning. |
| remote volumes / live | Lists volumes on a running endpoint and whether it can be frozen; live acquires one through a snapshot taken there. | The machine cannot be switched off - a snapshot freezes one instant even though the machine keeps running. |
| remote package --msi | Builds an installable agent, and a Windows MSI for Group Policy/Intune/SCCM push. | Deploying the agent ahead of time across a fleet, before any incident. |
4Step by step
- Pair with the other machineRun the agent on the target, or confirm it has already reported in on the roster.
- Find the driveremote discover / remote list for an ad-hoc pairing, or remote roster for an enrolled fleet.
- Choose idle, or liveA disk not in use images directly; a running machine's volume needs remote live, which freezes it first.
- Choose where to saveLocal storage on this machine, with room for the whole disk or volume.
- CopyThe image is verified on arrival; a short image is reported failed rather than handed over as complete.
- DoneRecover from the local image exactly as from any other - the network transfer is finished at that point.
Do not do this. Never install the agent on a machine already under suspicion mid-investigation - it announces the investigation and changes the machine. Enrolled does not mean reachable; a machine off the network cannot be acquired until it is back on one you can reach.
5Ten situations, and exactly what to do
A fleet of several hundred machines
You do not want the first hour of an incident spent working out how to reach one.
Push the agent ahead of time with the rest of the fleet software; pick the machine off the roster when needed.
- Build the MSI package with the console's address baked in
- Push it by Group Policy
- Pick the machine from remote roster when an incident happens
A machine on the same network, right now
No prior enrolment exists, but the target machine is reachable.
remote discover, then image its idle disk directly.
- Run the agent on the target machine
- Discover it from the console
- Image the named disk
A finance server cannot be stopped during month-end
The machine must keep running through the acquisition.
remote live - freezes the volume in a snapshot taken on the endpoint, then images that snapshot while the server keeps working.
- Check remote volumes for live-capable status first
- Run remote live against the volume
- Verify the image is unchanged across the acquisition
A laptop reports in from home
It appears on the roster but is not reachable from the office network.
Enrolled is not the same as reachable - roster shows it, but acquisition waits until it is back on a reachable network.
- Check remote roster
- Note it is enrolled but not currently reachable
- Wait, or queue the job for when it reconnects
A job needs to wait for a machine that is not available now
The target is offline and the job cannot start today.
remote queue --add - queued for the next time the endpoint is reachable.
- Add the job to the queue with the reason and case reference
- Run --run once the endpoint is back
- Check --list for status meanwhile
One file needs to be found across the whole fleet
A specific file or hash is suspected to exist on several machines.
remote sweep - asks every enrolled endpoint one question at once, without imaging any of them.
- Run remote sweep with the filename or hash
- Review hits per endpoint
- Only then image the machines that matched
Deploying to a mixed Windows/Linux/macOS estate
The fleet is not all one operating system.
remote package with --platform, building the right binary for each.
- Build the package once per platform, or --platform all
- Deploy each to its own machines
- Confirm each reports in on the roster
Confirming an agent never takes orders from the server
A security review is asking how the console cannot become one machine worth every workstation's disk.
Enrolment is report-only, by construction - the agent only reports in and offers reads, it accepts no server-issued commands.
- Review the agent's own read-only design
- Confirm the server can only request, never push, an action
- Document the report-only architecture for the review
The machine was switched off mid-acquisition
The user shut down the laptop while an image was in progress.
A persistent snapshot usually survives a restart; if it does not, resume is REFUSED rather than splicing two moments into one file.
- Restart the acquisition after the machine is back
- If the snapshot is gone, start fresh rather than resume
- Never accept a spliced image as a point-in-time copy
Acquisition over the internet
The machine is not on the same network as the console.
This is the honest limit - acquisition over the internet needs a relay both sides connect out to, which is not built. State it plainly rather than attempting a workaround.
- Confirm the machine is not reachable on the local network
- State the limitation to the client
- Plan a site visit or a local agent push instead
6The same job at the command line
recoveryantra remote discover && recoveryantra remote image --host 192.168.1.42 --key KEY --disk \\.\PhysicalDrive1 -o D:\Image.ddTurn a lab's raw chip dump into a disk this tool can read
What a chip-off lab hands over is not a disk image yet - it is a raw dump, spare areas included. This works out the geometry, de-scrambles it, corrects with the controller's own error-correction scheme and rebuilds the block map into an image the ordinary recovery flow can open.
1How to get there
Home → Chip-off NAND.
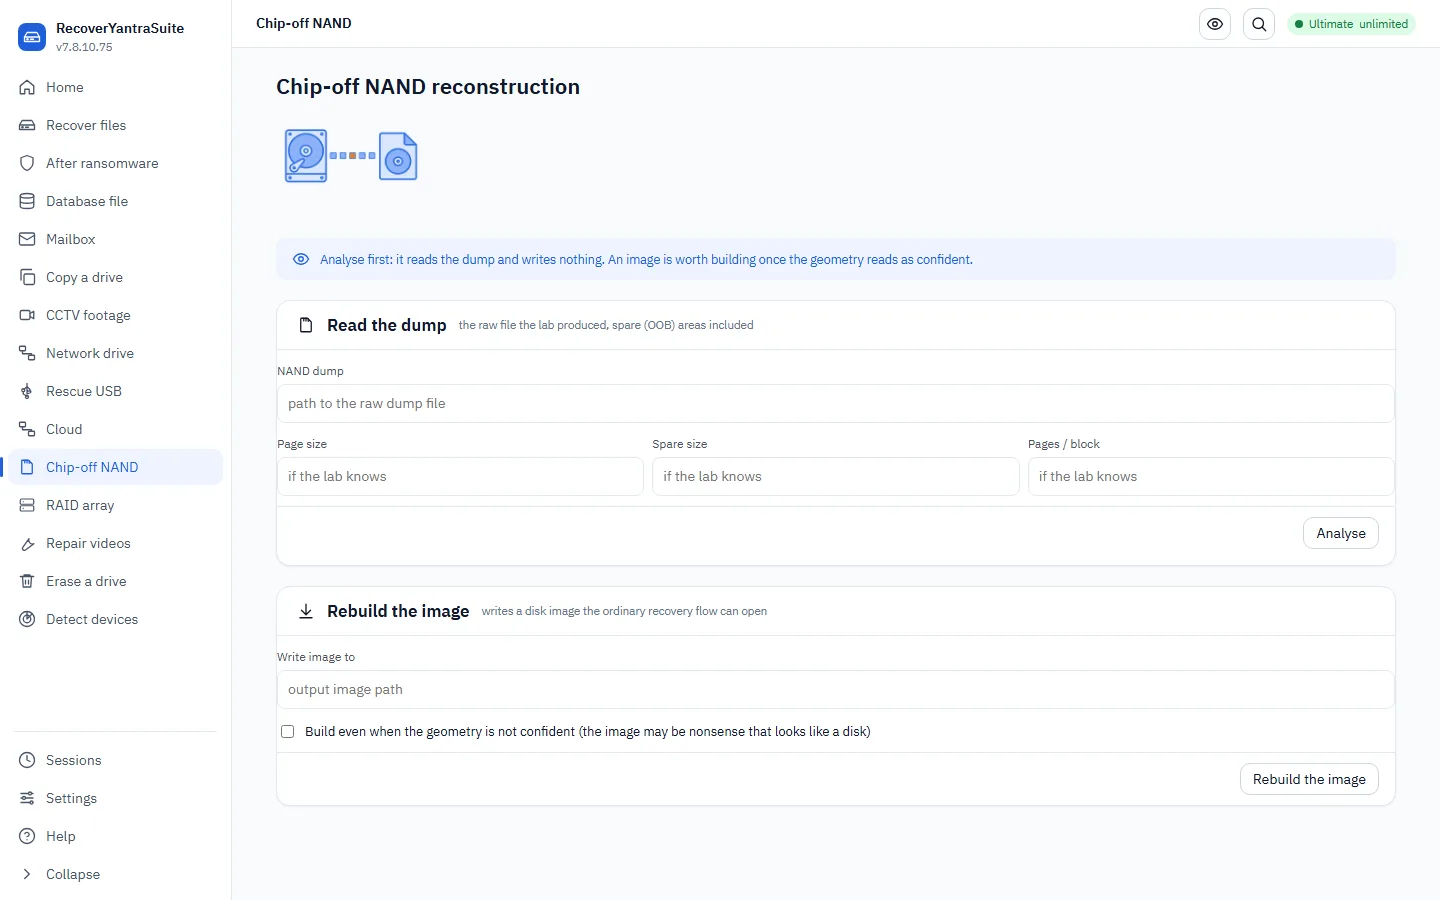
- 1Path to the raw dump the raw dump from the lab, spare (OOB) areas included.
- 2Page size, if the lab knows the page size in bytes, if the lab measured it.
- 3Spare size, if the lab knows the spare (out-of-band) area size, if the lab measured it.
- 4Pages per block, if the lab knows pages per erase block, if known.
- 5Analyse reads and reports the geometry, writing nothing - always run this first.
2Analyse, or rebuild with known figures?
3The options, and what to set them to
| Option | What it does | What to choose |
|---|---|---|
| --analyse | Reports geometry, scrambling, ECC scheme and the block map, writing nothing. | Run first, every time, before committing to an image. |
| --page-size / --spare-size / --pages-per-block | Geometry figures, taken as fact instead of inferred when supplied. | Only when the lab genuinely measured them - a wrong figure shifts every page and the result carves to nothing. |
| --xor-key / --xor-period | The controller's XOR de-scramble keystream and its repeat period. | Supply --xor-key when the lab has the file; a dump scrambled end to end cannot be de-scrambled by analysis alone without it. |
| --ecc-scheme / --ecc-step / --ecc-t / --ecc-offset | The controller's error-correction scheme and parameters. | Only when automatic detection could not settle it and the controller's datasheet gives the values - a wrong strength corrects nothing, or reads correction bytes as data. |
| --ftl-offset / --ftl-width / --ftl-endian | Where the logical block address sits in the spare area, and its width and byte order. | When known, to put blocks back in the order a filesystem expects rather than the chip's own physical order. |
| --force | Writes an image even when the geometry is not confirmed. | Only after --analyse, and only when there is no better option - a forced image can look sound while holding nonsense. |
4Step by step
- Point at the raw dumpThe file the lab read straight off the bare NAND chip, spare areas included - not a disk image yet.
- Analyse firstReports the geometry it can work out and writes nothing - always run this before committing to anything.
- Supply what the lab knowsPage size, spare size, ECC scheme and parameters, XOR key - each taken as fact rather than inferred when given.
- Choose where to save the imageA different drive from the dump.
- Rebuild the imageThe reconstructed image is written whole, so the ordinary recovery flow can open it like any other disk image.
- Recover from the rebuilt imageContinue with Recover a drive exactly as with any other image file.
Do not do this. A wrong page size, spare size or ECC parameter produces an image that looks like a real disk and holds nobody's files. Always run --analyse first, and supply figures only when the lab genuinely measured them.
5Ten situations, and exactly what to do
A phone's chip-off dump arrives from the lab
A lab desoldered the NAND chip and handed over the raw dump.
--analyse first, always - writes nothing and reports what the dump's geometry looks like.
- Receive the raw dump with spare areas included
- Run --analyse
- Read the reported geometry, scrambling and ECC findings
The lab supplies confirmed page and spare sizes
The lab's own datasheet gives exact figures for the chip.
Supply --page-size and --spare-size so they are taken as fact rather than inferred.
- Analyse first
- Rebuild with the confirmed page and spare sizes
- Confirm the built image opens as a disk
The controller scrambles the whole dump
Analyse reports the dump is scrambled end to end.
An XOR key file from the lab is what makes the dump readable at all - analysis alone cannot de-scramble it.
- Ask the lab for the XOR key file, if they have one
- Rebuild with --xor-key pointed at it
- Verify the rebuilt image's filesystem is recognisable
Automatic ECC detection could not settle it
Analyse reports the error-correction scheme is uncertain.
Supply --ecc-scheme, --ecc-step and --ecc-t from the controller's own datasheet.
- Get the controller's ECC parameters from its datasheet
- Rebuild with the stated ECC scheme and parameters
- Confirm the correction actually reduces errors on re-analysis
The block address field's position is known
The lab's controller documentation gives the FTL field's offset and width.
Supply --ftl-offset, --ftl-width and --ftl-endian so blocks are put back in logical order.
- Confirm the FTL field position from documentation
- Rebuild with the FTL parameters supplied
- Compare against a physical-order rebuild if in doubt
Nothing about the chip is known beyond the dump itself
The lab supplied only the raw bytes, no datasheet.
Analyse first and rebuild with only what it inferred - the result still needs verifying against the recovery it produces.
- Analyse with no figures supplied
- Rebuild using inferred geometry only
- Recover from the result and check whether files come back sensibly
The geometry could not be confirmed at all
Analyse reports low confidence in every figure.
--force only as a last resort, and only after reading exactly how uncertain the figures are - the run records that it was forced.
- Read the --analyse confidence carefully
- Use --force only when there is no better option
- State the forced status when handing anything back
The pages-per-block figure is unknown
The lab could not supply the erase-block size.
The image can still build without it, in the chip's own physical order rather than logical order.
- Rebuild without --pages-per-block
- Accept the physical-order layout
- Supply the figure later if the lab provides it, and rebuild again
Comparing two rebuilds with different assumptions
It is unclear which of two possible page sizes is correct.
Rebuild once with each candidate and compare which one produces a filesystem that actually recovers files.
- Rebuild with the first candidate page size
- Rebuild with the second, to a different output path
- Recover from each and compare which produces sensible files
The rebuilt image goes into the ordinary recovery flow
Once the image is built, the rest of the job is an ordinary recovery.
Open the rebuilt image with Recover a drive exactly as with any other image file.
- Rebuild the image
- Open Recover a drive against the rebuilt image
- Recover files with Smart mode as usual
6The same job at the command line
recoveryantra nandrecon dump.bin --analyseMake a recovered video play, by fixing its index
A video's index says where every frame is. When it is damaged or was lost with the recording, the picture is all there and unreadable anyway. This rebuilds the index - and says plainly when frames really are missing rather than claiming a repair.
1How to get there
Home → Repair videos. No source drive is needed - this works on already-recovered files.
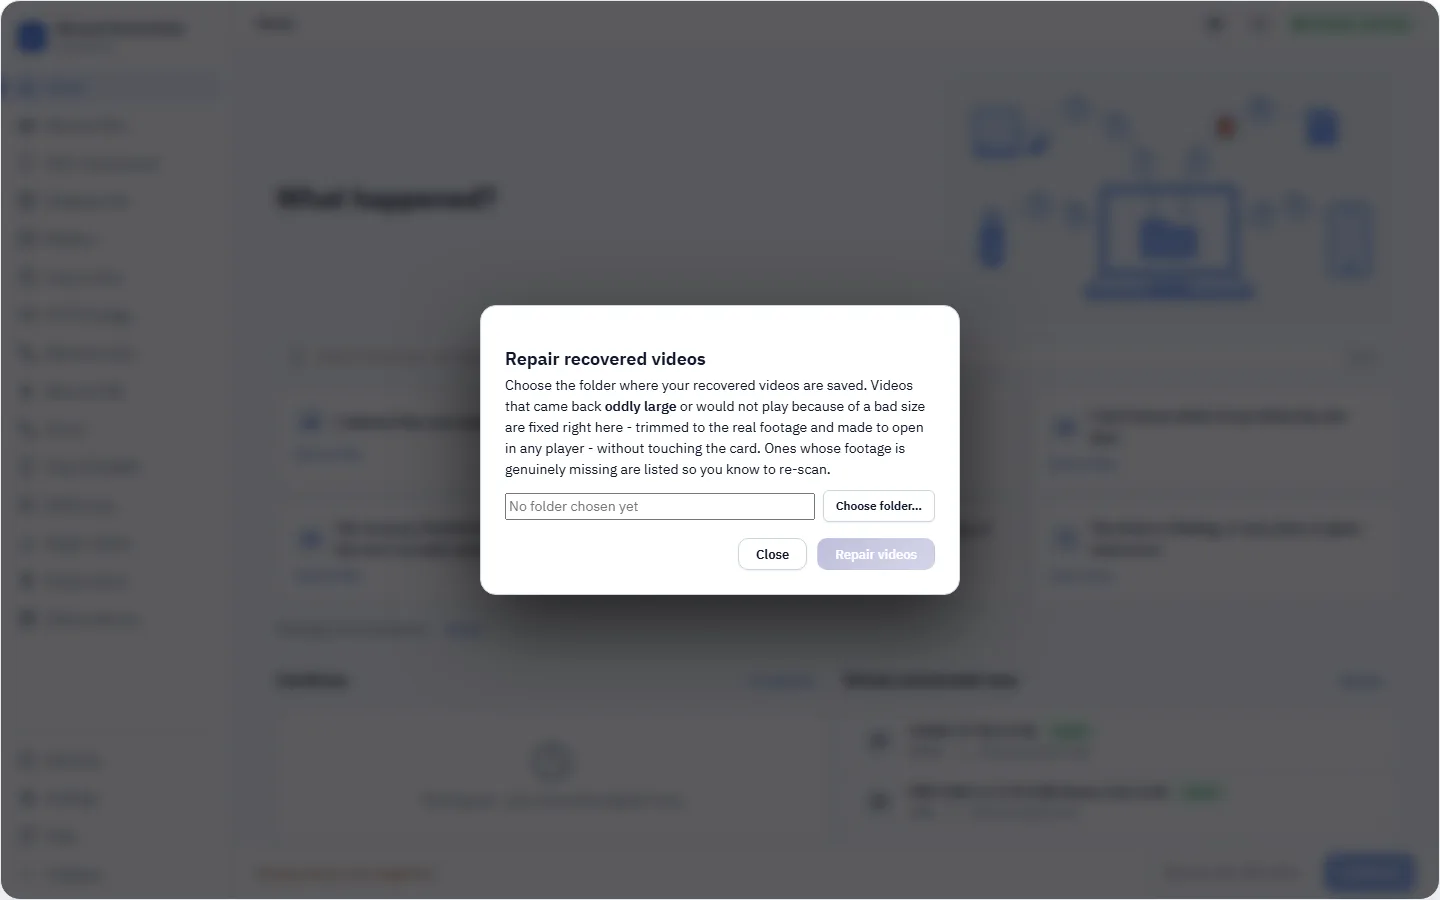
- 1No folder chosen yet the folder of recovered videos to repair - no source drive needed.
- 2Choose folder… browse to the folder holding the recovered videos.
- 3Repair videos runs the repair over every video in the chosen folder, working on copies.
2A whole folder, or one file against a reference?
3The options, and what to set them to
| Option | What it does | What to choose |
|---|---|---|
| fixvideos <folder> | Repairs every video in a recovered folder in place, on a copy. | Whenever a completed recovery lists videos as recovered but they will not play - the common case is a container index sized wrong or lost. |
| fixwith --file / --reference | Repairs one damaged clip using a healthy file from the same device as a structural reference. | One specific file with no usable index of its own, and a genuinely matching healthy file exists. A reference from a different device produces a file that opens and is wrong. |
| fixwith -o | Where the repaired copy is written. | The case store, when the original recovered copy has to be preserved exactly as recovered. |
4Step by step
- Finish the recovery firstRepair works on already-recovered files - it needs no source drive or image.
- Choose the folderThe recovery's own output folder, full of videos listed as recovered.
- AnalyseChecks each video's container index and video track before attempting anything.
- RepairThe index is rebuilt in a COPY - the recovered original is never modified.
- Check it playsWhere frames really are missing because the source was overwritten, the tool says so instead of claiming a repair.
Do not do this. Never re-encode a damaged recovered video with a converter to “fix” it. That bakes the fault in and loses quality permanently. Repair always works on a copy and rebuilds the index, which is lossless.
5Ten situations, and exactly what to do
A card of phone videos comes back 90% unplayable
A container header disagrees with the video's own index in every case.
fixvideos over the whole recovered folder - sizes from the index, rewrites the header so every player reads it.
- Finish the recovery
- Run fixvideos over the output folder
- Confirm the repaired copies play
One clip plays sound with no picture
The container's index survived but points into the wrong data.
This is the fragmented-recovery pattern - fixvideos rebuilds the index from the actual sample table, not the possibly-wrong mdat header.
- Run fixvideos over the folder holding the clip
- Confirm the picture now plays with the sound
- Note any clip still silent-only as a genuine gap
A single damaged file has no index at all
One specific MP4 recovered with a completely lost sample table.
fixwith, with a healthy file from the SAME camera as the structural reference.
- Find a healthy file from the identical camera or phone
- Run fixwith with --file and --reference
- Write the repaired copy to the case store
The original must be preserved exactly as recovered
The repaired file cannot overwrite what was already handed over as evidence.
fixwith always writes a separate copy - the source recovered file is never modified.
- Confirm the original recovered file is untouched
- Repair to a new output path with -o
- Keep both the original and the repaired copy on record
A 939 MB clip that should be 296 MB
The mdat header disagrees badly with the actual sample table.
fixvideos sizes correctly from the index and rewrites the header - the file becomes the size the actual video really is.
- Run fixvideos over the folder
- Confirm the repaired file's size matches its true video length
- Play it back to confirm
A reference file from a different device is the only one available
No matching camera sample exists, only a similar-looking clip from another device.
Do NOT use it. A reference from a different device produces a file that opens and is wrong - picture data is never taken from the reference, but the structural assumptions can still mismatch.
- Do NOT use a reference from a different device
- Find a genuine sample from the same camera instead
- State the limit if none exists
Media was genuinely overwritten on the source
The video was fragmented and part of it landed in space that was reused.
The honest limit - repair cannot restore picture data that was overwritten on the source. The result stays partly lost, and the tool says so.
- Run fixvideos
- Read the reported result honestly
- Do NOT claim a full repair when frames are genuinely missing
Re-encoding was suggested as a fix
A converter tool was offered as a way to “fix” the unplayable video.
Do NOT re-encode. That bakes the fault in and loses quality permanently - repair the index instead, which is lossless.
- Do NOT re-encode the damaged file
- Run fixvideos or fixwith instead
- Keep the repair lossless
A whole recovery's worth of mixed video needs checking
Several dozen recovered clips, some fine and some not.
fixvideos runs over the whole folder in one pass and only touches the ones that need it.
- Run fixvideos over the whole output folder
- Review which clips changed
- Spot-check a sample that plays
Confirming a repair before handing footage over
A repaired clip needs proving before it goes to a client.
Play the repaired copy directly, and compare its reported length against what the original recording should be.
- Repair with fixvideos or fixwith
- Play the repaired copy
- Compare the length against the expected recording
6The same job at the command line
recoveryantra fixvideos D:\Recovered\VideosErase a drive, and prove it was erased
Overwrites every block, then runs this product's own recovery engine over the result and issues a certificate stating the level actually achieved (NIST SP 800-88) - never more than was proven, and never claiming a level the drive could not confirm.
1How to get there
Home → Erase a drive.
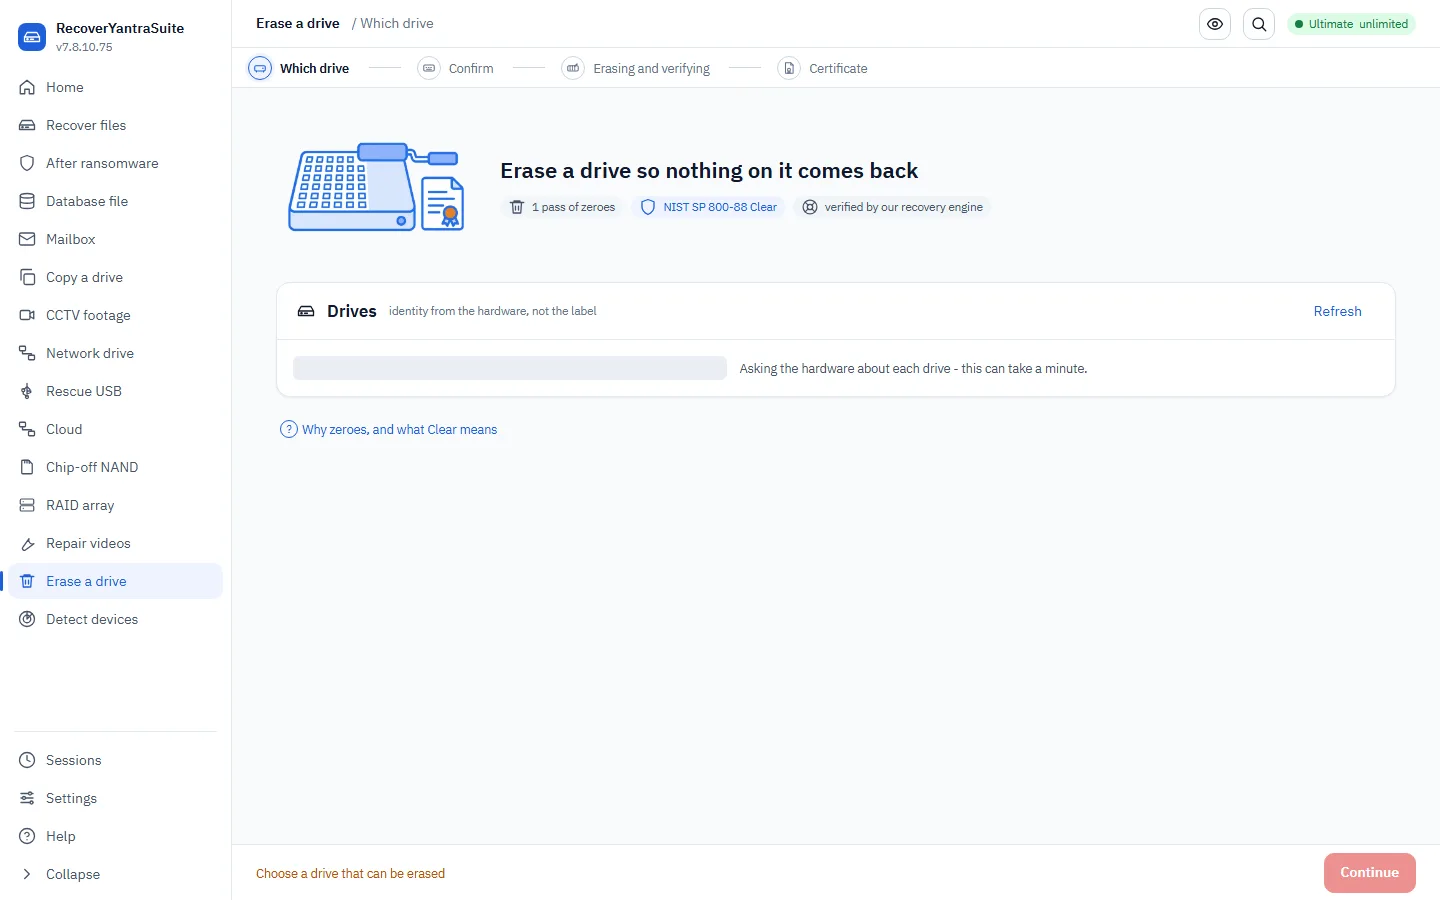
- 1Refresh re-reads attached drives.
- 2NIST SP 800-88 Clear the sanitisation level this default pass achieves, stated before a drive is even chosen.
- 3Why zeroes, and what Clear means explains why zeroes are used and what the NIST SP 800-88 Clear level means.
2A whole drive, or a working folder?
3The options, and what to set them to
| Option | What it does | What to choose |
|---|---|---|
| <target> | The drive being erased. | The system disk, the drive the product runs from, and the drive holding the report are all refused outright - there is no override for those three. |
| --confirm | The drive's own serial number (or its size in bytes if it reports none). | Type it every time. This is the one step that prevents erasing the wrong disk, and there is no override for it. |
| --passes / --pattern | Overwrite passes (default 1) and the fill pattern (default zero). | Leave both at default. NIST SP 800-88 Rev. 1 is explicit that one pass is enough on modern media, and a zeroed drive can be PROVEN clean by reading it back - random fill cannot be told from data that was already encrypted. |
| --firmware / --purge-method | The drive's own controller sanitise, for NIST Purge; optionally forcing a specific method. | Add --firmware to reach spare and remapped blocks an overwrite cannot address. The certificate records the level actually ACHIEVED, not the level requested. |
| --no-verify | Skips reading the drive back and trying to recover from it. | Only for a bulk pass over drives that will be physically destroyed afterwards anyway. Skipping verification removes the whole basis for the certificate's central claim - never issue an unverified certificate as though it were verified. |
| --examiner / --out | The name recorded on the certificate, and the folder it and the audit trail are written to. | The person accountable for the disposal, as your policy defines it; the folder on the records store, never on the drive being erased. |
4Step by step
- Choose the driveThe system disk, the drive the product runs from, and the drive holding the report can never be chosen - refused with no override.
- Type the serial number to confirmThis is what prevents erasing the wrong disk. There is no way around it.
- Choose how thoroughOne pass, zero pattern, is the default and is enough under NIST SP 800-88 Rev. 1. Add --firmware for drives with spare or remapped blocks an overwrite cannot reach.
- Erase and verifyThe overwrite runs, then this product's own recovery engine is run over the erased drive to prove nothing came back.
- Receive the certificateStates the level actually ACHIEVED - Clear, or Purge where the firmware confirmed it - and the honest limits, never the word “unrecoverable”.
Do not do this. There is no override for the serial-number confirmation, and none for the system disk, the drive the product runs from, or the drive holding the report. Rely on a quick format or deleting partitions and the data is still there - only an overwrite, verified, actually removes it.
5Ten situations, and exactly what to do
40 laptops going back at the end of a lease
Every machine needs a record proving it was sanitised.
erase, default one pass zero pattern, verified - a certificate naming each drive's own serial number.
- Confirm each drive's serial number by typing it
- Erase with the defaults
- Keep each certificate with the asset record
A drive is going to a third party
The organisation is selling hardware it no longer needs.
Same command - the default level (NIST Clear) is stated plainly on the certificate.
- Type the serial number to confirm
- Run erase with defaults
- Hand the certificate over with the drive
An SSD holding something genuinely sensitive
Spare and remapped flash blocks need reaching too, not just the visible sectors.
--firmware - the drive's own controller sanitises areas an overwrite cannot address.
- Run erase with --firmware
- Confirm the certificate states the level actually achieved
- Physically destroy the drive as well if policy requires it
Policy names a specific firmware method
An internal standard requires crypto-erase specifically, not whatever the drive prefers.
--purge-method forces the named method.
- Confirm the drive supports the named method
- Run erase --firmware --purge-method crypto
- Read the certificate for the level actually achieved
A large batch going for physical destruction anyway
Hundreds of drives are being shredded after the pass.
--no-verify only here - the destruction is the final sanitisation step, so the verification time is not required.
- Confirm physical destruction is genuinely scheduled next
- Run erase --no-verify for speed
- Never issue this as a verified certificate to a client
A working folder of recovered files at the end of a job
The client's recovered data has served its purpose on the bench.
wipe, not erase - a folder, not a whole device.
- Confirm the case is genuinely closed
- Run wipe against the folder
- Note the flash/backup limits stated with the result
Someone suggests three overwrite passes for extra safety
An old habit asks for a DoD-style multi-pass wipe.
Leave --passes at 1. NIST SP 800-88 Rev. 1 is explicit that a single pass is sufficient on modern media; more passes add time and no measurable security.
- Explain the current NIST guidance
- Leave --passes at the default
- Raise it only if a contract specifically demands a number
Random fill was suggested instead of zero
Someone believes random data is harder to recover than zeroes.
Leave --pattern at zero. A zeroed drive can be PROVEN clean by reading it back; random fill cannot be distinguished from data that was already encrypted, and it weakens the verification, not strengthens it.
- Explain why zero is the stronger, provable choice
- Leave --pattern at zero
- Let verification run to prove the result
Someone tries to erase the machine's own system drive
A mistake in drive selection targets the disk the product is running from.
Refused outright, with no override. The system drive, the drive the product runs from, and the drive holding the report can never be chosen.
- Attempt to select the system drive
- Read the refusal
- Choose the correct target drive instead
A truly sensitive SSD, beyond what software can reach
The data must be genuinely irrecoverable, not just professionally sanitised.
State the honest limit - overwriting cannot reach a flash drive's spare pages. For something this sensitive, physical destruction is the only complete answer, and the certificate says so.
- Run erase --firmware for the best software result
- State the honest limit on spare pages plainly
- Recommend physical destruction alongside the certificate
6The same job at the command line
recoveryantra erase \\.\PhysicalDrive2 --confirm SERIALNUMBER --out D:\Certs --examiner "J. Rao"