RecoverYantra · Data-recovery family

The Recovery Bible

Getting data back off every drive, card, phone and recorder, explained in plain words, with the exact steps, the options, and what to never do.

Recovery Bible
Start here

The Recovery Bible

One clear guide to getting data back, every kind of drive, card, phone and recorder, in plain words.

This book covers the whole RecoverYantra data-recovery family. For every kind of storage it tells you, in order: what to choose, the exact steps (the same order the app walks you through), the options and what they cost, what to think about first, and, on every page, what to do and what to never do.

One promise runs through all of it: your original drive is only ever read, never written to. Recovered files always go to a separate place. That single rule is why recovery is safe, and it is enforced by the app, not just suggested.

Fragments of files reassembling out of darkness
Lost files, pieced back together.

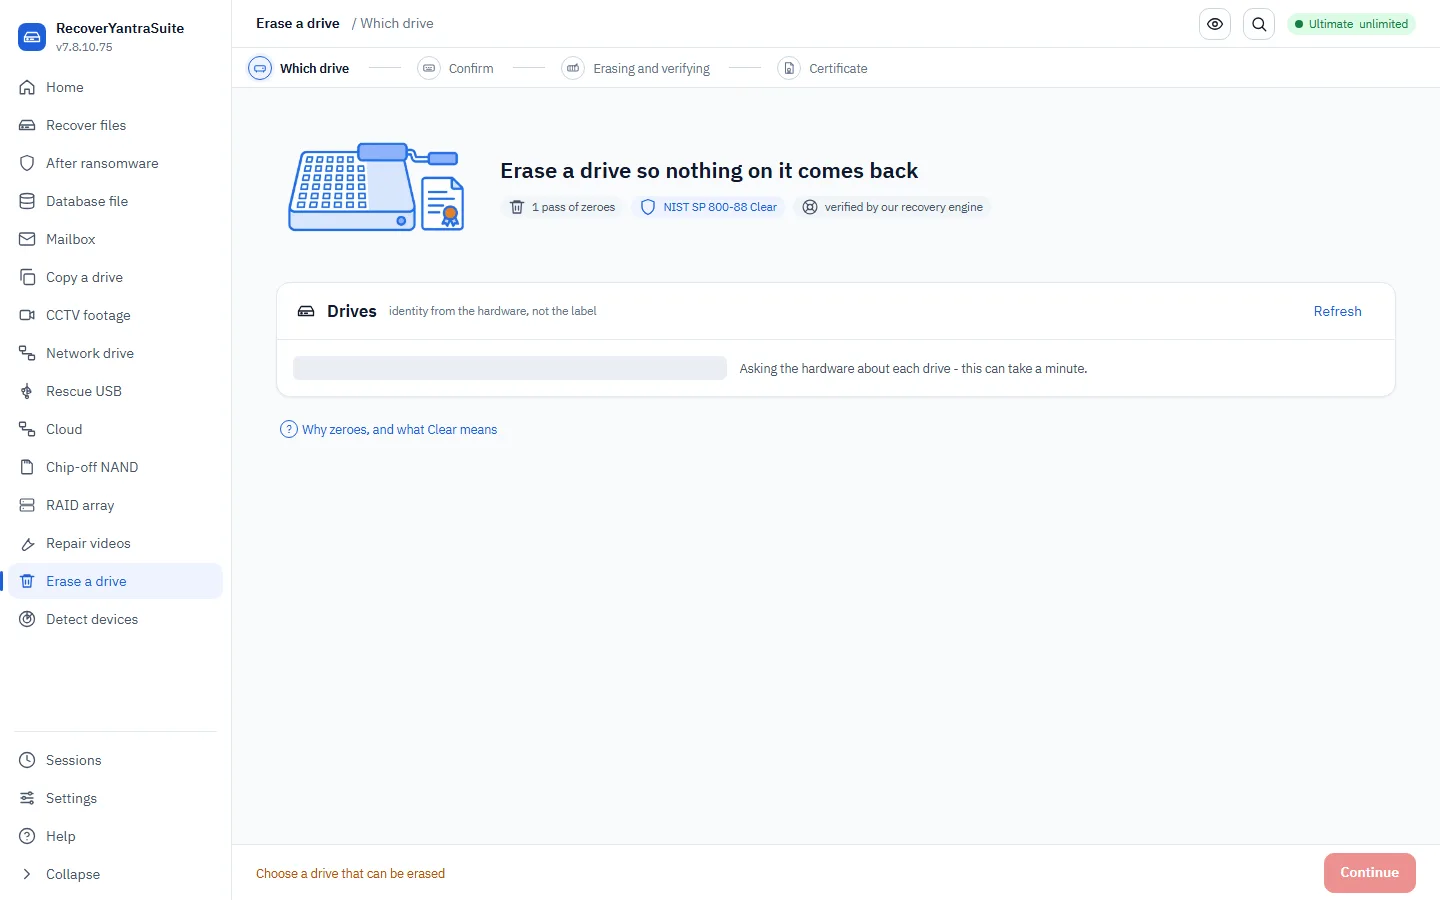
RecoverYantraSuite

The complete data-recovery platform: file, ransomware, database and mailbox recovery, recorder footage, imaging and secure erase. Phone acquisition is RecoverYantra Mobile; evidence work is the SakshyaYantra family's.

Recovery labs and organisations that need the whole recovery toolkit.

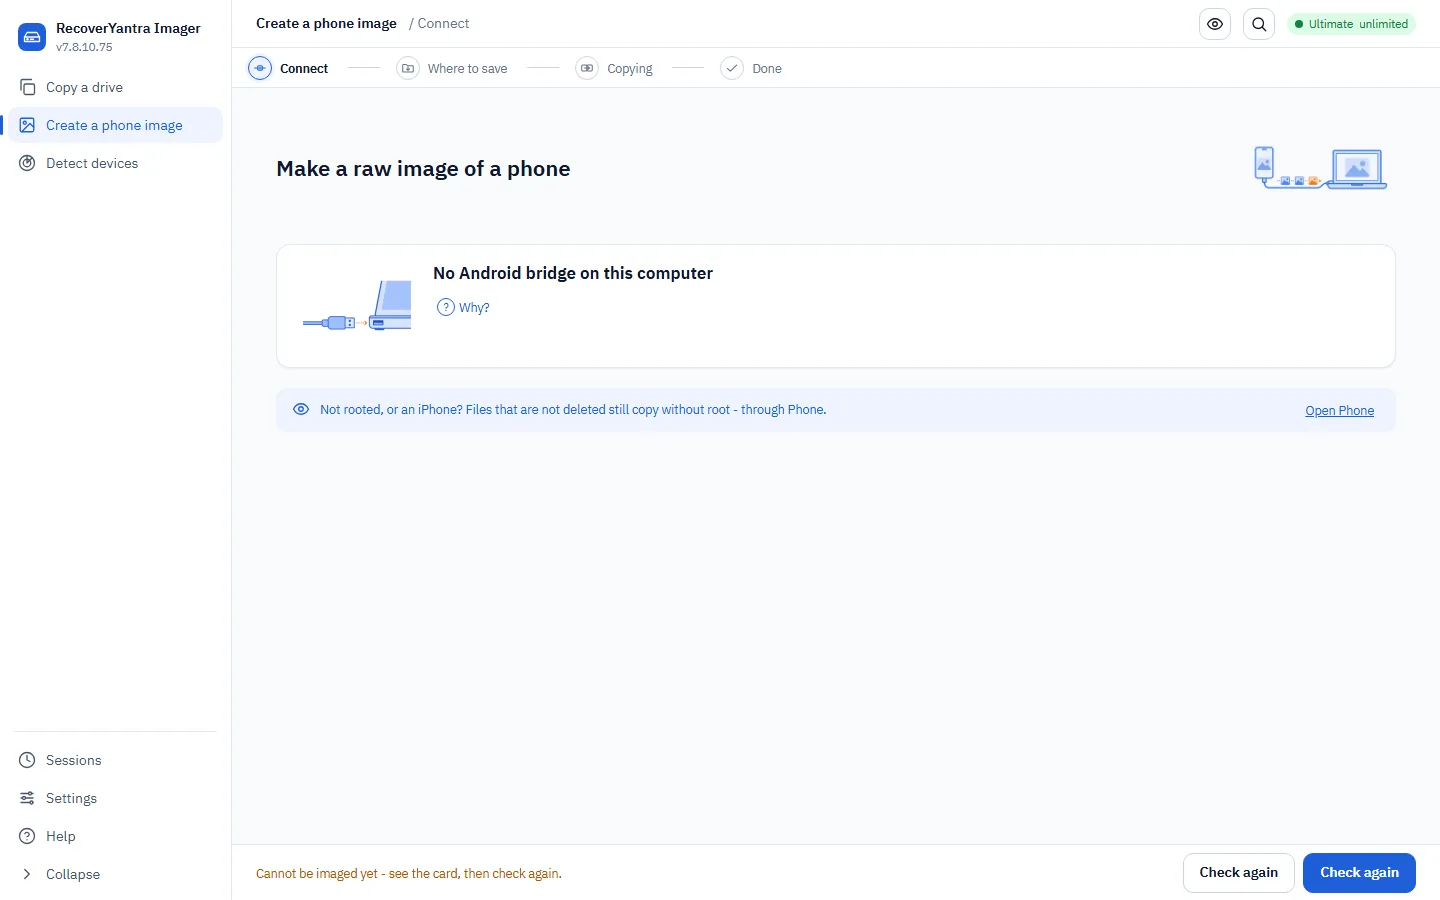
RecoverYantra Imager

Imaging for data recovery and forensics. It first CHECKS the drive and says plainly whether recovery is realistic - how much is unreadable, what to expect back, as a PDF report - then makes a gentle sector-by-sector copy to a separate disk you choose, raw or compressed E01 for handing to a lab. It reads the drive's index in seconds and lets you tick the files and folders you want back, deleted ones marked with their chances. Phones have their own guided steps.

Technicians and IT staff who image drives and phones before recovery or examination, anyone deciding whether a drive is worth sending to a lab, and anyone who needs one folder back.

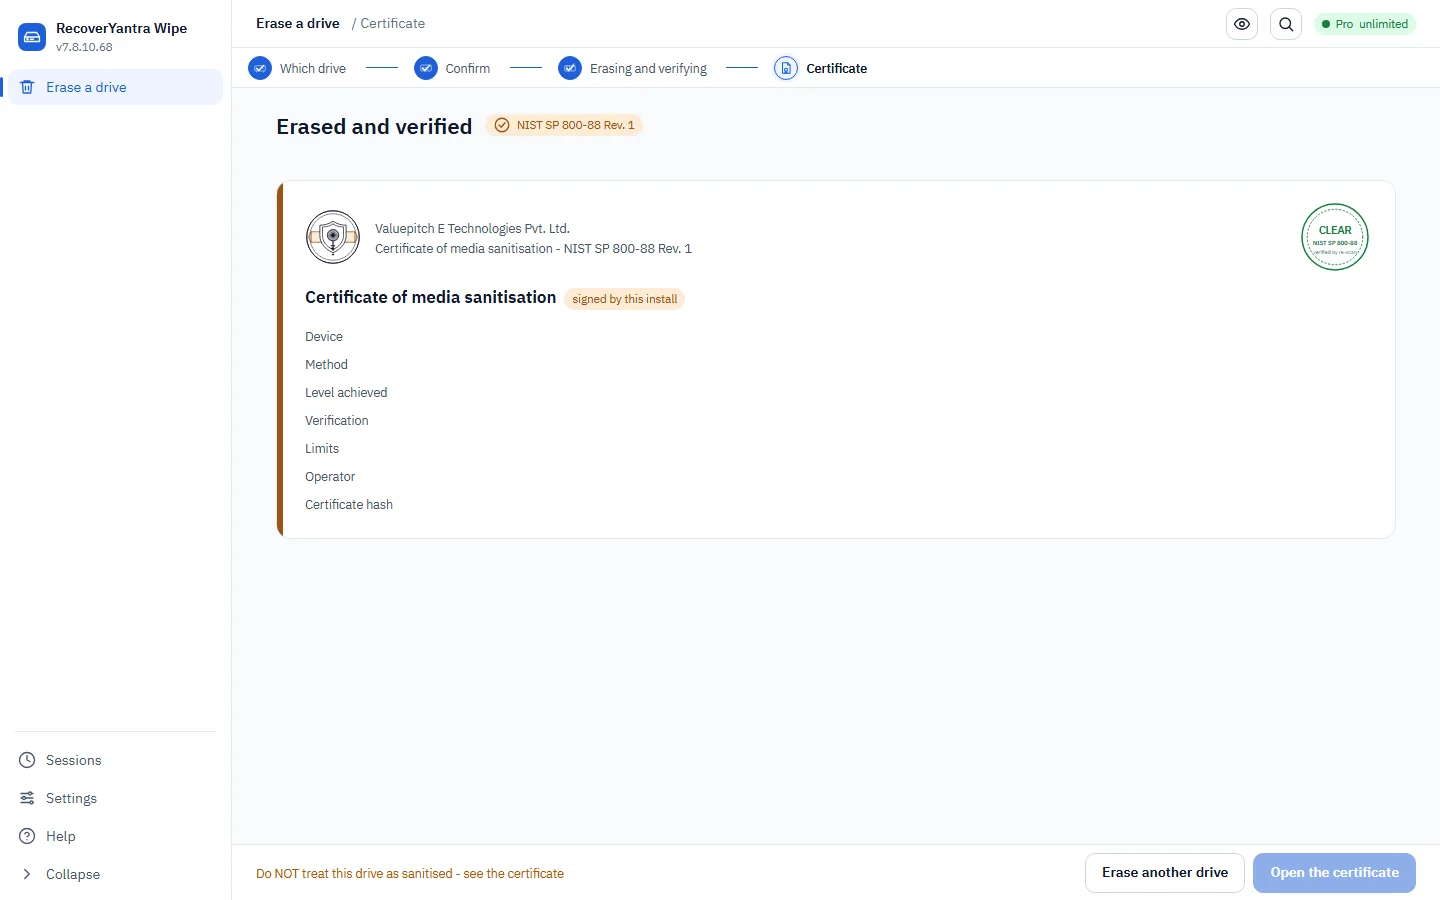
RecoverYantra Wipe

Sanitise a drive to NIST SP 800-88 Clear or issue its own firmware Purge, then verify it and produce a signed certificate.

Anyone disposing of, returning or reselling hardware.

RecoverYantra Mobile

Mobile acquisition for data recovery: identify a connected phone, pick the method that reaches it (checkm8, Qualcomm EDL, MediaTek BootROM, rooted ADB, backup), acquire byte-exact under a recorded authority, and read the app stores. Hands the image or extraction to RecoverYantra Suite for deep recovery.

Data-recovery labs handling phones - locked, dead or consenting.
The golden rules, for every job on every device
  • Stop using the drive the moment you notice the loss. Every new file written can land on top of what you are trying to get back.
  • Read-only on the source. The engine has no write path to the drive you are recovering. Recovered files go to a different drive, always.
  • If a drive is failing, copy it first. A clicking or slow drive is imaged once, then you work from the calm copy, never scanned over and over.
  • Look before you scan. Browse the drive’s own index in seconds and tick only what you need, or scan everything.
  • Recovered is not the same as usable. The app checks a file opens and marks anything it cannot prove whole, it never hands back a wrong file quietly.
Everyday drives & cards

SD, microSD, CF, USB, hard drive, SSD, external drive

The core recovery flow. If your storage is a card, a stick or a disk that still reads, start here.

All ordinary block storage, a phone’s memory card, a camera’s SD or CF card, a USB stick, an internal or external hard drive, an SSD or NVMe drive, is recovered by the same guided flow, because to the engine they are all just sectors to read. The differences are small and the app handles them for you.

Two strategies run together in smart mode: it parses the file system to bring files back with their original names and folders, and it carves by content to reconstruct files whose index is gone. You always get the maximum of both.

A floating cluster of storage devices
One flow reads them all — card, stick, disk.
Do
  • Work from an image for anything irreplaceable, then scan the image.
  • Save the recovered files to a different drive with room to spare.
  • Open a few recovered files before you trust the job is done.
  • Recover to a different physical drive, never to the source
  • Preview before exporting: the preview shows whether the file is whole
  • Where the volume is NTFS and the deletion is recent, expect original names and folder structure to survive
  • Work from an image for anything irreplaceable
  • Check the recovered photographs open before telling the customer the job is done
  • Keep the card until the customer has confirmed the result
  • Always run triage before deciding how to read the drive
  • If the drive is clicking or the triage reports it is unhealthy, image it before anything else
  • Never recover onto the drive being read
  • Set expectations before starting: a reinstalled drive is a partial recovery, not a complete one
  • Prioritise the file types the customer actually named
Don’t
  • Do NOT keep using the computer while you decide — downloads, updates and temp files overwrite what you are trying to get back.
  • Do NOT save recovered files onto the same drive; the pre-flight refuses it for this reason.
  • Do NOT run CHKDSK or 'repair' the drive first — it writes to the very drive you are recovering.
  • Do NOT keep using the computer while you think about it. Every download, update and temporary file can land on top of what you are trying to get back.
  • Do NOT save the recovered files onto the same drive. The pre-flight refuses it, and this is why.
  • Do NOT do a FULL format if you are asked again. A full format writes over every block and there is nothing left to find.
  • Do NOT let the camera or phone write anything new to the card.
  • Do NOT click Format. That is the one action that makes this harder.
  • Do NOT run CHKDSK. It writes its repairs onto the very structures somebody may need to read afterwards.
  • Do NOT run CHKDSK, or any other repair tool, a second time hoping it does better - each run writes to the very structures being read from here.
  • Do NOT format the drive because it "looks empty" - an index that comes back with nothing is not the same as a drive with nothing on it.

The steps, in order

We'll ask a few simple questions, then find your files. Your original drive is only ever read, never written to.

1Source2Options3Scan4Your files
  1. Stop using the drive

    safety

    Before anything else: unplug it, or stop saving to it. Every file written to a drive can land on top of the one you are trying to get back, and once that happens no tool can undo it. If the drive is the machine's own system disk, shut the machine down and read the drive from another computer.

    StandardUniversal first instruction in data recovery. R-Studio, UFS Explorer, Klennet and DMDE all lead with it.
  2. Is the drive healthy or is it failing?

    We read its SMART data and try a few sectors at both ends, because flash dies from one region outwards. This is the question that decides everything after it: a failing drive must be copied before it is scanned, because every extra hour of scanning is an hour it might not survive. For the full measured answer - the recoverable-or-not verdict, with the unreadable fraction as a range and a PDF report - run the quick check on the source step ('Can it be recovered?'), or `check` on the command line.

    StandardAssess before you act. The step every professional recovery workflow puts first and the one this product previously asked the user to guess at.
    recoveryantra list --triage
  3. What are you recovering from?

    Pick the kind of storage. This helps us read it the right way.

    USB / pen driveSD or memory cardHard disk (HDD)SSDCD / DVD / ISOA disk image fileRAID / NAS
  4. Make a copy first, or recover directly?

    If the health check found ANY unreadable sectors, copy first - we then work on the copy and the drive is read once instead of repeatedly. Recover directly only when the drive read cleanly and you are in a hurry.

    Image the drive first (safest)Recover directly
    StandardImage first, work from the image. ACPO principle 1 in forensics; standard practice in recovery.
    recoveryantra image --device <drive> -o <image.dd>
  5. Where should the recovered files be saved?

    safety

    Choose a folder on a DIFFERENT drive. We never save onto the drive you're recovering - that could overwrite the very files we're trying to get back.

  6. What happened / what do you want back?

    This focuses the VIEW, not the scan - we always recover everything, so you can widen it afterwards without scanning again.

    Files I deletedThe drive was formattedIt's corrupted / shows as RAWSpecific types (photos, documents, video)Everything
  7. Which device is it?

    Pick the exact drive from the list. Removable drives are shown; the drive this program runs from is disabled so you can't scan it by mistake.

  8. Ready to start?

    safety

    We'll show you the drive we'll read, the folder we'll write to, and the free space - then begin. Nothing is written to the source.

    recoveryantra recover --device <drive> -o <folder>
  9. Look at the files before you keep them

    Open a few before exporting. A file can come back with the right name and the right size and the wrong contents, if the space it used was reused after deletion - previewing is how you find that out while it still costs nothing.

    StandardPreview before recovery. Offered by every major recovery tool and the step this wizard omitted.
  10. Check what came back

    We confirm each exported file matches what we recovered, and tell you plainly about any we could not read whole. Files we know are wrong are marked, never quietly handed over.

    StandardVerify the output. In forensic mode this is a SHA-256 manifest; in recovery mode it is a readability and completeness check.
    recoveryantra recover ...

In the app

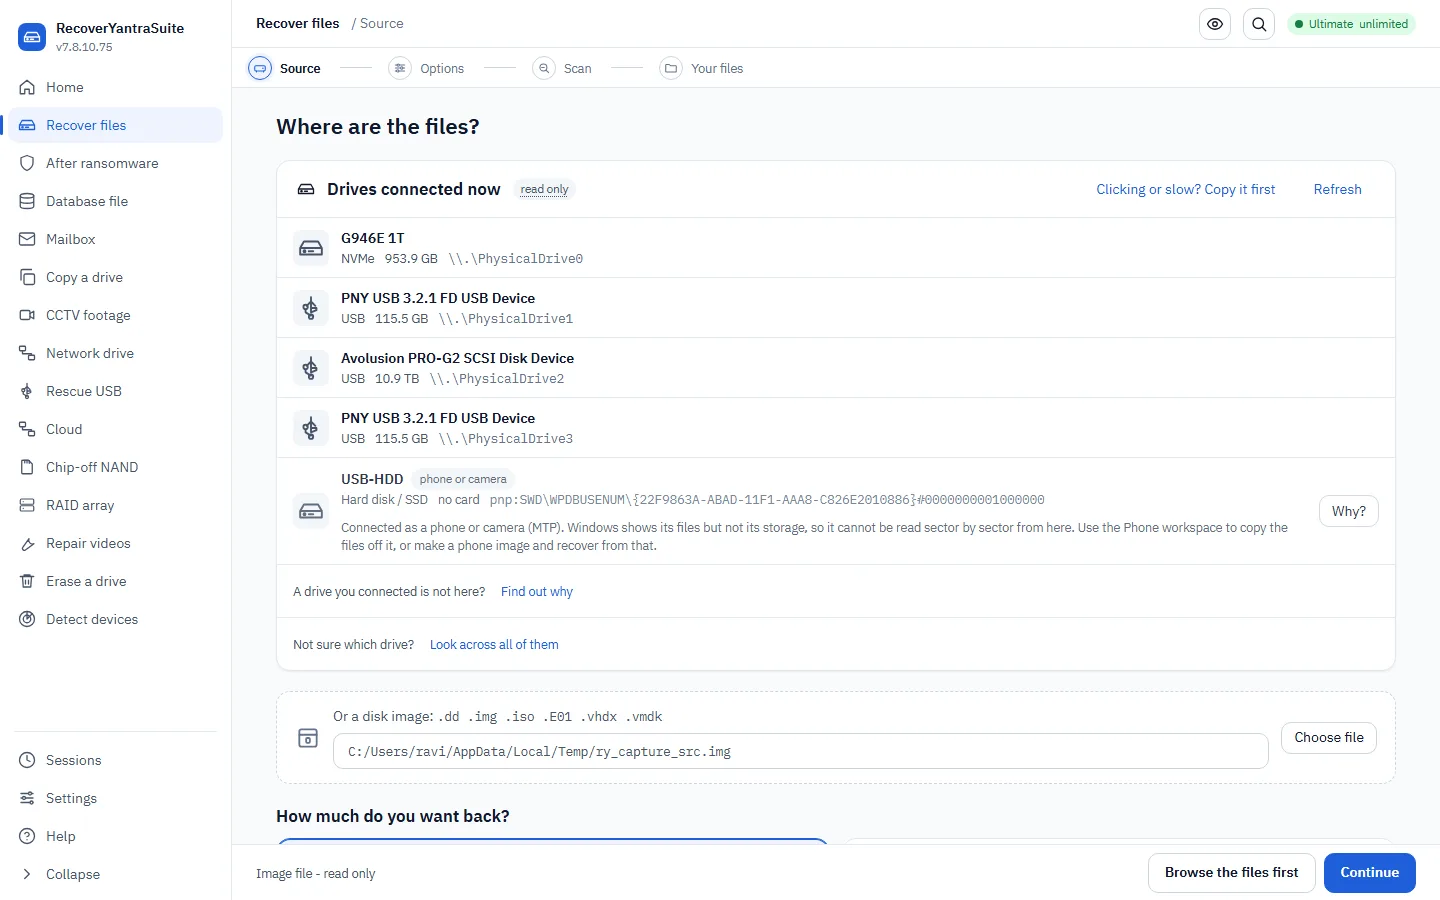
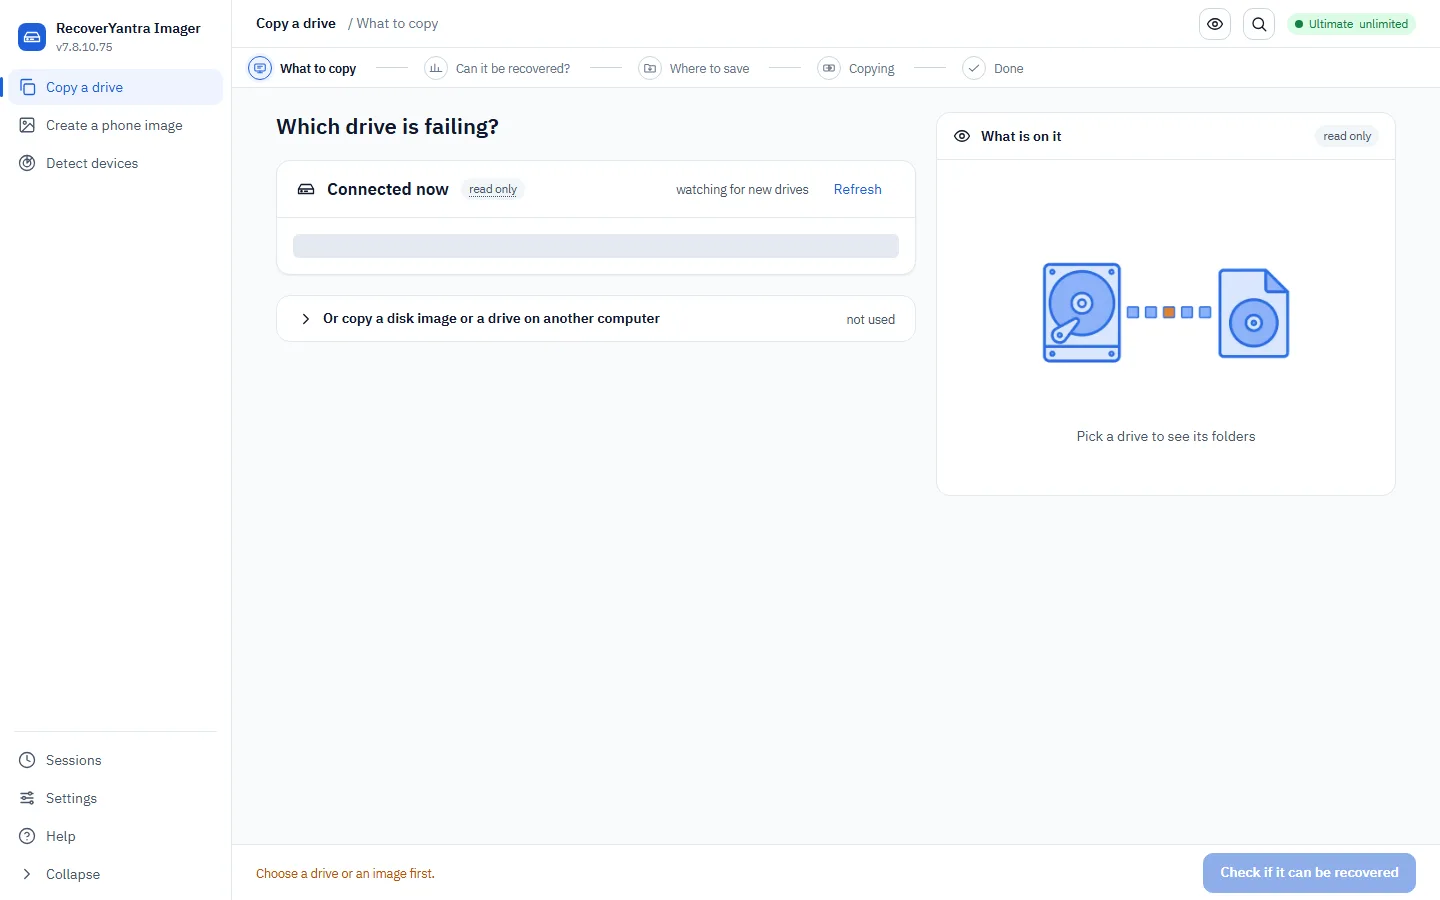
Step 1 &mdash; choose the source. Failing drives are steered to Copy first.
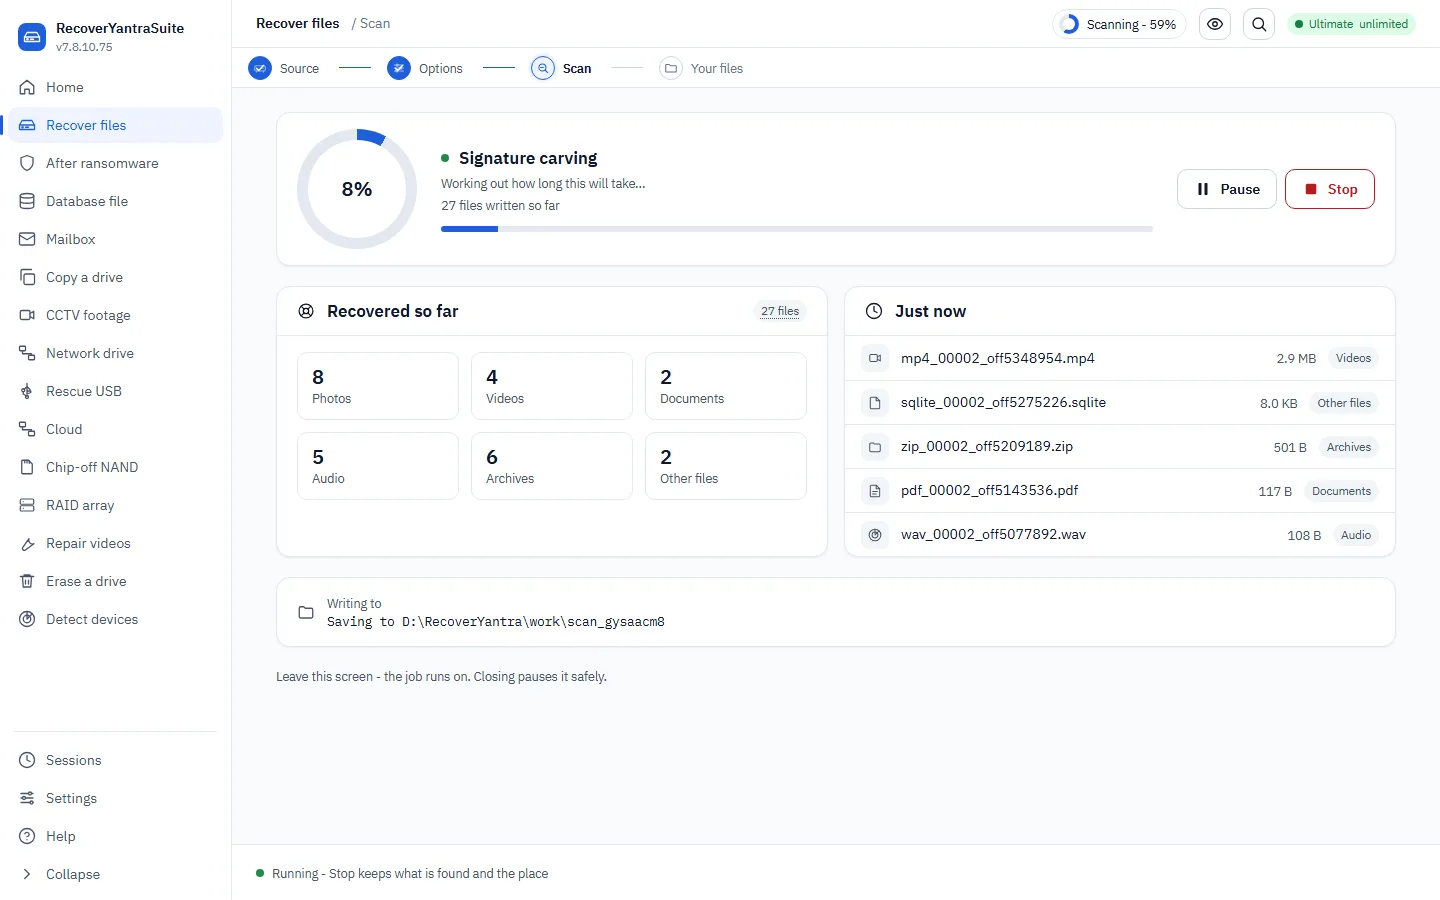
Step 3 &mdash; a live scan: real count, categories and the last finds.
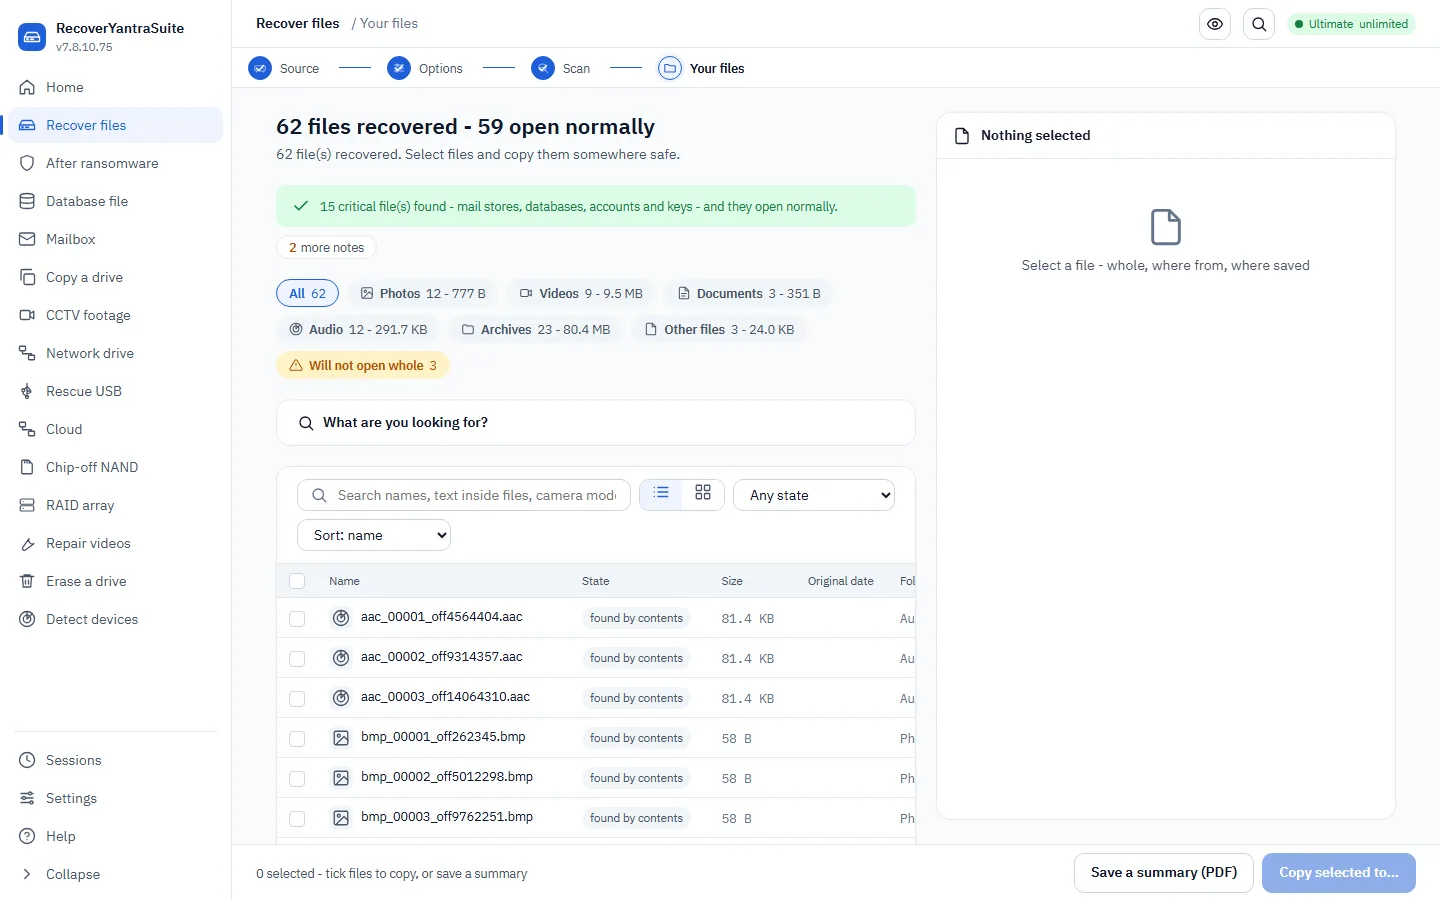
Step 4 &mdash; your files, with plain-language notes and filters.

In your words

“I deleted files and emptied the Recycle Bin”
What you see
  • The files are not in the Recycle Bin
  • The drive is otherwise working normally
  • It happened recently and little has been written since
Why it works

Deleting a file removes its directory entry, not its contents. The sooner you read the drive, the more of it is still there - and the first thing that matters is to stop writing to it.

Real example

A designer emptied the bin with 240 project files in it, noticed 20 minutes later, and unplugged the drive straight away. All 240 came back with their original names and folders, because nothing had been written over them in 20 minutes.

recoveryantra recover --device \\.\PhysicalDrive2 -o D:\RecoveredRead the drive, write the results somewhere else.
“I formatted the wrong drive”
What you see
  • Windows offered to format it and I said yes
  • The drive now shows as empty
  • It has the right capacity but no files
Why it works

A quick format writes a new, empty filing system over the old one. It does not erase the files themselves, so both routes are open: the old structures often survive, and anything they miss can be found by its contents.

Real example

A photographer formatted a 128 GB card in the wrong camera slot before a shoot. 3,180 raw files came back byte-exact, because a format had written a few megabytes of new filing system over 40 GB of untouched photographs.

recoveryantra recover --device \\.\PhysicalDrive3 -o E:\Cards --mode smartRead the old structures AND search by content, in one pass.
“Windows says the drive needs formatting, or shows it as RAW”
What you see
  • 'You need to format the disk before you can use it'
  • The drive shows 0 bytes, or the wrong size
  • It was working and now is not
Why it works

Usually one small structure has been damaged, not the data. Every filing system keeps a SECOND copy of what it cannot live without, and reading that spare copy often turns an unreadable drive back into a full list of files with their real names.

Real example

A wiped boot sector took a volume from 1 named file to 0. The backup boot sector, byte-identical, was sitting in the last sector of the same drive. Reading it gave back all 14,000 files with their names and folders.

recoveryantra recover --device \\.\PhysicalDrive2 -o D:\Out --mode smartFalls back to the spare copies when the primary structures will not parse.
“I ran CHKDSK and now files are missing, or the drive looks empty”
What you see
  • Windows offered to 'Scan and fix this drive' after an error, or you ran chkdsk /f yourself
  • The drive now looks like a normal, working volume - not RAW, not asking to be formatted
  • Folders that used to have files in them are empty, or the whole drive looks empty
Why it works

A repair tool can rewrite the index into something that still looks like a valid volume while pointing at the wrong place, so the drive stops asking to be formatted but also stops showing what it has. This reads the volume as it is now, and automatically tries the volume's own untouched spare copy of that index whenever the first read comes back essentially empty - nothing is written to get there.

Real example

A small business's 1 TB NTFS drive had chkdsk /f run on it after Explorer stopped showing the shared folder. Afterwards it mounted normally and reported the right free space, but recover came back with 0 named files. The volume's own backup boot sector, byte-identical and sitting in the last sector, was read instead: 4,180 files came back with their original names and folders, plus 6 fragments CHKDSK itself had already saved into FOUND.000.

recoveryantra recover --device \\.\PhysicalDrive2 -o D:\Recovered --mode fs --include-intactRead the volume as it stands now; the spare index copy is consulted automatically when the primary names almost nothing.
recoveryantra recover --device \\.\PhysicalDrive2 -o D:\Recovered --mode smart --include-intactAlso carve by content for anything neither copy of the index reaches.

Worked examples

Files deleted and the Recycle Bin emptiedeveryday

Files were deleted and the Recycle Bin emptied before anybody noticed they mattered. The volume is otherwise healthy and still in use, which is the part that decides the outcome.

  1. Stop using the drive holding the deleted filesDeleting a file releases its space. Anything written afterwards can land on it, and once that happens no tool recovers the contents.
  2. If the files are on the system drive, shut the machine down and read the disk from another machine, or work from an imageWindows writes to the system drive continuously, so a recovery run on the live system drive is racing the operating system.
  3. Scan in smart mode and review before exportingSmart mode parses the file system for original names and folders and carves free space for what the metadata no longer covers.
recoveryantra recover --device \\.\PhysicalDrive1 -o D:\RecoveredThe straightforward case: a healthy second drive, recovered to separate storage.
recoveryantra recover --image case.dd -o D:\Recovered --resumeContinue an overnight scan of a large drive without starting again.
Options that matter here
--modeLeave at smart. fs alone misses anything the file system no longer indexes, which is usually exactly what was deleted.
--include-intactAdd only if you also want the files that are still present. For a plain deletion the default is what you want.
--reportAdd when somebody other than you needs the result.
Honest limits
  • A file whose space has been reused is gone, and is reported as such rather than written out in a broken state
  • On an SSD, TRIM usually clears deleted data within minutes. The product detects this and says so rather than running a scan that cannot succeed
A memory card reports that it needs to be formattedeveryday

A camera, phone or card reader reports that the card must be formatted before it can be used. This usually means the file system header is damaged, not that the photographs are gone.

  1. Do not accept the format promptFormatting writes a new file system over the old one. The photographs usually survive it, but the names and folders often do not.
  2. Copy the card to an image first if it is failing or valuableA card that is producing read errors should be read once, not repeatedly.
  3. Scan the card or the image in smart modeThe file system header may be damaged while its backup copy is intact, in which case names and folders come back too.
recoveryantra recover --device \\.\PhysicalDrive2 -o D:\CardRecoveryRead the card directly when it is healthy.
recoveryantra image --device \\.\PhysicalDrive2 -o D:\card.dd --retries 1Image a card that is producing errors, with a low retry count.
recoveryantra recover --image D:\card.dd -o D:\CardRecovery --include-intactRecover everything from the image, present and deleted.
Options that matter here
--include-intactAdd it here. After a format the files were never deleted, so the deleted-only default will look almost empty.
--retriesLower it to 0 or 1 on a card that is deteriorating; each retry is another read of failing flash.
--modesmart. Card file systems keep a backup boot sector, which the product will fall back to automatically.
Honest limits
  • A card that is not detected at all by the operating system is a hardware fault, not a software case
  • Photographs the camera overwrote in normal use are gone
A USB stick or external drive shows as RAWeveryday

The drive appears in Windows but the volume has no recognised file system, so Windows reports it as RAW and offers to format it.

  1. Do not formatThe prompt means Windows cannot read the volume header. It is not a statement that the drive is empty.
  2. Run a triage firstIt reports whether the drive is healthy or failing, which decides between reading it directly and imaging it.
  3. Scan with intact files includedNothing was deleted here. The volume cannot be mounted, so the deleted-only default would return almost nothing.
recoveryantra list --triageCheck the drive's health and how it is connected.
recoveryantra recover --device \\.\PhysicalDrive2 -o D:\Out --include-intactRecover the whole volume, not only deleted files.
Options that matter here
--include-intactRequired for this case. Without it the result looks almost empty and the customer concludes nothing survived.
--modesmart. The file system may be recoverable from its backup copy, which returns names and folders.
--sector-sizeChange from 512 only for a 4K-native drive, where leaving it wrong prevents the volume being found at all.
Honest limits
  • A drive that does not appear at all is a hardware fault
  • If the volume was overwritten by a new file system and then used, the overwritten regions are gone
Windows was reinstalled over the dataeveryday

A machine was reinstalled or reset and the previous user's documents were not moved off first. Some of the old data is usually still in the space the new installation has not yet used.

  1. Stop using the machine immediatelyA fresh Windows installation writes continuously. Every hour of use reduces what is left.
  2. Read the disk from another machineRecovering the system drive while Windows runs on it is racing the operating system for the same free space. Take the disk out, or image it from a second machine.
  3. Scan in smart mode to a separate driveDocuments and photographs carve well even when the old file system has been replaced.
recoveryantra image --device \\.\PhysicalDrive0 -o E:\old-system.dd --retries 1Image the old disk once from a second machine, then work from the image.
recoveryantra recover --image E:\old-system.dd -o E:\Recovered --include-intactRecover everything the reinstall has not yet overwritten.
Options that matter here
--include-intactAdd it. The old files were not deleted; their file system entries were replaced.
--modesmart, then carve if the first pass returns little. A replaced file system means names are often gone but content is not.
--workersLeave at 0 so the carve uses the available cores.
Honest limits
  • Anything the new installation has written over is gone
  • Original folder structure is usually lost when the file system is replaced; files come back by type
Options & why, every switch, in plain words
--devicerecover
Recover directly from the attached drive when it is healthy, the job is not evidential, and time matters.
Cost / when: If the drive is failing, image it first. A direct scan reads the whole surface and can be the read that finishes a dying drive.
--imagerecover
The default choice for anything evidential, anything failing, and anything where the original must be returned untouched.
--ios-backuprecover
Point at an iTunes or Finder backup folder when the handset itself is unavailable, locked, or must not be touched.
--slabmaprecover
Reassemble a Storage Spaces virtual disk from member images and recover from the assembled volume.
-orecover
Always a separate drive from the source. The product refuses a destination on the drive being read.
--moderecover
Leave at smart. It parses the file system for original names and folders AND carves free space for what the metadata no longer covers. Use fs when you want named files quickly from an intact file system; use carve on formatted or badly damaged media where the metadata is gone.
Cost / when: fs alone misses everything the file system no longer indexes. carve alone returns files without their original names or folders. smart is what maximises the result.
--resumerecover
Continue a scan that was stopped, on the same source into the same output folder. A large drive is an overnight job and does not need to be restarted.
Cost / when: The checkpoint belongs to the DRIVE, not the path. A different disk in the same slot restarts from the beginning, with the reason stated.
--include-intactrecover
Add whenever the loss is a volume rather than a deletion: a reformatted disk, a RAW volume, a failed array. In those cases the files were never deleted and the default deleted-only view will look almost empty.
Cost / when: It substantially increases the output size, because it recovers everything present as well as everything deleted.
--listrecover
Look before you scan. Reads the filesystem index only and prints the folder tree - live and deleted files, deleted ones marked - in seconds, writing nothing. Use it first on any drive whose index is intact: it tells you whether the folder the customer wants is still named, so you can recover that alone with --only instead of reading the whole drive.
Cost / when: Free, and needs no licence. What it cannot show is anything whose index entry is gone - a formatted card, a wiped table - which still needs the full scan.
--onlyrecover
Recover one folder or file rather than everything: the customer wants the Documents folder, not four hours and a terabyte of working folder. Repeat the switch for several paths; a folder path takes everything under it, and 1:/Folder/ names the folder on partition 1 only. Paths are the volume's own, as --list prints them.
Cost / when: Implies --mode fs and --include-intact. Every content check, the manifest and the organising run exactly as in a full scan; a use is still charged for the drive.
--enginerecover
Leave at native. Select photorec only to cross-check a result with a second implementation, which is occasionally useful in a disputed matter.
Cost / when: The external engine must be installed separately and does not carry this product's validation or its verdicts.
--workersrecover
Leave at 0 so the carve uses the available cores. Set 1 when you need the machine responsive for other work, or when reproducing a result exactly for a report.
Cost / when: Output is byte-identical either way; only the time changes. Below about 128 MB the product stays single-threaded because process start-up costs more than it saves.
--sector-sizerecover
Change from 512 only for 4K-native drives, where the wrong value prevents the volume being recognised.
--passwordrecover
Supply the BitLocker recovery password, LUKS passphrase or hex key for an encrypted volume.
Cost / when: Without the correct credential the volume cannot be read by anyone. The product states that rather than returning fragments. The credential is not retained for a later resume.
--forcerecover
Only when you have read the pre-flight objection and established that it is wrong for your situation.
Cost / when: The two objections it can override are both serious: too little room means the scan stops part way, and writing onto the drive being recovered overwrites the data you are trying to get back.
--reportrecover
Generate the report at the end of the scan whenever the result goes to somebody else: a client, an insurer, or a case file.
--profilerecover
Override the saved mode for this one run, for example a single evidential job on a bench normally used for commercial recovery.
Cost / when: Setting it per run avoids the more common error, which is leaving a bench in forensic mode and hashing every file on high-volume commercial work.
--apfs-snapshotsrecover
Run first on any Mac volume. Snapshots are point-in-time views that often still hold the file as it was before it was deleted or overwritten.
--apfs-snapshotrecover
Recover from the named snapshot. Where the file exists in a snapshot, this returns it byte-exact and is far better than carving for it.
--vss-listrecover
Run first on any Windows volume, and always in a ransomware incident. Shadow copies hold previous versions from before the deletion or the encryption.
--vss-snapshotrecover
Reconstruct the volume as it was at that snapshot and recover from it. This is frequently the fastest complete recovery available.
Everyday drives & cards

Browse first, take only the files you need

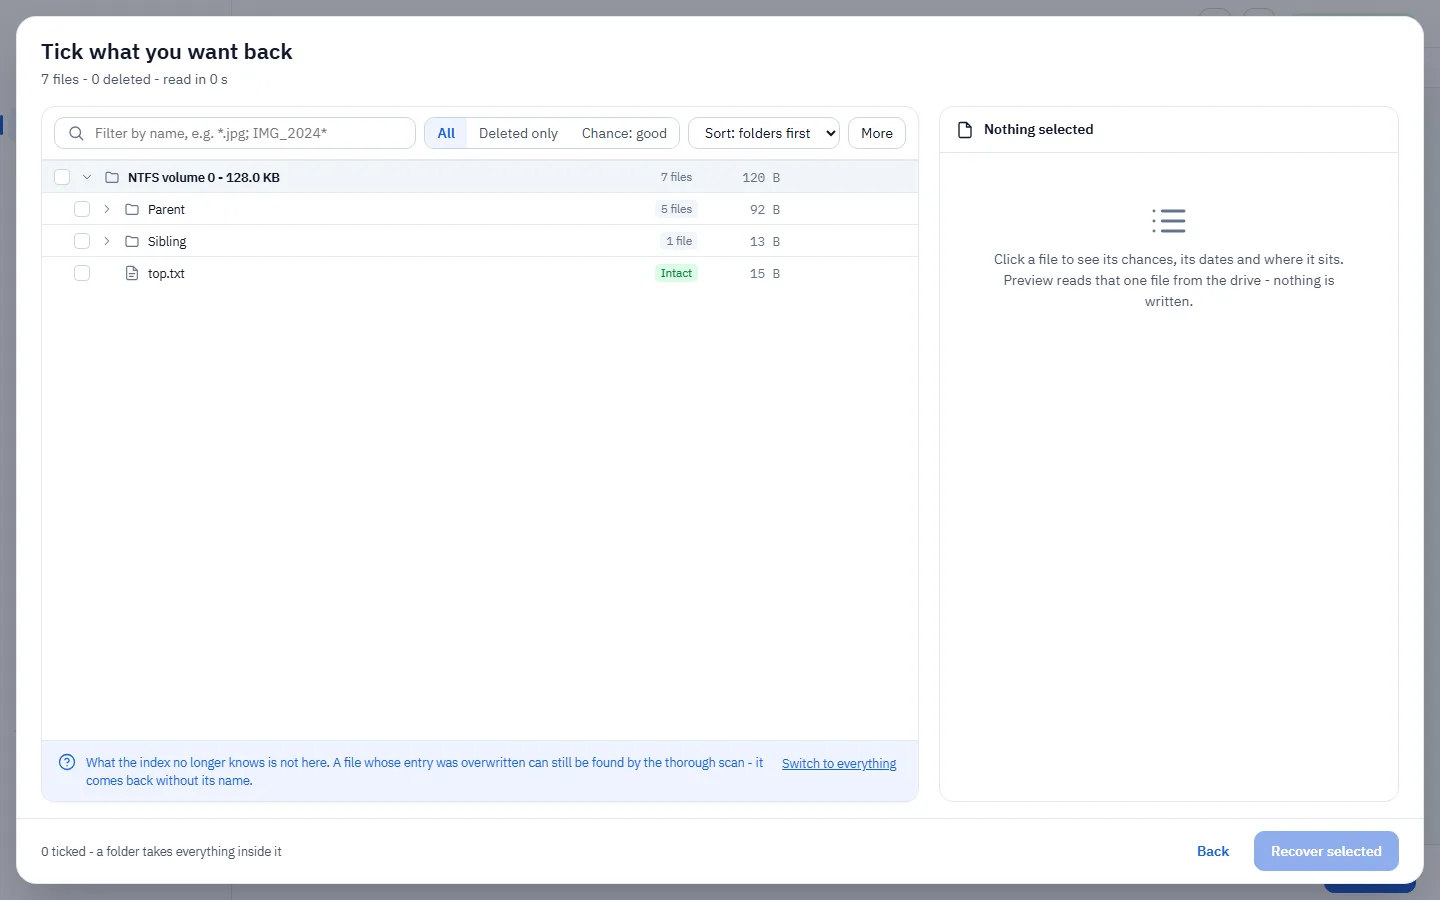
Read the drive’s index in seconds and tick one folder, instead of scanning the whole disk for hours.

You do not always want everything. The app can read the drive’s own folder index in seconds and show it as a tree, deleted entries marked, each with an honest recovery chance, and write out only what you tick. One folder off a 1 TB drive takes seconds and a little space, not hours and a working folder the size of the disk.

This is free and needs no licence to look. It cannot show what the index has truly lost (a formatted card, a wiped table), that still needs the full scan above.

Do
  • Use Browse first when you know roughly where the files are.
  • Read the recovery-chance column before you commit &mdash; it is measured, not guessed.
Don’t
  • Do NOT assume a ticked folder pulls in nothing else &mdash; a ticked folder covers everything under it.
  • Do NOT rely on Browse alone after a format; the lost index needs a full scan.

The steps, in order

See what is on the drive in seconds, tick the files or folders you want, and recover only those - instead of waiting for the whole drive and picking afterwards.

The tree is a modal reached from the Source step ('Browse files first'), not a panel of its own - ticking and recovering happen in the same dialog.

  1. See what is on the drive

    We read the index - the filesystem's own record of names and folders, deleted entries marked - without touching any file's contents. Seconds, and free.

    StandardBrowse before recovering. R-Studio and DMDE both read the index first and let you choose.
    recoveryantra recover --list --device <drive>
  2. Tick what you want back

    A ticked folder covers everything under it. Find by name, modified date or minimum size; deleted entries carry their recovery chances so you know before you commit.

  3. Where should the recovered files be saved?

    safety

    A folder on a different drive. Only the ticked files are read and written - the destination never holds more than that.

  4. Recover the selection

    safety

    Only what is ticked is read from the source and written out, under its own folder path rather than sorted by type.

    recoveryantra recover --only <path> --device <drive> -o <folder>
  5. Check what came back

    The same completeness check a full recovery gets, scoped to the files you actually asked for.

In the app

The drive&rsquo;s folder tree: tick boxes, deleted marks, and a recovery-chance column.
Options & why, every switch, in plain words
--include-intactrecover
Add whenever the loss is a volume rather than a deletion: a reformatted disk, a RAW volume, a failed array. In those cases the files were never deleted and the default deleted-only view will look almost empty.
Cost / when: It substantially increases the output size, because it recovers everything present as well as everything deleted.
--listrecover
Look before you scan. Reads the filesystem index only and prints the folder tree - live and deleted files, deleted ones marked - in seconds, writing nothing. Use it first on any drive whose index is intact: it tells you whether the folder the customer wants is still named, so you can recover that alone with --only instead of reading the whole drive.
Cost / when: Free, and needs no licence. What it cannot show is anything whose index entry is gone - a formatted card, a wiped table - which still needs the full scan.
--onlyrecover
Recover one folder or file rather than everything: the customer wants the Documents folder, not four hours and a terabyte of working folder. Repeat the switch for several paths; a folder path takes everything under it, and 1:/Folder/ names the folder on partition 1 only. Paths are the volume's own, as --list prints them.
Cost / when: Implies --mode fs and --include-intact. Every content check, the manifest and the organising run exactly as in a full scan; a use is still charged for the drive.
Everyday drives & cards

Find the right drive, find the right file, compare two scans

Before and after the recovery: find the drive that holds the data, and find the one file among thousands.

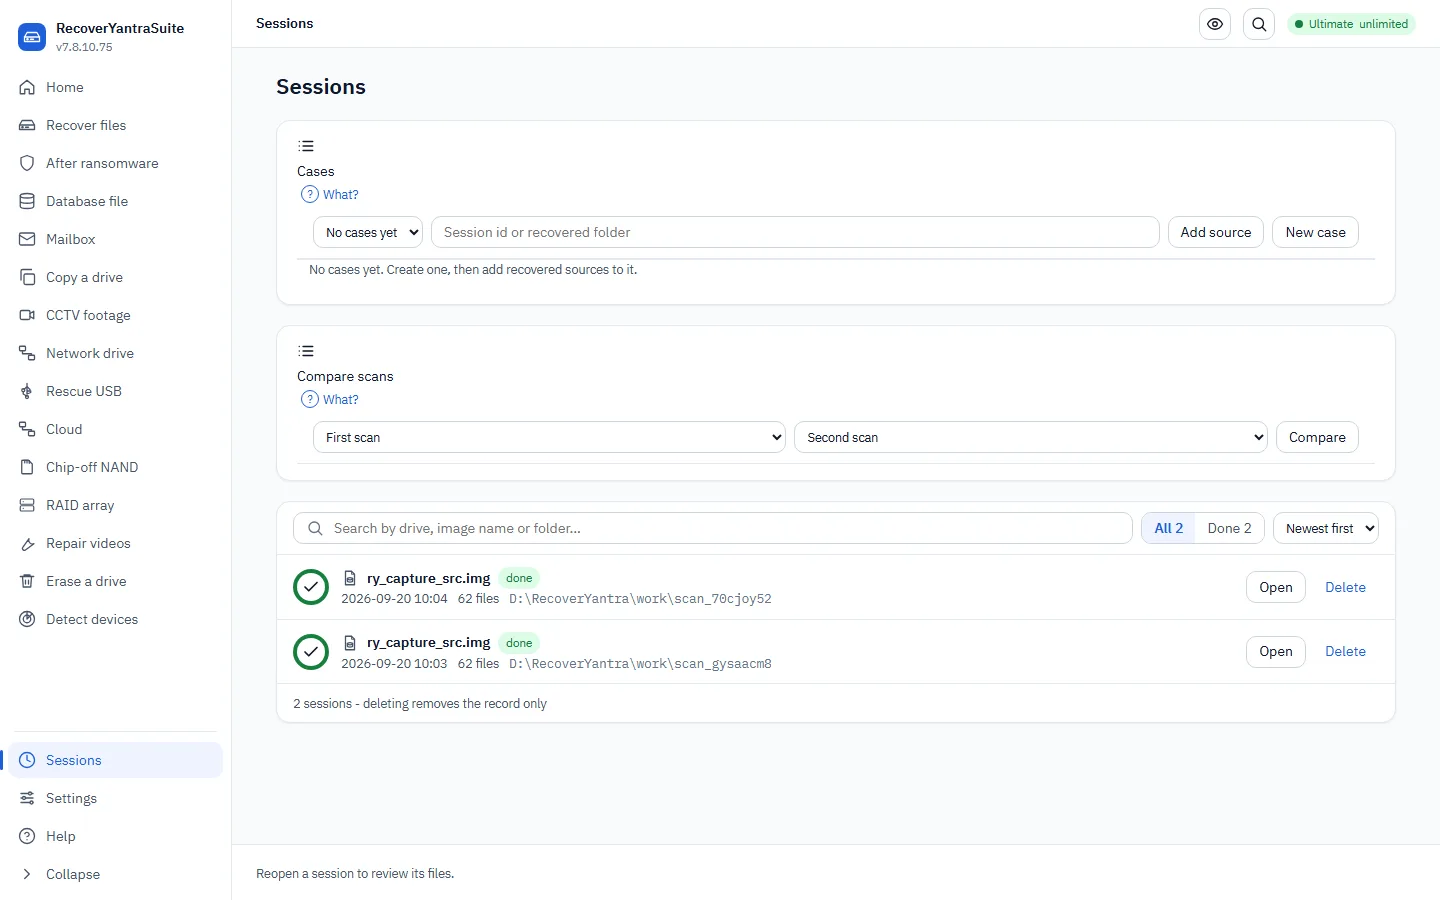
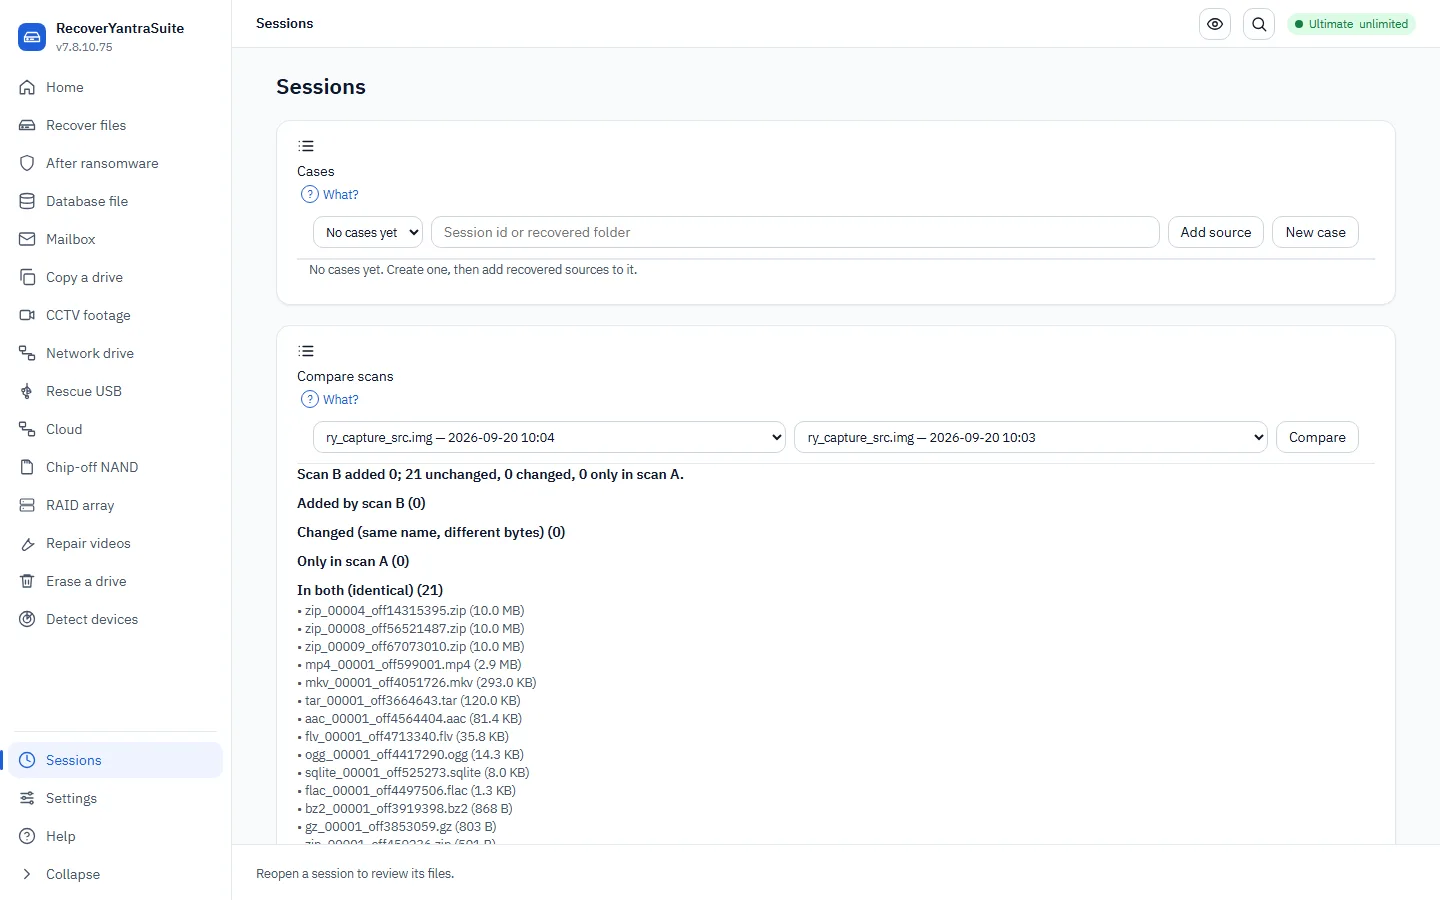
Two small helpers save a lot of time. Which drive has it narrows down which of several disks to scan. Find my file searches the recovered set by name, type, date or content once the scan is done. And Compare puts two scans of the same source side by side, so a second, deeper pass shows exactly what it added.

Do
  • Save the scan as a session so you can resume or compare it later.
  • Use Find my file rather than scrolling &mdash; it searches names, types and content.
Don’t
  • Do NOT re-scan a healthy drive just to compare &mdash; open the saved session instead.
  • Do NOT compare scans of two different drives; compare is for the same source over time.
  • Do NOT run a full scan on every attached drive in turn hoping to get lucky - each full scan can take hours and spends a use per source under the licence, while reading the index alone is free and takes seconds.
  • Do NOT judge a drive by its letter or its size alone. Two drives of a similar size look identical from the outside; only the index by name tells them apart.
  • Do NOT re-scan the drive narrowed to one file type to "search faster" - the product always recovers everything up front for exactly this reason, and a second scan costs another use under the licence for no benefit.
  • Do NOT open the first file that looks close and assume it is right - check the trust grade shown beside it first; a mismatched or empty file wastes the one look you get before you notice it is wrong.

The steps, in order

You already have your files back. This narrows the results down to the one you actually came for, using the three things you can usually answer even when you cannot remember the filename: roughly when, roughly what kind, and roughly what it was called.

This narrows the results screen you already have open - it is a filter on one grid, not a separate procedure with stages of its own, so there is no rail.

  1. Roughly when did you last see it?

    A date range is enough - a month, or just a year. We match it against whichever date survived on each file (created, modified or last accessed); a file that kept none of its dates cannot be matched this way and is left for the other two questions to find.

  2. Roughly what kind of file was it?

    Photo, video, audio, document or archive - the same groups the results screen already sorts everything into, so narrowing here never excludes a format quietly.

    PhotoVideoAudioDocumentArchiveNot sure / everything
  3. Roughly what was it called?

    A part of the filename is enough - "tax", "IMG_2021", "invoice". This matches the name only, not what is inside the file.

  4. See the matches

    Every match is shown with the trust grade already worked out for it - a file whose contents do not match its name, or that came back empty, is marked so before you open it rather than after.

    StandardNo surveyed data-recovery competitor documents this last step at all - they report a count and offer a preview.
    recoveryantra search <recovery_dir> "<part of the name>" --category <kind>

In the app

Saved and resumable scans, and the compare picker.
Two scans of one source, differenced.

In your words

“I don't know which of my drives has the data”
What you see
  • An external drive, an old laptop disk in a caddy and a couple of USB sticks are all attached at once
  • You can describe the file - a name, roughly when it was made - but not which drive it is on
  • Guessing wrong costs a full scan of a drive the file was never on
Why it works

A filesystem index reads in seconds and needs no licence; run over every USABLE attached drive it answers the question that comes BEFORE "recover from which drive" - the one the product otherwise assumes you can already answer. Each drive is only read once for its listing, so checking four candidates costs a couple of minutes total instead of committing hours, and a use of the licence, to the wrong one first.

Real example

A customer had one photo, 'IMG_2019_beach.jpg', somewhere across a 4 TB external drive, a 500 GB laptop disk pulled into a USB caddy, and two 64 GB USB sticks. Listing each drive's index by name took under two minutes combined and found the file on the third of the four, sparing three full scans - each of which would have taken hours - of drives it was never on.

recoveryantra list --triageSee every attached drive first, with its state and why any of them is not usable, before searching a single one.
recoveryantra recover --image \\.\PhysicalDrive2 --listRead one drive's index by name - the free, licence-free first look this situation is built on. Repeat for each candidate drive until the name turns up; a single sweep across every listed drive at once is the same engine call, one drive at a time.
“The recovery finished but which of these is the one I actually wanted”
What you see
  • A finished recovery with tens or hundreds of thousands of files on screen
  • You remember roughly when it was, roughly what kind of file, and part of the name - not the exact path
  • The results grid is too big to scroll through by eye
Why it works

The scan already recovered everything (the product never narrows a scan up front), so this is a filter on the results you already have, not another pass over the drive. It answers with the three things a customer can actually say - roughly when, roughly what kind, roughly what it was called - and shows RC1's trust grade (good / mismatch / empty / unknown) beside every match, so you are never sent to open a file that will not.

Real example

A customer recovered 229,104 files off a formatted 128 GB card and could not find the one photo of a 2021 receipt they needed for a tax return. Filtering to "2021", category Document, name containing "receipt" cut the grid from 229,104 to 7 matches in under a second, one marked mismatch and skipped.

recoveryantra search <recovery_dir> "receipt" --category documentFilter by category and part of the name; the date range narrows further on the results screen.
A drive in trouble

A failing, clicking or very slow drive, copy it first

The single most important choice with a dying drive: image it once, then recover from the calm copy.

A drive that clicks, is very slow, or throws read errors is dying, and every extra hour of scanning is an hour it might not survive. The Imager first checks the drive and tells you plainly whether recovery is realistic, with numbers and a PDF report, then makes a gentle, multi-pass copy that skips bad areas and retries them softly, keeping a map of what could not be read. You then recover from the copy, and the real drive is read once instead of a dozen times.

RecoverYantra Imager does this and is free, checking, copying and browsing cost nothing, so anyone can find out whether a drive is worth sending to a lab.

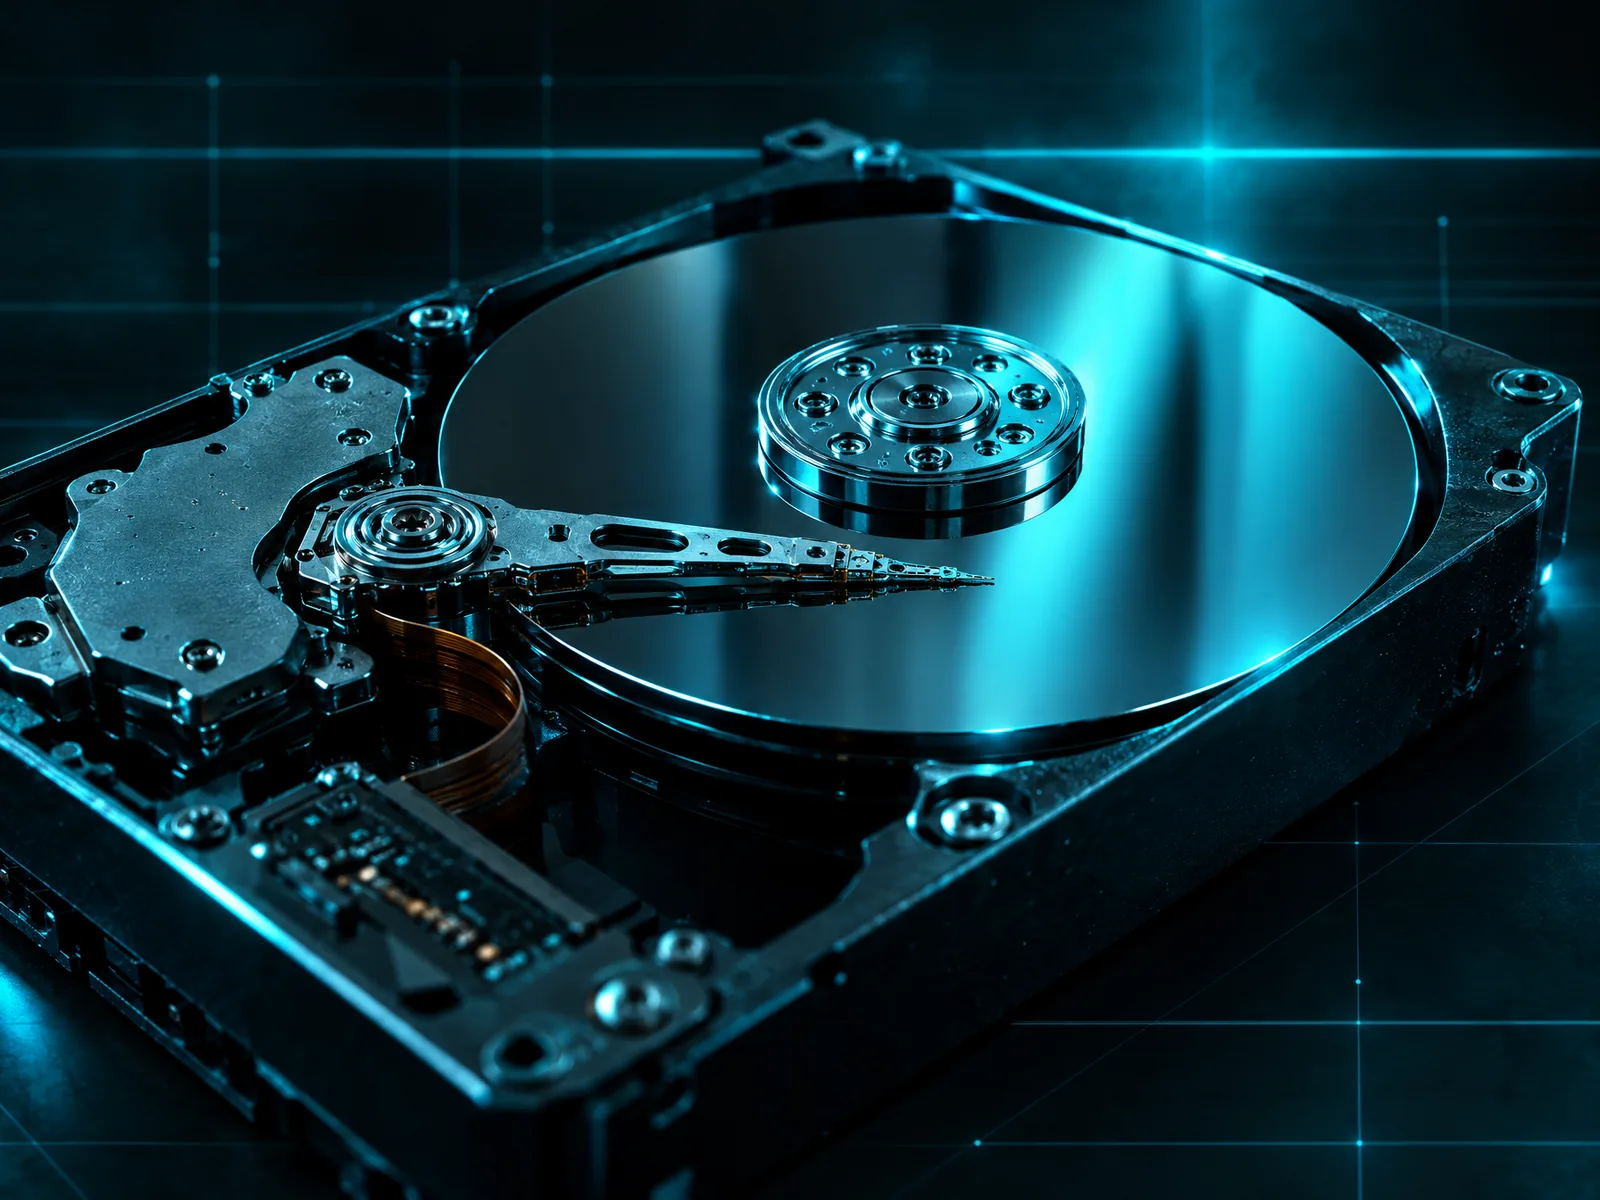
An opened hard drive with its platter exposed
A failing disk is copied gently, once &mdash; not scanned to death.
Do
  • Image the drive first, then scan the image &mdash; never the drive repeatedly.
  • Choose E01 if a lab will open it; it is already compressed.
  • Stop and let the drive rest if it is getting hot or slower.
  • Recognise a mechanical fault and stop, rather than proving it with one more attempt
  • If imaging is attempted at all, image once, with retries low, and work from the image afterwards
  • Decide the retry policy before the first read
  • Keep the skip map: it tells you which recovered files sit over unreadable regions
  • Return the original to the client as soon as the image is verified
  • Image before experimenting, always
  • Judge an assembly by opening files of several types, never by the fact that a volume appeared
  • Write down each combination tried and the result, or you will repeat them
Don’t
  • Do NOT scan a failing drive directly &mdash; a full-surface scan can be the read that finishes it.
  • Do NOT retry bad sectors hard on flash; lower the retry count.
  • Do NOT keep re-imaging from byte zero &mdash; resume the copy so a dying drive is read once.
  • Do NOT run a normal scan first. A scan reads the whole surface repeatedly and can be the thing that finishes the drive off.
  • Do NOT run CHKDSK or a repair tool. They WRITE to a drive that is already failing.
  • Do NOT keep power-cycling it hoping it will behave.

The steps, in order

First we CHECK the drive and tell you plainly whether recovery is realistic. Then we make a faithful copy - gently, so a failing drive isn't stressed - and you recover from the copy.

1What to copy2Can it be recovered?3Where to save4Copying5Done
  1. What do you want to copy?

    A drive, a phone, or an existing image file. Phones have their own guided steps.

  2. Can it be recovered?

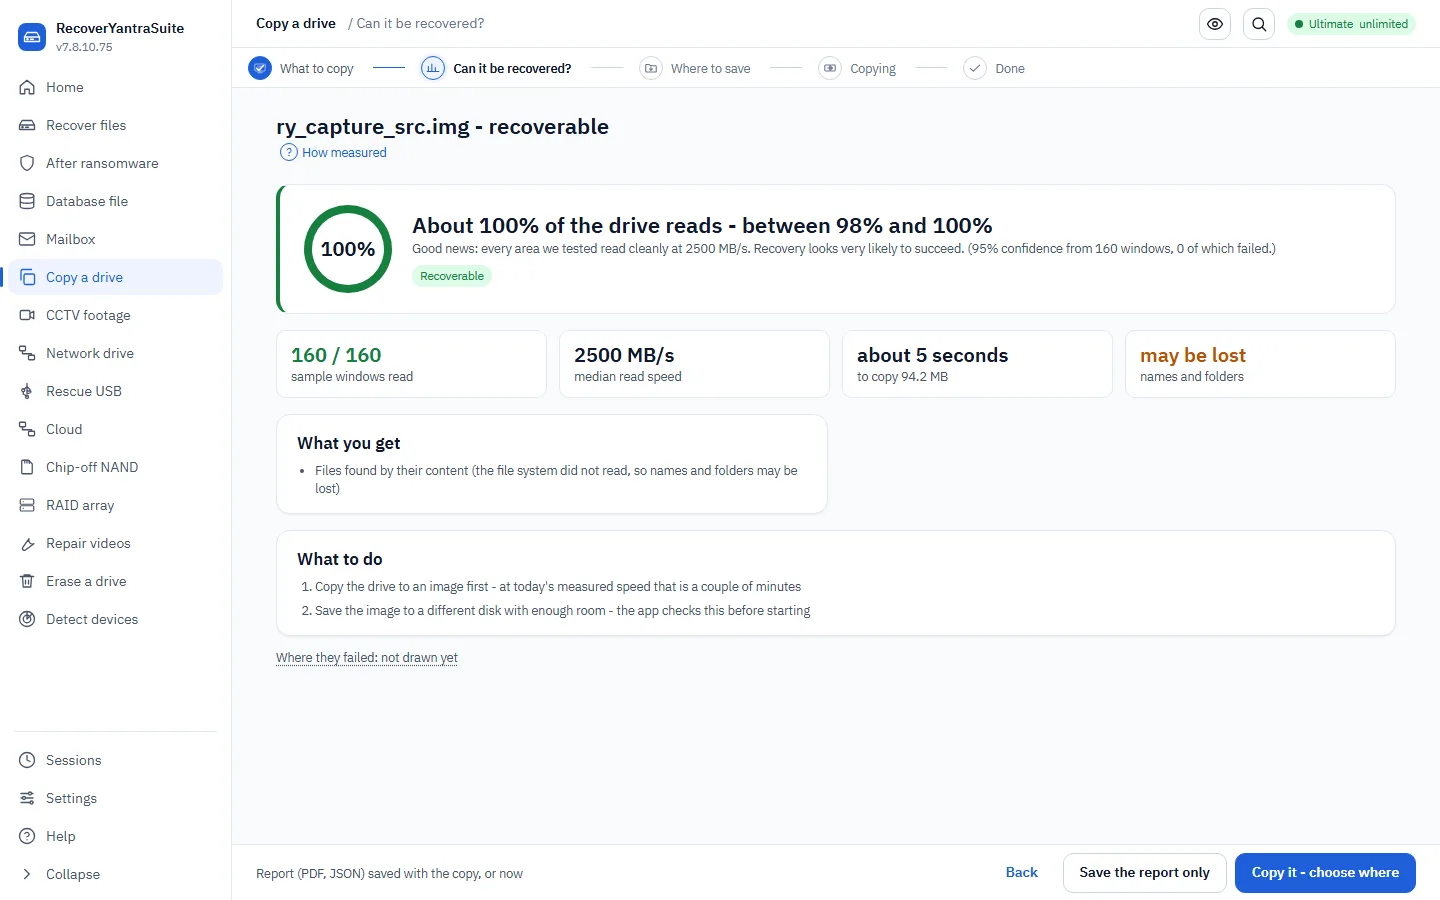
    Before any copying, we test areas right across the drive and tell you the chances: how much is unreadable, what you can expect back, and what cannot come back. You get the answer as a PDF report you can keep or send to us.

    StandardAssess before you act - the step every professional recovery workflow puts first.
    recoveryantra check --device <drive> --pdf report.pdf
  3. Where to save the image?

    safety

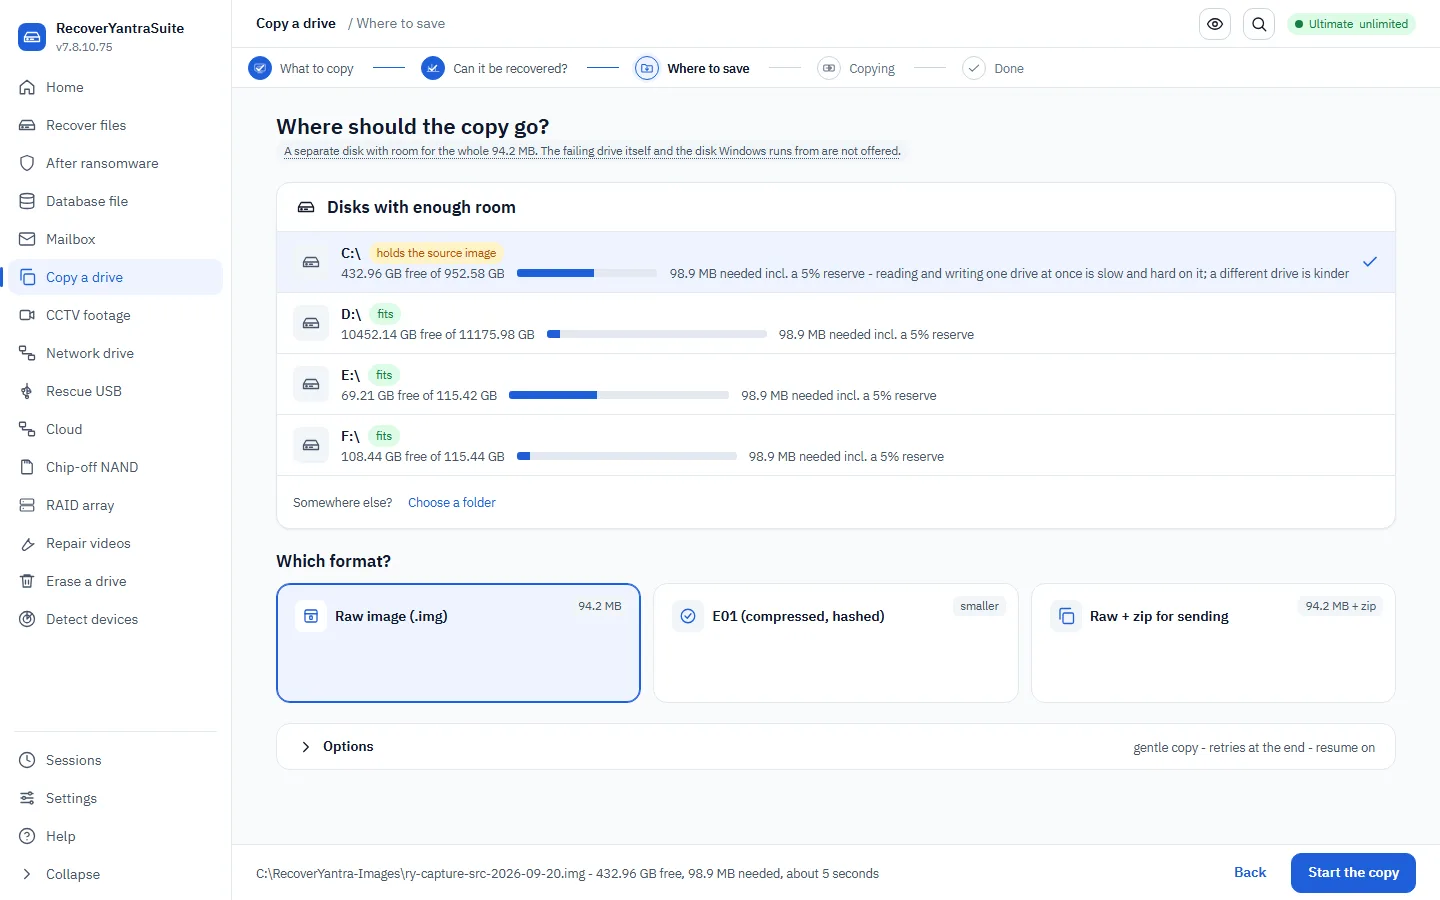
    A separate drive with room for the whole source - the app lists your drives with their free space and refuses the drive being copied. Choose raw (.img) or E01, the compressed format recovery labs open directly.

  4. Start the copy?

    safety

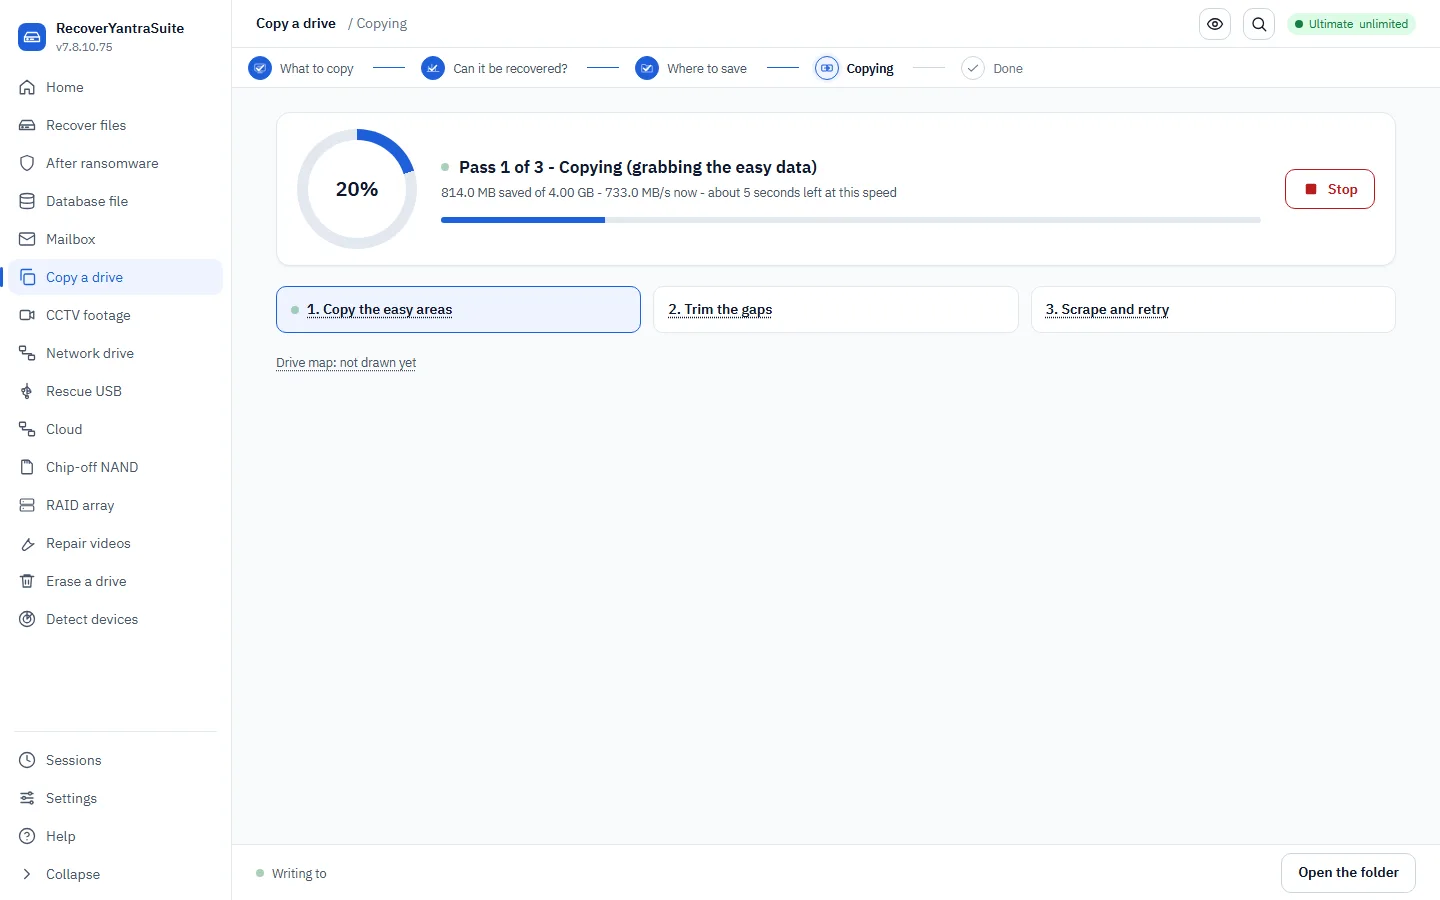
    We copy in passes, skipping bad areas first and retrying them gently, and keep a map of what couldn't be read. You can stop at any time and continue later.

  5. Sending it to a lab?

    An E01 is already compressed - hand it over as it is. A raw image can be zipped here; any lab can open a zip.

In the app

The feasibility verdict &mdash; measured numbers, not a guess.
A separate destination is forced, with real free space shown.
A real copy in flight: saved bytes, speed, unreadable-so-far, Stop.

In your words

“The drive is clicking, or very slow, or gives read errors”
What you see
  • A repeated click, beep or grinding
  • The computer freezes when it is plugged in
  • Copying starts and then stalls
Why it works

A dying drive has a limited number of reads left in it. Imaging takes the easy data FIRST and only then returns to the difficult areas, so you get the most out of it before it stops - and every scan afterwards runs against the copy, not the patient.

Real example

A 2 TB drive with a clicking head was imaged over 11 hours: 99.96% copied, 840 MB unreadable in 4 regions. It failed completely 2 days later. Everything recovered afterwards came out of that image, which would not have existed if the first move had been a scan.

recoveryantra list --triageCheck the drive's health before you touch it.
recoveryantra image --device \\.\PhysicalDrive2 -o D:\failing.dd --retries 1Copy it gently: few retries, easy data first.

Worked examples

An external drive was dropped and is now clickingeveryday

A drive has suffered physical trauma and is making mechanical noise. This is the case where using the wrong approach destroys the data permanently.

  1. Power the drive down and stop tryingA clicking drive is a head or actuator fault. Every additional power cycle risks the heads contacting the platter.
  2. Do not run a recovery scan against itA scan reads the whole surface. On a mechanically failing drive that is the read that finishes it.
  3. Send it to a cleanroomThis is not a software case, and the product will say so.
recoveryantra list --triageConfirms the condition and the device class. Keep it brief.
recoveryantra image --device \\.\PhysicalDrive2 -o D:\drive.dd --retries 0ONLY if the drive is reading and the decision has been taken to attempt a single gentle pass. Not for a clicking drive.
Options that matter here
--retries0 or 1 for a deteriorating drive. High retry counts on a failing surface cost you the areas not yet reached.
--formatraw for speed on a marginal drive; convert to E01 later from the image if the matter needs it.
Honest limits
  • No software opens a physically failed drive. A drive that will not spin, or is not detected, needs a cleanroom and donor parts
  • Imaging a drive with a head fault can convert a recoverable case into an unrecoverable one
A client's drive is failing and every read is a riskbench

The drive still reads but is deteriorating. The decision that matters is made in the first ten minutes: read it once, carefully, and work from the copy.

  1. Triage briefly, then stop reading the driveTriage establishes the condition. It is not a scan and should not become one.
  2. Image once, with a retry policy chosen in advanceEvery retry is another read of a failing surface. Decide the policy before starting, not while watching it.
  3. Do all the recovery work against the imageThe original goes back to the client having been read once.
recoveryantra list --triageEstablish condition, bus and device class.
recoveryantra image --device \\.\PhysicalDrive2 -o E:\client\drive.dd --retries 1One careful pass, with bad regions skipped and logged.
recoveryantra recover --image E:\client\drive.dd -o E:\client\Out --include-intact --reportRecover from the image, not the hardware.
Options that matter here
--retriesLow on a deteriorating drive. High retry counts can cost you the areas the imaging has not reached yet.
--formatraw is faster on a marginal drive; convert later if the matter needs an evidence container.
--forceOnly after reading the objection. It can override a same-drive destination, which would overwrite the data.
Honest limits
  • A drive that is mechanically failing needs a cleanroom, and imaging it can finish it
  • Regions that could not be read are absent from the image, and files over them are incomplete
Loose disks have arrived from an array nobody documentedbench

A set of disks has arrived with no controller, no documentation and no agreed order. The order and geometry have to be established before anything can be read.

  1. Image every disk firstEverything after this is trial and error, and it must be done against copies.
  2. Try automatic detection before assuming anythingLinux md, Intel RST, Synology SHR and Windows dynamic disks all write their layout onto the members.
  3. Where the metadata is gone, test geometries and judge by the filesA correct assembly produces files that open. A wrong one produces a volume that mounts and returns rubbish.
recoveryantra image --device \\.\PhysicalDrive3 -o E:\arr\d3.ddImage each disk, labelled with the bay it came from.
recoveryantra raid --members E:\arr\d1.dd E:\arr\d2.dd E:\arr\d3.dd --auto -o E:\Out --include-intactLet the members' own metadata supply the geometry.
recoveryantra raid --members E:\arr\d1.dd E:\arr\d2.dd E:\arr\d3.dd --level 5 --chunk 131072 --layout left-symmetric -o E:\Out --include-intactTest a stated geometry when the metadata is absent.
recoveryantra raid --members E:\arr\d1.dd E:\arr\d2.dd --list-volumesOn Windows dynamic disks, list the volumes the set carries.
Options that matter here
--autoAlways try first.
--chunkThe variable most worth testing systematically. A wrong value mounts and returns corrupt files.
--layoutOnly change for an array documented as non-standard.
--list-volumesWindows dynamic disks can carry several volumes on one set of disks.
Honest limits
  • An array missing more members than its level tolerates cannot be assembled
  • A member that was partially rebuilt with wrong data will contribute that wrong data
Options & why, every switch, in plain words
--deviceimage
Image the drive first whenever it is failing, whenever the original must go back to the client untouched, or whenever the matter may be produced. Every later step runs against the image.
Cost / when: Imaging reads the whole drive once. On a drive that is actively dying that single pass is the best chance you get, so choose the retry policy before starting, not after.
--sourceimage
Re-image an existing file, for example to convert a raw image to E01 or to make a working copy of an evidence image.
-oimage
The image path on the case store. Name it for the exhibit, not for the machine.
--retriesimage
Same trade-off as on acquire: more retries recover more marginal sectors and cost more reads of a failing surface.
--formatimage
Use e01 for evidential work: it is compressed and carries the acquisition metadata other forensic tools expect. Use raw when the image will be mounted or read by tooling that only takes a flat image.
Cost / when: Raw images are the size of the whole drive, including empty space.
--forceimage
Only after reading the objection. See acquire.
--targetedimage
Filesystem-aware, read-once imaging: the filesystems' own allocation maps say which space holds data, and only that is read and copied - free space is skipped without touching the drive. Use it to image a large or failing drive faster and more gently, and to get a smaller image, when the live files are what matter.
Cost / when: Deleted files still sitting in free space are NOT captured - free space is exactly where they live. When deleted data matters, take a full image (omit --targeted). A filesystem we cannot read a map for is imaged in full, so it is never wrong, only sometimes not smaller.
--entropy-mapimage
Measure the entropy of the data as it is copied and record which spans are high-entropy - encrypted or compressed - in the image's .map.json. Use it to see at a glance whether a drive (or a region) is encrypted before spending time on recovery.
Cost / when: Entropy cannot tell encryption from compression; a high-entropy span may be either. It is a signpost, not a verdict.
--devicecheck
Run the feasibility check the moment a drive arrives, before quoting, before imaging and before any promise to the client: it measures how much of the drive is unreadable and states the chances in plain words.
Cost / when: A few hundred sampled reads - seconds on a healthy drive, and one gentle attempt per area on a failing one. Far cheaper than discovering mid-copy that the job was never viable.
--imagecheck
Check an existing image instead of a drive - for example to confirm a copy received from a client or another lab reads cleanly before work is billed against it.
--pdfcheck
Write the verdict as a PDF wherever a client, insurer or case file needs the answer on record. The report states its numbers as ranges and says it is based on a sample.
--samplescheck
More samples narrow the stated range and cost more reads of the drive. The default suits a first assessment; raise it when the estimate must be tighter than a few percent.
Cost / when: Each extra sample is another read of a drive that may be dying. On clearly failing hardware, keep the default and move to the copy.
A drive in trouble

The drive does not show up at all

List everything the computer can see, usable or not, and be told exactly why.

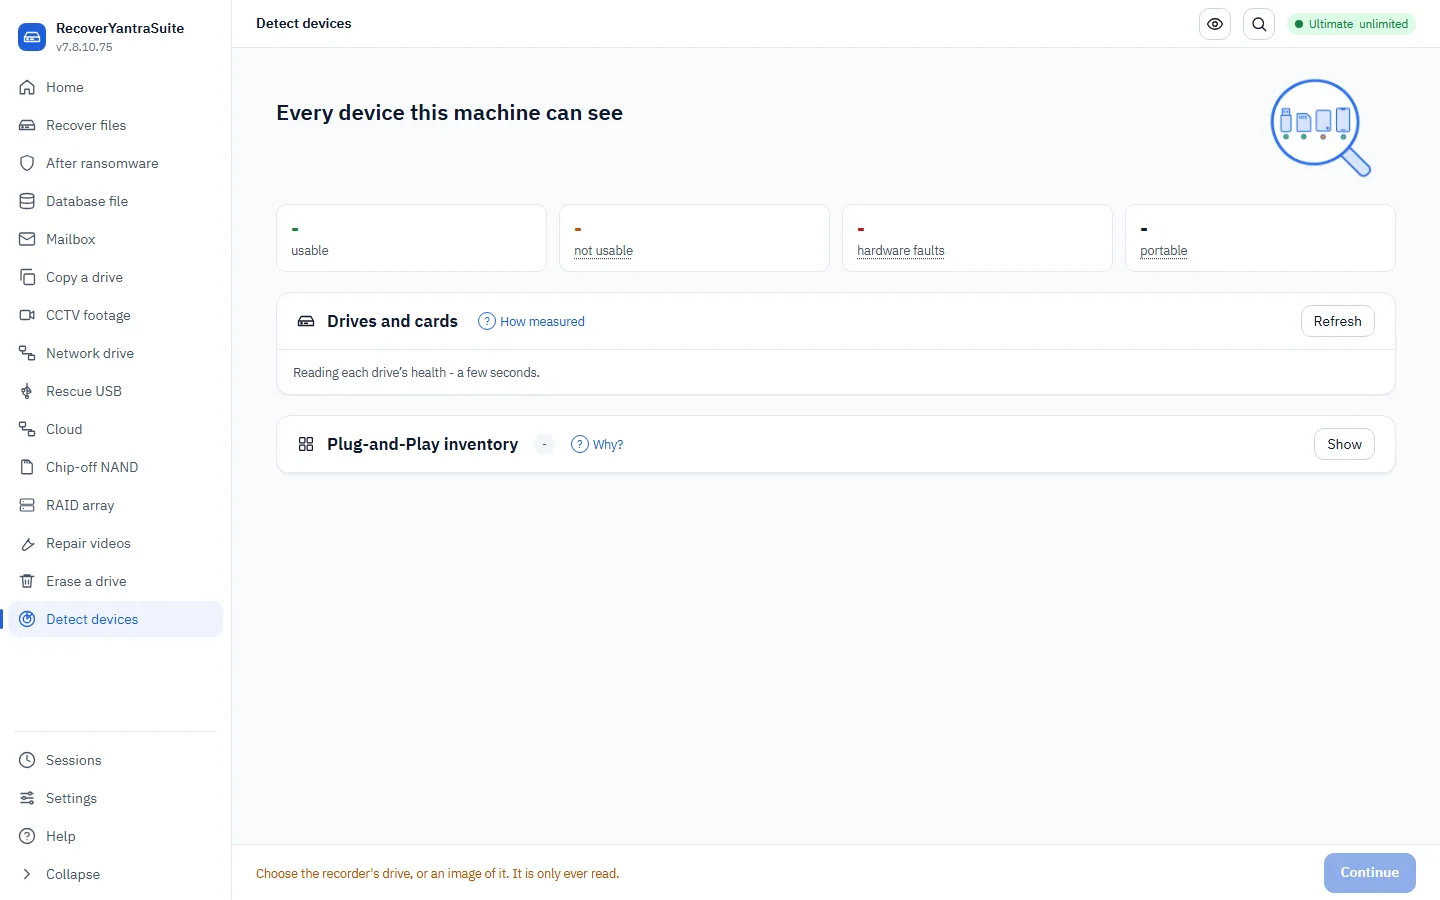
“Not detected” usually means the product knew and did not say. Detect devices lists everything the machine can see, drives it can use, drives it can see but not use, and phones in transfer mode, and every one that will not open says why: it needs administrator rights, it is in use, Windows cannot start its controller, or the card reader cannot address a card this large. It saves the whole picture as a report you can send with any support request.

Do
  • Plug the device straight into the machine, not through a hub; power a desktop external drive.
  • Read the row&rsquo;s reason and do what it says &mdash; a big card needs an SDXC reader.
  • Save the report and send it if you ask for help.
Don’t
  • Do NOT assume a missing drive is a software fault &mdash; the row tells you if it is hardware.
  • Do NOT keep re-plugging a drive that reads but is failing; image it instead.
  • Do NOT buy recovery software until you know the drive is readable. No software reaches a drive the machine cannot see.
  • Do NOT open the drive. The platters need a clean room, and opening it ends any chance a lab has.

The steps, in order

See everything this computer can see - drives it can use, drives it can see but not use, and why - and save it as a report.

Detection is one screen: connect, look, save the report. There is no stage to advance through, so there is no rail.

  1. Connect the device

    Plug it straight into the machine, not a hub; a desktop external drive also needs its mains adapter.

    StandardISO/IEC 27037 7.4 - identification of digital devices
  2. Read what the computer sees

    Every device is listed, usable or not. One that is connected but cannot be used says why: cannot be read, needs administrator, in use, Windows cannot start it, or a phone in MTP mode.

    recoveryantra detect
  3. Do what the row says

    A card the reader cannot address needs an SDXC reader; a bridge Windows cannot start needs power, cable, a USB 2.0 port or a different enclosure; a drive that reads but is failing goes to Image, not Scan.

    recoveryantra which "drive not detected"
  4. Save the report

    HTML, PDF and JSON, with every device, its state, the Plug-and-Play inventory and the environment. Send it with any support request about a drive that is not detected.

    recoveryantra detect --report <folder>

In the app

Every device the OS sees, with state, bus, serial and health.

In your words

“The drive does not show up at all”
What you see
  • Nothing appears in Explorer or Disk Management
  • It may not spin up, or the light does not come on
  • It worked yesterday
Why it works

There are four links between plugged-in and readable, and only two of them are ours. Being LISTED is never proof of being READABLE, so this actually reads a sector at each end before saying anything.

Real example

A customer had followed 3 guides telling them to run as administrator. The check read sector 0 and a sector near the end, and found the drive absent from the bus entirely: an enclosure fault, not a software problem. 5 minutes instead of an afternoon, and a 4 TB drive that was fine once re-housed.

recoveryantra list --triageSay which link in the chain is broken, and whether it is ours.
Options & why, every switch, in plain words
--reportdetect
Write the detection report - HTML, PDF and JSON - into this folder: every device with its state, bus, serial and sector size, the hardware Windows can see but cannot use with the code and the fix, and the Plug-and-Play inventory. Use it when a customer or a partner says a drive is not detected: the report replaces "it does not work" with what the machine actually sees.
Cost / when: The folder goes through the same pre-flight as every other writing job; the report is small, so only rights and a full disk stop it.
--no-healthdetect
Skip the health read of each usable drive. Detection is then a listing only and returns in a second or two. Use it on a machine with many drives, or when a drive is known to be failing and you do not want even a test read against it before imaging.
--forcedetect
Write the report even when the pre-flight objects to the folder. Use it only when you have read the objection and it does not apply - a report is a few hundred kilobytes, so the usual reason is a destination the check cannot judge.
Cost / when: A refusal you have not read is not one you can override safely.
A drive in trouble

The computer will not start, make a rescue USB

When the files are on a machine that will not boot, read them from a rescue stick or another computer.

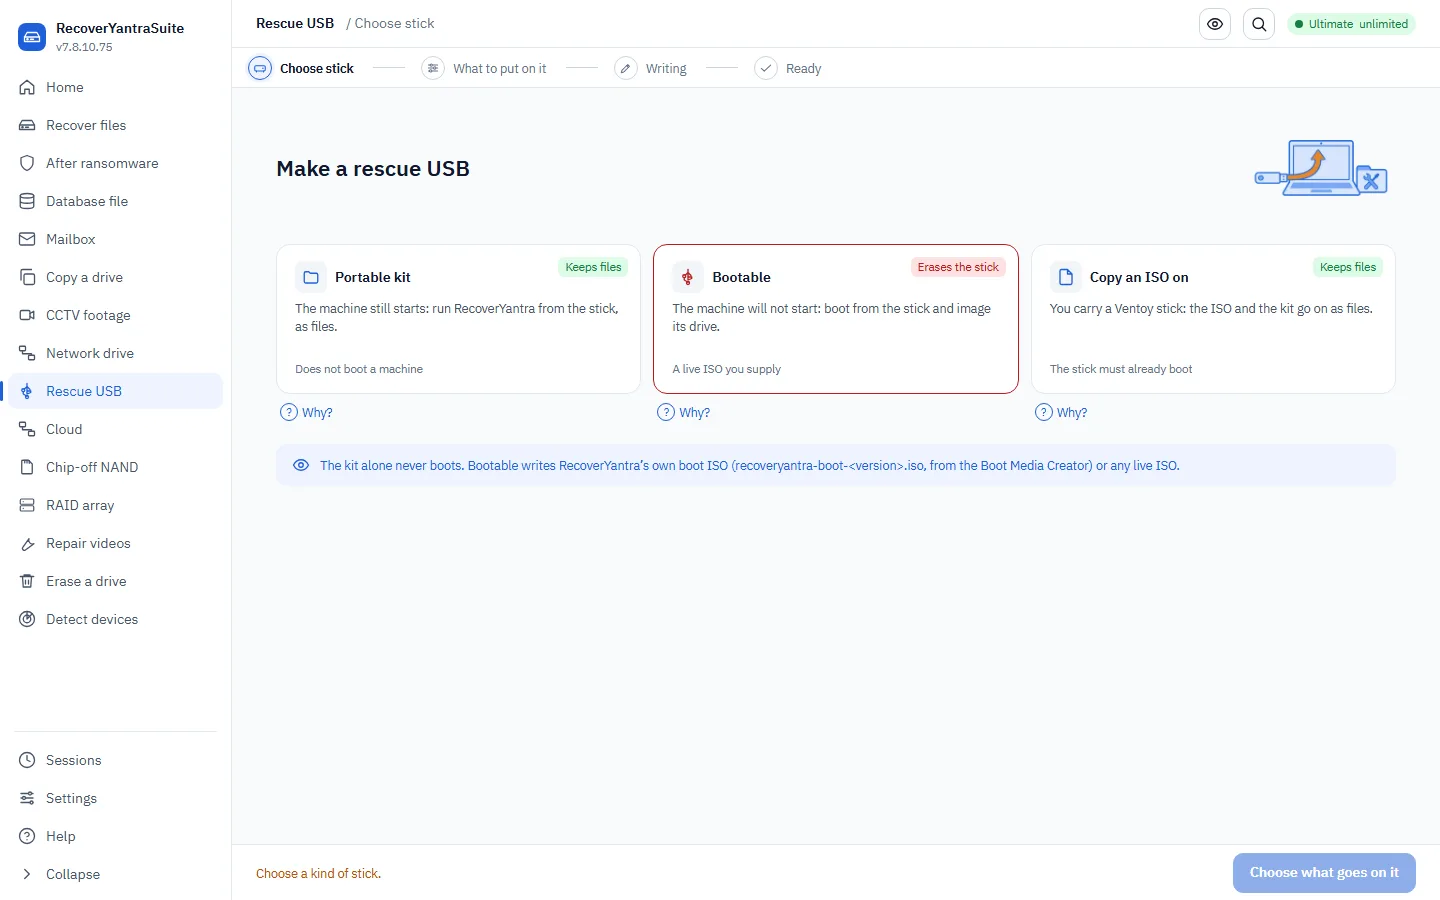
If the machine itself will not start but the drive is fine, you have two honest routes: take the drive out and read it from another computer, or build a rescue USB that boots the dead machine into the recovery tool. The USB wizard is clear about which stick actually boots, a portable kit that keeps its files, a truly bootable stick that erases itself, or a copy-an-ISO stick for Ventoy, so you are never handed a stick that will not start the machine.

Do
  • Take the drive out and read it from a working computer if you can &mdash; it is the simplest route.
  • Use a spare USB stick for a bootable rescue &mdash; making it bootable erases it.
  • Check the ISO carries a USB boot record before relying on the stick at a customer site
  • Image to external storage, never back onto the machine's own disk
  • Label the image with the machine it came from before leaving site
Don’t
  • Do NOT keep power-cycling a machine that will not boot if the data is precious; get the drive out first.
  • Do NOT expect a 'portable kit' stick to boot a dead machine &mdash; only the bootable option does.
  • Do NOT run Windows recovery or 'reset this PC' first. Both write to the disk, and reset can delete the files you want.
  • Do NOT put the disk in another Windows machine without a write blocker - Windows writes to any disk it sees.

The steps, in order

Prepares a USB stick for recovering a machine that will not start.

1Choose stick2What to put on it3Writing4Ready
  1. Which USB stick?

    safety

    Only drives whose HARDWARE reports itself removable are offered, and the system disk can never be chosen. A drive that will not identify itself is refused rather than guessed at.

  2. What should go on it?

    safety

    The portable kit (files only, nothing erased), a bootable stick made from a live ISO you supply (this ERASES the stick), or an ISO copied on for Ventoy.

    Portable kit (nothing erased)Bootable from an ISO (erases the stick)Copy an ISO on (keeps files)
  3. Confirm

    safety

    We name the stick, its size and what will happen to it. Erasing needs an explicit yes and the server refuses without one, so the interface is never the only guard.

  4. Writing

    Written, then READ BACK and compared by hash - dying flash reports a happy write and stores something else, and you would find out standing at a machine that will not boot.

    recoveryantra bootusb

In the app

Three honest choices: portable kit, bootable (erases), copy an ISO on.

In your words

“The computer will not start, and the files are on its internal disk”
What you see
  • It fails before Windows loads
  • You cannot get to the desktop to install anything
  • The disk itself is probably fine
Why it works

The disk is usually healthy; it is the machine that will not start. Working from a USB means the broken system never runs, so nothing writes to the disk you are recovering.

Real example

A laptop that would not get past the logo was recovered from a USB: the disk was fine and a Windows update had failed half way. 96 GB of documents and photographs came off it untouched, in 3 hours.

recoveryantra bootusb --target \\.\PhysicalDrive4 --payload-iso linux.isoPrepare a stick that really boots.
recoveryantra acquireOn the booted machine: pick a disk and image it.

Worked examples

A laptop will not start and its data is neededbench

The machine does not boot. The disk may be perfectly healthy, and the fastest safe route is often to read it without dismantling the machine.

  1. Prepare rescue mediaA stick that boots the machine into an environment that can read the disk read-only.
  2. Boot the machine from the stick and image the diskImaging first keeps the option of trying something else.
  3. Recover from the image on the benchThe failed machine is not the place to do the recovery work.
recoveryantra bootusb --target E:\Lay the toolkit onto the stick.
recoveryantra bootusb --target E:\ --payload-iso D:\live-linux.isoMake the stick genuinely bootable from a live Linux image.
recoveryantra acquire -o E:\Evidence --retries 1From the booted stick: pick the drive from a numbered list and image it to the stick.
recoveryantra recover --image E:\Evidence\disk.dd -o F:\Out --include-intactRecover from the image back on the bench.
Options that matter here
--payload-isoRequired to make the stick actually boot. Writing an ISO ERASES the stick, so use a stick with nothing on it.
--targetConfirm this is the stick and not an external evidence drive.
--retriesKeep low if the disk in the dead machine is also suspect.
Honest limits
  • Laying the toolkit onto a stick does not make the stick bootable; that needs an operating system on it
  • A machine that will not power on at all cannot be helped this way
Options & why, every switch, in plain words
--targetbootusb
The mounted rescue USB. Use when you need to carry the tool to a machine that must not be written to or cannot be dismantled.
Cost / when: Existing files on the stick are left alone, but confirm you have chosen the stick and not an external evidence drive.
--toolbootusb
Point at a specific build when preparing a stick for a machine that must run a version you have already validated for the case.
--payload-isobootusb
Supply a live Linux ISO when the target machine will not start, so the stick can boot it and read the drive in place.
Cost / when: Writing an ISO makes the stick bootable and ERASES it. Check the ISO carries a USB boot record first, or the stick will be written perfectly and still not boot.
--payload-dirbootusb
Use an extracted WinPE or live-Linux tree instead of an ISO when your organisation maintains its own validated boot environment.
A drive in trouble

The drive is encrypted (BitLocker, LUKS, FileVault, VeraCrypt)

With the password or recovery key, the volume is unlocked and recovered like any other.

An encrypted volume is not a dead end if you hold the password or recovery key. The engine decrypts BitLocker (including recovery-password unlock), LUKS 1 and 2, FileVault 2 and VeraCrypt in pure code, then recovers from the unlocked volume exactly like any other drive. Without the correct credential no tool can read it, the app says so plainly rather than returning fragments, and it does not keep the credential for a later resume.

Do
  • Have the BitLocker recovery key or passphrase ready before you start.
  • Unlock the volume first, then run the ordinary recovery on it.
  • Exhaust the organisation's own key escrow before anything else
  • Omit the password on the command line so it is not left in shell history
  • Record which credential source was used
Don’t
  • Do NOT expect recovery without the credential &mdash; nobody can read the volume without it.
  • Do NOT rely on the password being remembered for a resumed scan; you will be asked again.
  • Do NOT try to recover from an encrypted volume without unlocking it first. Everything found will be meaningless.
  • WITHOUT the key or password there is no route. Encryption that could be worked around would not be encryption.

In the app

The source step &mdash; an encrypted volume is unlocked here before the scan.

In your words

“The drive is encrypted and I have the password or recovery key”
What you see
  • BitLocker, LUKS or FileVault
  • You have the recovery key, password or keyfile
  • The volume will not mount normally
Why it works

Everything on the drive is unreadable until it is unlocked, so this has to come first. Unlocking happens in memory against a read-only source: the drive itself is never modified.

Real example

A stolen-then-recovered laptop had BitLocker on and the owner had the 48-digit recovery password from their account. The volume was unlocked read-only and 300 GB recovered; not 1 byte was written to the drive.

recoveryantra recover --device \\.\PhysicalDrive2 -o D:\Out --password <recovery-key>Unlock read-only and recover in one pass.

Worked examples

An encrypted volume is blocking the recoverycrosscut

The volume is encrypted with BitLocker, LUKS, FileVault or VeraCrypt. Without the credential there is nothing to recover, and with it the job is ordinary.

  1. Find the credential before doing anything elseFor BitLocker this is frequently in Active Directory, a Microsoft account, or a printed recovery sheet.
  2. Unlock and recover in one step where the volume type supports itThe recovery runs against the decrypted view.
  3. For a container file, unlock it separatelyVeraCrypt and TrueCrypt containers are handled by their own command.
recoveryantra recover --device \\.\PhysicalDrive1 --password "123456-654321-..." -o E:\Out --include-intactUnlock a BitLocker volume with its recovery password and recover.
recoveryantra veracrypt E:\container.hc --json E:\Out\unlock.jsonUnlock a VeraCrypt container, prompting for the password rather than leaving it in shell history.
recoveryantra veracrypt E:\container.hc --truecrypt --hiddenA legacy TrueCrypt volume, or the hidden volume within one.
Options that matter here
--passwordWithout the correct credential the volume cannot be read by anyone. The credential is not retained for a later resume.
--pimSupply the Personal Iterations Multiplier if the volume was created with one; without it the correct password still fails.
--cipherRestricting to a known cipher cuts unlock time. Restricting to the wrong one makes a correct password look wrong.
--hiddenOnly where a hidden volume exists and you are authorised to access it.
Honest limits
  • Where the key is genuinely unknown, no software recovers the contents, and the product says so rather than returning fragments
  • Camellia and Kuznyechik containers are identified but not decrypted
Options & why, every switch, in plain words
--passwordrecover
Supply the BitLocker recovery password, LUKS passphrase or hex key for an encrypted volume.
Cost / when: Without the correct credential the volume cannot be read by anyone. The product states that rather than returning fragments. The credential is not retained for a later resume.
--passwordveracrypt
Omit it to be prompted. Typing a password on the command line leaves it in shell history and in process listings.
Cost / when: On a shared or logged bench, treat the prompt as the only acceptable route.
Bigger & unusual storage

RAID array or NAS box

Loose disks from a failed array, reassembled, level and layout worked out for you.

When a RAID or NAS fails you often have a pile of member disks or their images. Point the app at them and it works out the level, order and stripe size, reassembles the array read-only and recovers from the rebuilt volume. It handles RAID 0/1/5/6, nested 10/50/60, JBOD, Synology SHR, Intel RST and Storage Spaces, and where it cannot auto-detect, you set the parameters yourself.

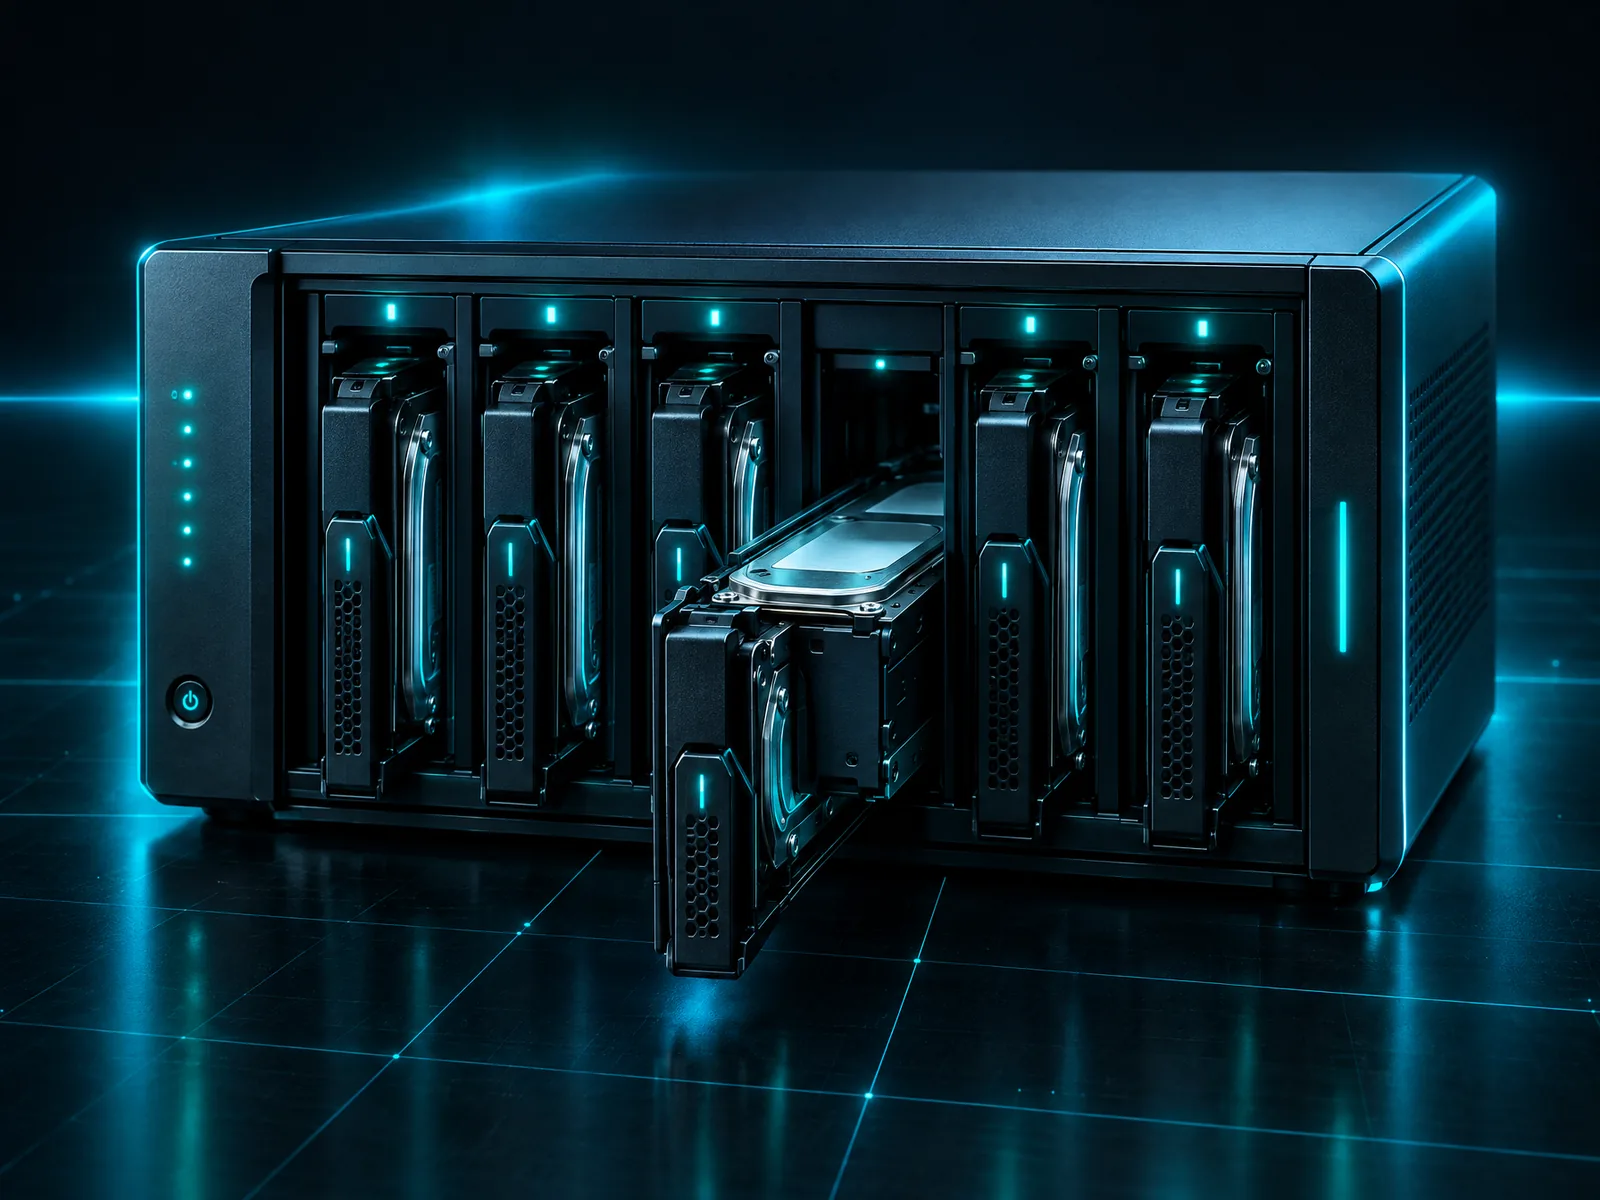
A multi-bay NAS enclosure with drive trays
A dropped array member, and the rest rebuilt around it.
Do
  • Image each member disk first, then assemble from the images &mdash; safest for the originals.
  • Label the disks by bay order before you pull them, if you still can.
  • Let auto-detect propose the level, then confirm it against what you know.
  • Image every member before touching the array
  • Label the images with the physical bay each disk came from
  • Verify by opening several recovered files of different types, not by the fact that a volume appeared
  • Record which bay each disk came from before removing any of them
  • Recover to storage that is not part of the NAS
  • If the unit is under warranty, image first and let the vendor have the hardware afterwards
  • Image all members before assembly
  • Keep the member images together with the slab map; one without the other is not usable
  • Confirm the assembled volume yields real files before reporting success
  • Do not let the replacement board initialise or rebuild the array
  • Image both members before any assembly attempt
  • Confirm with files that open, not with a volume that appears
  • Image before experimenting, always
  • Judge an assembly by opening files of several types, never by the fact that a volume appeared
  • Write down each combination tried and the result, or you will repeat them
Don’t
  • Do NOT let a NAS 'rebuild' onto a suspect disk before you have copied the members.
  • Do NOT guess the member order by trial and error on the live disks; work from images.
  • Do NOT let the NAS rebuild onto a replacement disk before imaging the members. A rebuild with the wrong assumption overwrites parity and can destroy what was recoverable.
  • Do NOT change the disk order in the enclosure.
  • Do NOT run this against a Drobo. A Drobo uses BeyondRAID, a proprietary block-virtualisation layer with no mdadm-style striping - --auto will scan for hours and detect nothing. See the hardware-help entry for what to procure instead.

The steps, in order

A RAID set is spread across several disks. Add each member (or a missing one, blank), let it work out the layout off the disks - Windows dynamic disks, Intel RST, SNIA DDF, Synology SHR / mdadm - or set the level yourself, check the assembled volume's partition table looks right, then recover from it exactly like a single disk.

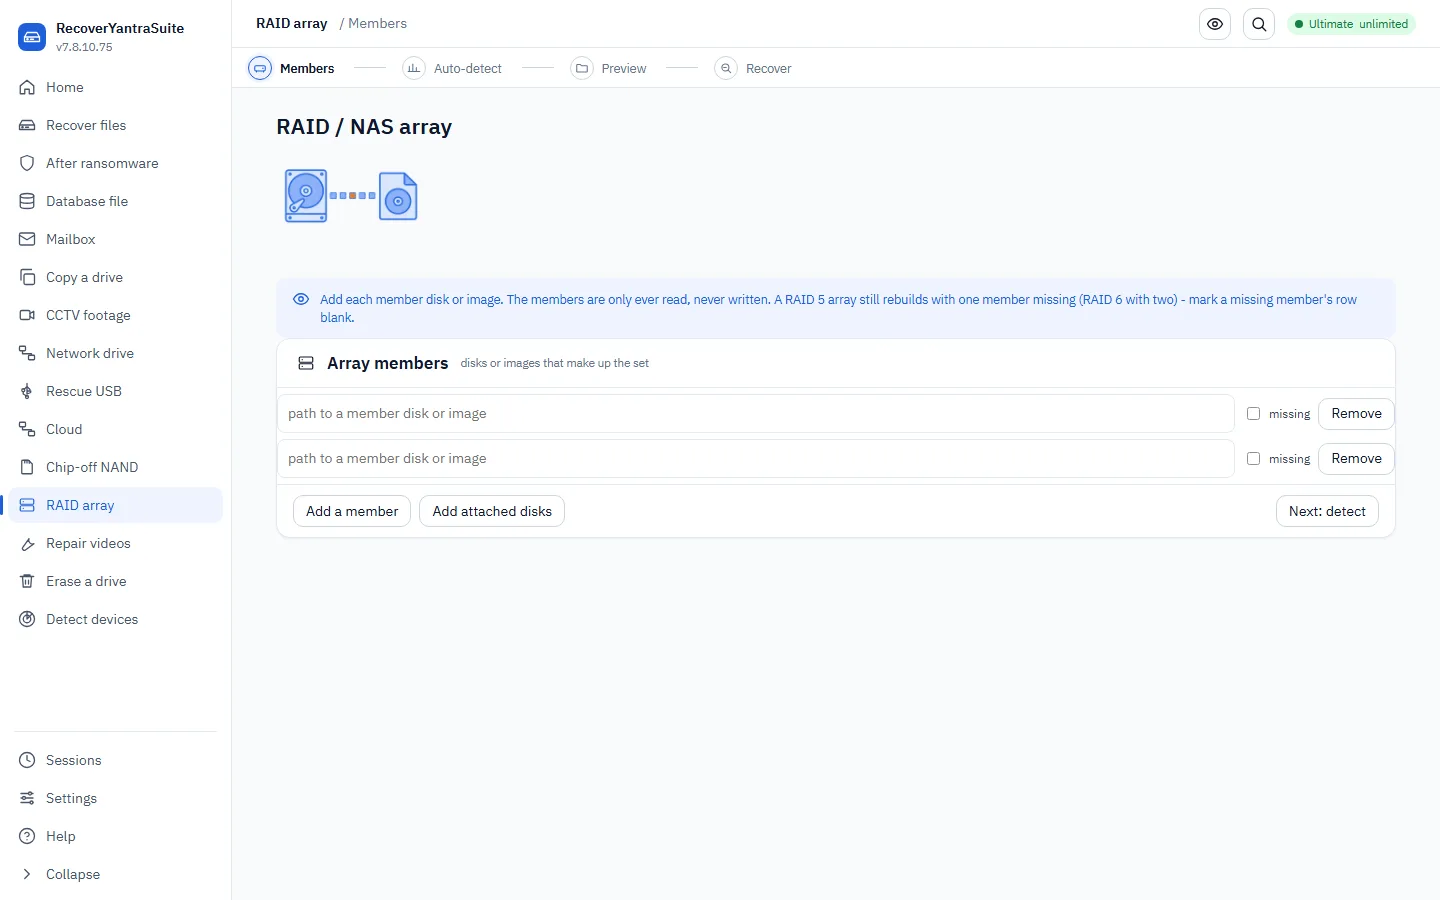
1Members2Auto-detect3Preview4Recover
  1. Add the members

    Each disk or image in the set. They are only ever read, never written. A RAID 5 array still rebuilds with one member missing (RAID 6 with two) - mark a missing member's row blank so the array is rebuilt degraded.

    recoveryantra raid --members d1.img d2.img d3.img
  2. Work out the layout

    Read the RAID metadata off the disks (LDM, IMSM, DDF, SHR / mdadm), or set the level, chunk size and layout yourself when there is no metadata to read.

    recoveryantra raid --members d1.img d2.img d3.img --auto
  3. Check the assembled volume

    See the rebuilt volume's partition table before committing. If it looks wrong, go back and set the level yourself rather than recovering from a bad assembly.

  4. Recover from the array

    Hand the assembled volume to the ordinary recovery scan - the same results grid and export, licensed and charged like any single source.

    recoveryantra raid --members d1.img d2.img d3.img --auto -o OUT

In the app

The assembly wizard: member slots, level, and auto-detect.
The assembly wizard: member slots, level, and auto-detect.needs a device, shown in its honest waiting state

In your words

“A NAS or RAID array has failed”
What you see
  • Two or more disks that were one volume
  • The box will not rebuild, or rebuilt wrongly
  • You have the disks but not the controller
Why it works

The array's layout - order, block size, parity rotation - can be worked out from the disks themselves, so the original controller is not needed. Each member is only ever read.

Real example

A 4-disk NAS lost its controller. The stripe size, disk order and parity pattern were detected from the members, the volume was reassembled read-only, and 2.4 TB of company files came back with their folder structure intact.

recoveryantra raid --members d1.dd d2.dd d3.dd d4.dd --auto --list-volumesWork the layout out from the disks and show what is on it.
recoveryantra raid --members d1.dd d2.dd d3.dd d4.dd --auto -o D:\OutRecover from the reassembled array.

Worked examples

A RAID 5 array dropped a disk and the controller will not rebuildbusiness

An array has lost a member and the controller either refuses to rebuild or failed part way through. The data is still spread across the surviving members and can be assembled in software.

  1. Stop the controller from rebuilding againA second rebuild attempt onto a marginal disk is the most common way a recoverable array becomes unrecoverable.
  2. Image every surviving member before assembling anythingAssembly is read-only, but the members are usually the same age and the same model, so a second failure during the work is a real risk.
  3. Assemble from the member images and read the volumeGeometry is read from the members' own metadata where it survives.
recoveryantra image --device \\.\PhysicalDrive1 -o E:\raid\d1.dd --retries 2Image each member in turn to the case store.
recoveryantra raid --members E:\raid\d1.dd E:\raid\d2.dd - E:\raid\d4.dd --auto -o E:\Out --include-intactAssemble with the failed member marked absent and recover the volume.
recoveryantra raid --members E:\raid\d1.dd E:\raid\d2.dd - E:\raid\d4.dd --level 5 --chunk 65536 -o E:\Out --include-intactState the geometry yourself when the metadata is gone.
Options that matter here
--autoTry first. It reads level, order and stripe size from the members, which removes the guesswork.
--membersOrder is what matters. A dash marks the missing member; a wrong order assembles a volume full of scrambled files.
--chunkThe value most often recorded wrongly in site documentation. If files open as garbage, this is the first suspect.
--include-intactRequired. Nothing here was deleted; the array stopped assembling.
Honest limits
  • RAID 5 with two failed members cannot be reconstructed. RAID 6 tolerates two
  • A member that was rebuilt with wrong data before you arrived contributes wrong data to the assembly
A NAS unit is offline and the data is in daily usebusiness

A NAS has stopped serving. The unit itself may have failed while the disks are fine, which is the common case and the recoverable one.

  1. Take the disks out and label the bay orderNAS units store the array layout on the disks, but bay order is the cheapest thing to record and the most annoying to reconstruct.
  2. Image each diskConsumer NAS disks are usually the same batch and the same age.
  3. Assemble the array and read the volumeSynology SHR, standard Linux md arrays and LVM volumes are read from their own metadata.
recoveryantra list --triageCheck each disk's health before imaging it.
recoveryantra image --device \\.\PhysicalDrive2 -o E:\nas\d1.ddImage each NAS disk.
recoveryantra raid --members E:\nas\d1.dd E:\nas\d2.dd --auto -o E:\Out --include-intactAssemble and recover. Auto covers SHR and Linux md layouts.
Options that matter here
--autoCorrect for almost every NAS. The layout is written on the disks by the unit itself.
--include-intactRequired: this is a whole-volume recovery.
--sector-sizeChange from 512 only for 4K-native disks.
Honest limits
  • An encrypted NAS volume needs its passphrase; without it the data is not readable
  • A NAS that wrote a new configuration over the old array may have destroyed the layout, and that is not always recoverable
A Storage Spaces pool will not come onlinebusiness

A Windows Storage Spaces pool reports as unhealthy and its virtual disk will not attach, so the data on it is unreachable through Windows.

  1. Image every member diskReassembly reads across all of them, and pool members are commonly the same age.
  2. Reassemble the virtual disk from the member imagesThe pool database describes how slabs are laid across the members.
  3. Recover from the reassembled volumeOnce assembled it reads as an ordinary NTFS or ReFS volume.
recoveryantra image --device \\.\PhysicalDrive3 -o E:\pool\m1.ddImage each pool member.
recoveryantra recover --slabmap E:\pool\slabmap.json -o E:\Out --include-intactReassemble from the slab map and recover the volume.
Options that matter here
--slabmapThe route for a Storage Spaces virtual disk; a plain member image on its own is not a volume.
--include-intactRequired, as with any whole-volume recovery.
Honest limits
  • A pool missing more members than its resiliency tolerates cannot be reassembled
  • Parity layouts must be established correctly; the product builds the candidates and keeps the one that yields a real file system
An Intel RST array will not assemble after a motherboard failurebench

A desktop or workstation using Intel Rapid Storage Technology has lost its motherboard. The replacement board does not recognise the array, so the volume is unreachable.

  1. Image both disksThe array metadata is on the disks, so nothing is lost by working from copies.
  2. Assemble from the members' own metadataIntel RST writes its metadata block onto the members, so the array can be read without the board that made it.
  3. Recover the volumeOnce assembled it is an ordinary Windows volume.
recoveryantra image --device \\.\PhysicalDrive1 -o E:\rst\d1.ddImage each member.
recoveryantra raid --members E:\rst\d1.dd E:\rst\d2.dd --auto -o E:\Out --include-intactAssemble from the Intel metadata and recover.
Options that matter here
--autoReads the Intel metadata directly. This is the route for fake-RAID.
--include-intactRequired.
--membersOrder still matters even with automatic detection; keep the images labelled by port.
Honest limits
  • If the new board wrote fresh array metadata over the old, the original layout may be gone
  • A degraded RAID 0 cannot be recovered: it has no redundancy
Loose disks have arrived from an array nobody documentedbench

A set of disks has arrived with no controller, no documentation and no agreed order. The order and geometry have to be established before anything can be read.

  1. Image every disk firstEverything after this is trial and error, and it must be done against copies.
  2. Try automatic detection before assuming anythingLinux md, Intel RST, Synology SHR and Windows dynamic disks all write their layout onto the members.
  3. Where the metadata is gone, test geometries and judge by the filesA correct assembly produces files that open. A wrong one produces a volume that mounts and returns rubbish.
recoveryantra image --device \\.\PhysicalDrive3 -o E:\arr\d3.ddImage each disk, labelled with the bay it came from.
recoveryantra raid --members E:\arr\d1.dd E:\arr\d2.dd E:\arr\d3.dd --auto -o E:\Out --include-intactLet the members' own metadata supply the geometry.
recoveryantra raid --members E:\arr\d1.dd E:\arr\d2.dd E:\arr\d3.dd --level 5 --chunk 131072 --layout left-symmetric -o E:\Out --include-intactTest a stated geometry when the metadata is absent.
recoveryantra raid --members E:\arr\d1.dd E:\arr\d2.dd --list-volumesOn Windows dynamic disks, list the volumes the set carries.
Options that matter here
--autoAlways try first.
--chunkThe variable most worth testing systematically. A wrong value mounts and returns corrupt files.
--layoutOnly change for an array documented as non-standard.
--list-volumesWindows dynamic disks can carry several volumes on one set of disks.
Honest limits
  • An array missing more members than its level tolerates cannot be assembled
  • A member that was partially rebuilt with wrong data will contribute that wrong data
Options & why, every switch, in plain words
--membersraid
List the member images IN ARRAY ORDER. Use a dash for a member that is missing or has failed.
Cost / when: Order matters. Getting it wrong produces a volume that looks plausible and contains scrambled files, which is worse than an obvious failure.
--autoraid
Try this first. It reads the geometry from the members' own metadata, which removes the guesswork on Linux, NAS, Intel RST and Windows dynamic disks.
Cost / when: Auto-detection needs the metadata to survive. Where it does not, fall back to stating the level and chunk size yourself.
--levelraid
State the level when the metadata is gone and you know the array's configuration from documentation or the controller.
--chunkraid
State the stripe size with --level. It is the single value most often recorded wrongly in site documentation.
Cost / when: A wrong chunk size assembles an array that mounts and returns corrupt files. Verify by checking that recovered files open.
--layoutraid
Change from the default only for an array documented as using a different parity layout.
--list-volumesraid
Run first on Windows dynamic disks. One set of disks can carry several volumes, and you need to know which one holds the data.
--volumeraid
Select the volume by the name Windows gave it, from --list-volumes.
-oraid
The output folder, on separate storage from the member images.
--moderaid
As on recover: smart unless you have a reason. On a reassembled array, smart is almost always right because the file system is usually intact once the geometry is correct.
--sector-sizeraid
Change from 512 only for arrays built on 4K-native drives, where leaving it wrong prevents the volume being found at all.
--include-intactraid
Add when you need the whole volume out, not only what was deleted. This is the normal case for a failed array: nothing was deleted, the array stopped assembling.
<nascmd>nas
Recover through a running Synology/QNAP-style NAS's own already-assembled block devices over SSH, without pulling the disks. The NAS's own kernel has already assembled its md arrays and activated its LVs, so this reads the live device node directly and never runs mdadm or lvm itself. Every subcommand is documented on its own line.
Bigger & unusual storage

Virtual machine disk (VHD, VHDX, VDI, QCOW2, VMDK)

A VM that will not start, opened as a disk and recovered from inside.

A virtual disk is just a disk in a file. The engine opens VHD, VHDX, VDI, QCOW2 and VMDK directly, reads the file system inside and recovers from it, whether the guest will not boot, the container is damaged, or files were deleted inside the VM. Snapshots and split/sparse formats are handled.

Do
  • Copy the virtual-disk file somewhere safe first, then recover from the copy.
  • Keep the whole snapshot chain together &mdash; a child disk needs its parents.
  • Copy the virtual disk off the datastore before starting
  • Where a snapshot chain exists, establish which link is the current one before reading any of them
  • Extract data rather than attempting to resurrect the guest, unless the guest itself is the deliverable
Don’t
  • Do NOT run the VM again while recovering &mdash; it writes to the very disk you need.
  • Do NOT delete or consolidate snapshots before you have the data out.
  • Do NOT keep trying to boot the guest. Each attempt writes to the disk.
  • Do NOT delete or merge snapshots to tidy up first - the data you want may only exist in one of them.

The steps, in order

We read the virtual disk directly and recover the files inside it, just like a real drive. The disk file is only ever read.

1Source2Options3Scan4Your files
  1. Which virtual disk format?

    This is the file the VM uses as its hard disk. We read all the common ones.

    VMware (.vmdk)Hyper-V (.vhdx / .vhd)VirtualBox (.vdi)QEMU / KVM (.qcow2)Raw (.img / .dd)
  2. What do you need back?

    Files from inside the disk, or the whole disk carved (for a deleted/corrupt VM).

    Files from inside the virtual diskThe whole disk (deleted or corrupt VM)
  3. Where is the virtual disk file?

    Point us at the .vmdk/.vhdx/.vdi/.qcow2 file (or a copy of it).

  4. Where should recovered files be saved?

    safety

    A separate drive - never inside the virtual disk or its folder.

  5. Recover

    We open the virtual disk (`recover --image <file>`), read its filesystem, and recover files - including deleted ones. A snapshot chain is followed to its current state.

In the app

Point the recovery at the virtual-disk file as the source.

In your words

“A virtual machine will not start, or its disk is damaged”
What you see
  • A .vmdk, .vhdx, .vdi or .qcow2 file
  • The hypervisor refuses it, or the guest will not boot
  • Snapshots may be involved
Why it works

A virtual disk is a filing system inside a file. Reading the container gives access to the guest's own volumes, so the guest never has to start for its files to come out.

Real example

A finance server's 900 GB VHDX would not boot after a failed snapshot merge. The guest volume was read straight out of the container and all 41 GB of the accounts database came out without the machine ever starting.

recoveryantra recover --image server.vhdx -o D:\OutRead the guest volume inside the container.

Worked examples

A virtual machine disk is corrupt and the backup is too oldbusiness

A VMware or Hyper-V virtual disk will not boot or will not attach, and the most recent usable backup predates work that matters.

  1. Copy the virtual disk files off the datastoreWork from a copy. The datastore is live storage and the original should stay untouched.
  2. Open the virtual disk directly and read the guest file systemThe disk does not need to boot, or even attach, to have its contents read.
  3. Recover the files the business needs, not the whole guestA full guest restore is usually slower than extracting the data and putting it into a working machine.
recoveryantra recover --image E:\vm\server-flat.vmdk -o E:\Out --include-intactRead the guest file system straight out of the virtual disk.
recoveryantra recover --image E:\vm\server.vhdx -o E:\Out --include-intact --reportThe same for Hyper-V, with a report.
Options that matter here
--include-intactRequired. The guest's files were never deleted.
--modesmart. The guest file system is usually intact once the container can be read.
--reportUseful evidence for the change record.
Honest limits
  • A split or snapshot chain with a missing link cannot be reassembled past the gap
  • An encrypted guest volume still needs its key
Options & why, every switch, in plain words
--imagerecover
The default choice for anything evidential, anything failing, and anything where the original must be returned untouched.
--slabmaprecover
Reassemble a Storage Spaces virtual disk from member images and recover from the assembled volume.
Bigger & unusual storage

CD, DVD or Blu-ray disc

A scratched or half-written disc, read as its own file tree, deleted entries included.

Optical discs get their own readers, not blind carving. The engine reads the ISO 9660 tree (with Joliet and Rock Ridge long names, and the raw 2352-byte ripper formats) and the UDF file system every Blu-ray and most DVDs use. UDF can even undelete: a deleted entry still points at its data, so a removed file comes back with its name, folder, size and dates. Files on a disc are stored end to end, so what comes back is exact. Point the recovery at the drive or at an .iso image of the disc.

Do
  • Rip a scratched disc to an .iso first if it reads slowly, then recover from the image.
  • Try the disc in a different drive &mdash; some readers cope with scratches better.
Don’t
  • Do NOT polish or 'repair' a disc with anything abrasive before imaging it.
  • Do NOT trust a single slow read of a failing disc; image it and work from that.

In the app

Choose the optical drive, or an .iso image of the disc, as the source.
Options & why, every switch, in plain words
--imagerecover
The default choice for anything evidential, anything failing, and anything where the original must be returned untouched.
--moderecover
Leave at smart. It parses the file system for original names and folders AND carves free space for what the metadata no longer covers. Use fs when you want named files quickly from an intact file system; use carve on formatted or badly damaged media where the metadata is gone.
Cost / when: fs alone misses everything the file system no longer indexes. carve alone returns files without their original names or folders. smart is what maximises the result.
Bigger & unusual storage

A drive inside a machine that cannot be opened

Read a disk over the network from another computer, byte for byte.

Sometimes the drive cannot come out, a sealed all-in-one, a machine still in use across the building. A small agent runs on that machine and serves its disks read-only to your console, and the image that arrives is byte-identical to the source (checked by SHA-256). The transfer shows real throughput so a working copy never looks dead.

Do
  • Use the network route only on machines you are authorised to read.
  • Watch the throughput figure &mdash; it proves the copy is really moving.
  • Verify the image length against the source before releasing the machine
  • Run the agent only on a network you control
  • Record the start and finish times: a large drive over a slow link is an overnight job
Don’t
  • Do NOT expect the agent to take orders from a server &mdash; it only reports and serves, by design.
  • Do NOT assume a machine that 'checked in' is reachable; the roster probes it first.

The steps, in order

Runs a read-only agent on the far machine and copies a disk across the local network.

1Pair2Which drive3Copying4Done
  1. Pair with the other machine

    safety

    Install and start the agent there; it offers its disks read-only. Both machines show the same pairing code.

    recoveryantra remote agent
  2. Which drive should be copied?

    The agent lists what it can offer, with size and health.

    recoveryantra remote list
  3. Where should it be saved?

    safety

    A local folder with room for the whole drive.

  4. Copying

    Live throughput and an estimate. The copy is verified by hash - a transfer that looks finished and is short is the failure this must never hide.

    recoveryantra remote image --host <agent> -o <image.dd>

In the app

The network-drive workspace: find the machine, then image its disk.
The network-drive workspace: find the machine, then image its disk.needs a device, shown in its honest waiting state

Worked examples

A drive must be read in a machine that cannot be dismantledbusiness

The data is on a machine that cannot be opened: a laptop under warranty, a server that must not be taken apart, or a site nobody can attend today.

  1. Run the agent on the target machineIt serves the drive read-only across the network.
  2. Image the drive from the working machineThe image lands on your storage, and the recovery runs against it.
  3. Verify the image before releasing the machineA short image is reported as failed rather than handed over.
recoveryantra remote agentRun on the machine holding the drive, so it can be read across the network.
recoveryantra remote listSee which drives that machine is offering.
recoveryantra remote imageCopy the drive across to local storage.
recoveryantra recover --image E:\remote.dd -o E:\Out --include-intactRecover from the image once it has arrived.
Options that matter here
--include-intactUsually required, since the machine's files were not deleted.
--reportWorth producing when the machine is going back to somebody else.
Honest limits
  • The transfer is only as reliable as the link, and a large drive over a slow network takes as long as it takes
  • A machine that will not boot at all needs rescue media or the disk removing after all
Options & why, every switch, in plain words
<rcmd>remote
Work with a machine across the network. `agent` runs on the far machine and offers its disks read-only; `discover` and `list` find it and show what it has; `image` copies a disk that is not in use; `volumes` asks a running machine what it has and whether it can be frozen; `live` acquires a machine that is STILL IN USE, through a snapshot taken on that machine. Use the network route when the drive cannot be removed: a machine under warranty, a server that cannot be opened, a member of staff three time zones away, or a site you cannot attend.
Cost / when: The transfer is only as reliable as the link. The image is verified on arrival, and a short image is reported failed rather than handed over as complete. `live` additionally creates a snapshot on the far machine, which allocates space there - so a live acquisition writes to the endpoint even though it never writes to the data being acquired, and every result records that. A volume that cannot be frozen is refused rather than read while it moves. Live acquisition is built into Enterprise, Forensics and the Suite.
Bigger & unusual storage

A chip-off, JTAG or PC-3000 dump, ingested by the Imager

Bring in a raw dump another rig made, and turn it into something you can recover from.

When a lab has already pulled the bytes off a chip, a chip-off NAND read, a JTAG dump, or a PC-3000 image with its bad-sector map, the Imager ingests that dump. A raw NAND dump is reconstructed (ECC, page/spare geometry, XOR) into a mountable image; a foreign forensic container or a hardware imager’s image is normalised through image --source. Then you recover from it with the ordinary flow. The Imager is free, so this costs nothing.

Honest ceiling: this ingests a dump someone else produced. Physically reading a chip off the board, or capturing a live bus, is hardware-rig work and stays out of scope, the app says so.

A macro of a NAND flash memory chip
A raw NAND dump, rebuilt into a mountable image.
Do
  • Bring the dump and any geometry the chip lab noted (page size, ECC, planes).
  • Let the reconstruction propose the geometry, then recover from the mountable image.
Don’t
  • Do NOT expect this to read a chip off the board &mdash; that is a hardware rig&rsquo;s job.
  • Do NOT discard the original dump; keep it until the recovered image is confirmed good.

The steps, in order

A lab that reads a bare memory chip hands you a raw dump, not a disk. This works out the page and block geometry, unscrambles the controller, applies the chip's error correction and puts the blocks back in order, then writes an image the recovery flow can open.

Chip-off NAND is one screen, not a numbered wizard: you analyse the dump (which writes nothing) and then rebuild the image from the same screen, so there is no rail to hang.

  1. Point at the raw dump

    The file the lab produced, spare (OOB) areas included. It is read-only; nothing is written to it.

  2. Analyse first

    Read the dump and report the geometry, scrambling, error correction and block map. It writes nothing and tells you which figures, if any, the lab still needs to supply.

  3. Where should the image be saved?

    safety

    A separate drive from the dump.

  4. Rebuild the image

    Write the image, and read the count of pages the error correction could not fully fix before trusting it - a complete image is not the same as a fully verified one.

In the app

The NAND reconstruction workspace &mdash; geometry hints if the lab knows them.
The NAND reconstruction workspace &mdash; geometry hints if the lab knows them.needs a device, shown in its honest waiting state
Options & why, every switch, in plain words
<dump>nandrecon
The raw dump a lab read straight off the bare NAND chip, spare (OOB) areas included. It is not a disk image yet; this command is what turns it into one the recovery engine can read.
-onandrecon
Where to write the reconstructed image, on a different drive from the dump. The rebuilt image is written whole so the ordinary recovery flow can open it like any other disk image.
--analysenandrecon
Read the dump and report the geometry, scrambling, error correction and block map it can work out, writing nothing. Run this first, before you commit to an image, because it costs nothing and tells you which figures still need supplying.
--page-sizenandrecon
The page size in bytes when the lab already measured it, so it is taken as fact instead of inferred. Supplying a wrong figure produces an image that looks like a disk and holds nobody's files, so give it only when you know it.
--spare-sizenandrecon
The spare (out-of-band) area size in bytes when the lab measured it. It is taken as given rather than inferred; a wrong value shifts every page and the result carves to nothing, so supply it only when known.
--pages-per-blocknandrecon
How many pages make up an erase block when the lab measured it. It is used for the block map; an image can still be built without it, in the order the chip stores rather than logical order.
--xor-keynandrecon
A file holding the controller's XOR keystream when the lab supplied one. A dump scrambled from end to end cannot be de-scrambled by analysis alone, so this file is what makes such a dump readable at all.
--xor-periodnandrecon
The length in bytes at which the scrambling keystream repeats, when it is known. It narrows the de-scramble search; leave it off and the period is recovered from the dump.
--ecc-schemenandrecon
The controller's error-correction code, bch or hamming, when automatic detection could not settle it. It decides how spare bytes are read as correction data, so name it only when you know the controller.
--ecc-stepnandrecon
How many data bytes each error-correction step covers, when detection needs help. It pairs with the scheme and strength; the wrong step corrects nothing, so supply it only from the controller's datasheet.
--ecc-tnandrecon
The correction strength, the number of bit errors each step can fix, when detection needs help. It has to match the controller; a value too low leaves errors, too high reads correction bytes as data.
--ecc-offsetnandrecon
Where the correction bytes begin inside each page's spare area, when it is known. It positions the read of the correction data; leave it off and the offset is inferred from the dump.
--ftl-offsetnandrecon
Where the logical block address sits inside the spare area, when the lab knows the controller. It is what lets the blocks be put back into the order a filesystem expects rather than the chip's own order.
--ftl-widthnandrecon
How many bytes the logical block-address field takes in the spare area, when it is known. It pairs with the offset to read the block map; an image still builds without it in physical order.
--ftl-endiannandrecon
The byte order of the block-address field, little or big, when the lab knows the controller. It only matters once the offset and width are set, and the wrong order scrambles the block map.
--forcenandrecon
Write an image even when the geometry could not be confirmed, taking the best guess rather than refusing. Use it only after --analyse shows how uncertain the figures are.
Cost / when: A forced image is built on unconfirmed page and block sizes, so it can look like a sound disk while holding nonsense; the run records that it was forced.
--deviceimage
Image the drive first whenever it is failing, whenever the original must go back to the client untouched, or whenever the matter may be produced. Every later step runs against the image.
Cost / when: Imaging reads the whole drive once. On a drive that is actively dying that single pass is the best chance you get, so choose the retry policy before starting, not after.
--sourceimage
Re-image an existing file, for example to convert a raw image to E01 or to make a working copy of an evidence image.
-oimage
The image path on the case store. Name it for the exhibit, not for the machine.
--retriesimage
Same trade-off as on acquire: more retries recover more marginal sectors and cost more reads of a failing surface.
--formatimage
Use e01 for evidential work: it is compressed and carries the acquisition metadata other forensic tools expect. Use raw when the image will be mounted or read by tooling that only takes a flat image.
Cost / when: Raw images are the size of the whole drive, including empty space.
--forceimage
Only after reading the objection. See acquire.
--targetedimage
Filesystem-aware, read-once imaging: the filesystems' own allocation maps say which space holds data, and only that is read and copied - free space is skipped without touching the drive. Use it to image a large or failing drive faster and more gently, and to get a smaller image, when the live files are what matter.
Cost / when: Deleted files still sitting in free space are NOT captured - free space is exactly where they live. When deleted data matters, take a full image (omit --targeted). A filesystem we cannot read a map for is imaged in full, so it is never wrong, only sometimes not smaller.
--entropy-mapimage
Measure the entropy of the data as it is copied and record which spans are high-entropy - encrypted or compressed - in the image's .map.json. Use it to see at a glance whether a drive (or a region) is encrypted before spending time on recovery.
Cost / when: Entropy cannot tell encryption from compression; a high-entropy span may be either. It is a signpost, not a verdict.
Bigger & unusual storage

Files from a cloud folder or mailbox

Pull back what a cloud-synced folder deleted, or collect a mailbox from Microsoft 365 / Google.

Some data lives in the cloud, not on the disk in front of you. The app can read a provider export or a cloud-sync cache to bring back files a synced folder deleted, and (in the Suite) collect a mailbox from Microsoft 365 or Google Workspace with authorisation, narrowed by date and keyword, written out as ordinary .eml files anyone can open.

Do
  • Collect only what the authority covers &mdash; narrow by date and keyword.
  • Export to .eml so the result opens in any mail app, not just this one.
  • Exhaust the provider's own version history before doing anything else
  • Take the machine out of use as soon as the loss is reported
  • Search rather than browse: a full-volume recovery is too large to read by eye
Don’t
  • Do NOT over-collect a whole mailbox when the authority is one quarter.
  • Do NOT treat a cloud login found in evidence as permission; that is refused on purpose.

The steps, in order

Cloud data is recovered two ways: the copy synced to this computer, and the provider's own version history / restore. We do both, honestly - we can't raw-read a cloud service.

Cloud acquisition runs from the CLI and the export ingest; there is no workspace panel to hang a rail on yet.

  1. Which cloud?

    This sets where the local copy lives and which restore to use.

    OneDrive / SharePointGoogle DriveDropboxBoxiCloud DriveAWS S3Azure BlobGoogle Cloud Storage
  2. Is there a synced copy on this computer?

    If the account was synced here, the files (or online-only stubs) are on the local disk and we recover them directly.

    Yes, there's a local sync folderNo / online-onlyNot sure - scan for it
  3. Where should recovered files be saved?

    safety

    A separate drive from the sync folder.

  4. Use the provider's restore for the rest

    For anything not cached locally, use the provider's version history, point-in-time restore, or trash window (OneDrive Files Restore 30 days, Google/Dropbox version history, S3 versioning). We tell you exactly which and how long the window is.

  5. Recover

    We recover the local sync cache and report the provider-side restore avenue for each file that lives only in the cloud.

In the app

The cloud workspace &mdash; point it at an export file and an output folder.
The cloud workspace &mdash; point it at an export file and an output folder.needs a device, shown in its honest waiting state

Worked examples

Files deleted from a cloud-synced folder are past the provider's retentionbusiness

Files were removed from a OneDrive, Google Drive or Dropbox folder and the provider's own recycle bin no longer has them. The local cache on the machine may still hold copies.

  1. Check the provider's version history firstWhere it still holds the file, that is the complete and correct answer, and it takes minutes.
  2. Recover the local sync cache from the machineThe client keeps local copies and metadata that frequently survive the deletion.
  3. Stop using the machine while this is outstandingThe cache is on the same volume as everything else the machine writes.
recoveryantra recover --device \\.\PhysicalDrive0 -o E:\OutRecover deleted files, including the cloud client's local cache.
recoveryantra search E:\Out "quarterly report"Find the specific document across a large recovery.
Options that matter here
--modesmart. Cache files are ordinary files on the volume.
--reportUseful when the client needs to show what was and was not recoverable.
Honest limits
  • The provider's copy of the account is not read directly; the local cache is what is recovered here
  • A machine that has been in heavy use since the deletion will have overwritten much of the cache
Options & why, every switch, in plain words
<cloudcmd>cloud
Pick what to do: `steps` shows the stages (free); `ingest` takes in a provider export the admin produced; `collect` acquires a mailbox live over the API; `caches` finds local sync caches.
Special file types

After ransomware

Before you pay or panic: shadow copies, partly-encrypted files, and known decryptors, worked methodically.

Ransomware encrypts files, but it often misses things. The app looks for Windows shadow copies and provider snapshots that predate the attack, recovers the parts of large files the malware never reached, identifies the family so you can check for a public decryptor, and recovers deleted originals the attacker thought were gone. It is methodical and honest, it never claims to break strong encryption it cannot.

Do
  • Isolate the machine and image it before anything, so evidence and shadow copies survive.
  • Check for shadow copies and snapshots first &mdash; they are often the whole answer.
  • Identify the family and look for a public decryptor before considering payment.
  • Isolate first, then stop using the machines entirely
  • Preserve a copy of the ransom note and a sample encrypted file
  • Do not rename or delete the encrypted files; they are evidence and sometimes partly recoverable
  • Work from an image where the incident may be litigated
  • Check snapshots before committing to any other recovery route
  • Do not let anyone run a clean-up or a reinstall until this is checked
  • Record which snapshot each recovered file came from
  • Capture memory at the scene if the machine is still running
  • Salvaged partial content is labelled as partial everywhere it travels
  • Extract database and virtual-disk contents rather than trying to repair the encrypted container
  • Verify before running, on copies, with the originals preserved
  • Where the index says no decryptor exists, that is the answer; do not substitute an unverified tool
  • Record the tool, version and hash used, in the incident notes
Don’t
  • Do NOT keep the machine running and writing &mdash; it can destroy the shadow copies you need.
  • Do NOT run the attacker&rsquo;s 'decryptor' &mdash; image first and work on the copy.
  • Do NOT pay on the assumption the files are unrecoverable until you have checked.
  • Do NOT delete the encrypted files. A decryptor may be published later, and without the files it will be useless to you.
  • Do NOT reinstall or wipe the machine yet. It holds the evidence of how they got in.
  • Do NOT pay before checking. A good proportion is often recoverable for nothing.

The steps, in order

We'll work out what's recoverable without ever paying - starting with the files that were never really encrypted.

1What was hit2What hit you3What survived
  1. First, preserve the evidence

    safety

    Do NOT delete the encrypted files or the ransom note, and don't wipe the machine. Keep the note, a sample of the malware, and - if the machine is still on - a memory image. We'll explain each.

  2. Point us at the affected files

    Choose the folder (or a copy of the drive) that was hit. We only read it.

  3. Where should recovered data be saved?

    safety

    A clean, SEPARATE drive - never the infected one. Keep the encrypted originals too; a decryptor may appear later.

  4. Find the free wins

    We check every file: some were only renamed or fake-encrypted and come back with no key at all.

  5. Your recovery plan

    We identify the family, look for surviving originals and any known weakness, and give you an honest plan - including when the files themselves can't be decrypted.

In the app

The ransomware workspace &mdash; point it at the affected folder or drive.

In your words

“Files have been encrypted and there is a ransom note”
What you see
  • Files renamed with an unusual extension
  • A note demanding payment
  • It may still be spreading
Why it works

Some of what looks encrypted is not: files that were only renamed, partially encrypted, or whose originals survive in shadow copies, temporary files or free space. Those come back with no key and no payment. What genuinely is encrypted is said to be encrypted.

Real example

A file server hit overnight: 190,000 files renamed. 41,000 came back without any key - deleted originals still in free space, plus documents whose temporary copies had never been encrypted. The rest genuinely needed a key nobody had, and the report said so.

recoveryantra ransomware --dir E:\Shares --triageFind what comes back with no key at all.
recoveryantra ransomware --dir E:\Shares --verdictIdentify the family and give an honest plan.

Worked examples

Files across a server were encrypted overnightincident

Files have been renamed with an unfamiliar extension and a ransom note has appeared. The first hour decides how much comes back, because the originals many strains delete are still in free space.

  1. Take the affected machines off the network and STOP USING THEMContinued use overwrites the free space holding the deleted originals, which is the highest-value recovery available.
  2. Identify the family before planning anythingWhat is recoverable depends entirely on which strain it is.
  3. Triage, then hunt the originals, then state a verdictIn that order. The verdict is only honest once the first two are done.
recoveryantra ransomware --dir E:\hit --note-file E:\hit\README.txtIdentify the family from the encrypted files and the note.
recoveryantra ransomware --triage E:\hitHow many files are recoverable with no key, salvageable, or truly encrypted.
recoveryantra ransomware --recover-originals E:\hitFind the originals the encryption process deleted.
recoveryantra ransomware --verdict E:\hitThe full flow fused into one stated outcome with a priority order.
Options that matter here
--note-fileThe note is frequently the strongest single identifier of the family.
--recover-originalsThe highest-value step and the most time critical. Run it early.
--verdictUse when a client or an insurer needs one defensible answer rather than three separate outputs.
--usnjrnlAdd when the original PATHS matter as well as the contents.
Honest limits
  • Strong encryption with a key held only by the attacker cannot be broken by anyone
  • Every hour the machines stay in use reduces what can be recovered from free space
The attacker deleted the backups before encryptingincident

Backups have been deleted or encrypted as part of the attack. Windows shadow copies and file-system snapshots are frequently missed by the attacker and are the fastest complete recovery.

  1. Check for shadow copies before anything elseThey hold the volume as it was before the encryption, and reading one is far faster and more complete than carving.
  2. Check NAS and volume-manager snapshotsQNAP, Synology and LVM snapshots survive many attacks.
  3. Recover from the snapshot rather than from the encrypted volumeA snapshot recovery returns whole files with their names and folders.
recoveryantra recover --device \\.\PhysicalDrive1 --vss-listList the Windows shadow copies present on the volume.
recoveryantra recover --device \\.\PhysicalDrive1 --vss-snapshot {c4a1b2...} -o E:\OutReconstruct the volume as it was at that snapshot and recover it.
recoveryantra ransomware --nas-snapshots E:\lvm-metadata.txtEnumerate NAS and LVM snapshots from the volume metadata.
Options that matter here
--vss-listAlways run first on a Windows volume in an incident.
--vss-snapshotFrequently the fastest complete recovery available.
--nas-snapshotsThe equivalent question on QNAP, Synology and LVM estates, and commonly overlooked.
Honest limits
  • An attacker who deleted the shadow copies as well leaves nothing on this route, and the product will say the list is empty
  • A snapshot older than the work that matters recovers an older state, not the current one
Large files were only partly encryptedincident

Several strains encrypt only part of each file to work faster across a large estate. The untouched regions of large documents, databases and virtual disks are still readable.

  1. Identify the strain and its encryption patternThe pattern determines which regions survived.
  2. Map the damage before deciding what is worth extractingTriage reports what proportion of each file is intact.
  3. Extract the untouched regionsFor a database or a virtual disk, the intact regions are frequently enough to recover the contents.
recoveryantra ransomware --dir E:\hit --listReview the known families and their outlook.
recoveryantra ransomware --triage E:\hitDamage assessment across the affected folder.
recoveryantra ransomware --verdict E:\hit --memory E:\memory.rawFull flow, including a scan of a captured memory image for key material.
Options that matter here
--triageRun before promising anything. It separates recoverable, salvageable and genuinely encrypted.
--memoryOnly useful if memory was captured while the machine was still running. That is a reason to capture it at the scene.
--listReview the family's known behaviour before planning.
Honest limits
  • The encrypted regions are not recoverable without the key
  • A partly recovered document is a partial document, and is reported as one
A decryptor has been found online for the identified familyincident

A published decryptor appears to exist for the strain. Running an unverified executable against the client's only remaining data is how a single incident becomes two.

  1. Check the index for a legitimate published decryptorIt names the tool, the publisher and the scope, or states that none exists.
  2. Verify the downloaded file before running itCompare its hash against the catalogue entry for the tool.
  3. Test on copies, never on the only remaining dataA decryptor that behaves unexpectedly must not be able to make things worse.
recoveryantra ransomware --decryptor stop_djvuThe offline decryptor index for that family: publisher, key status and scope, or a statement that none exists.
recoveryantra ransomware --verify-tool E:\downloads\decryptor.exeHash the downloaded tool and check it against the catalogue.
Options that matter here
--decryptorRun before searching the internet, not after. It also states when no legitimate tool exists.
--verify-toolAlways. A tool from anywhere other than the named publisher is an unknown executable aimed at the client's last copy.
Honest limits
  • Most modern families have no published decryptor and the index says so
  • A decryptor covers a specific time window or key set; it may not apply to this victim even for the right family
Options & why, every switch, in plain words
--dirransomware
Point at a folder holding encrypted files and the ransom note. The first question in every incident is which strain, because that decides what is realistically recoverable.
--namesransomware
Supply observed filenames when you cannot give the tool access to the affected system, for example when working from a photograph of a screen or a client's email.
--note-fileransomware
Supply the ransom note itself. It is often the strongest single identifier of the family.
--listransomware
Review the known families and their outlook when scoping an incident or briefing a client on likely outcomes.
--decryptorransomware
Check whether a legitimate published decryptor exists for the identified family before planning any other recovery.
Cost / when: Where none exists the index says so. Do not substitute an unverified tool found by searching; that is how a second incident starts.
--verify-toolransomware
Always run this against a decryptor you have downloaded, before running it on client data.
Cost / when: A decryptor obtained from anywhere other than the named publisher is an unknown executable being run against the only copy of the data.
--triageransomware
Run early. It reports how many files are recoverable with no key, how many are salvageable, and how many are genuinely encrypted, before anyone commits to a recovery plan or a payment discussion.
--recover-originalsransomware
Run on every incident. Many strains write a new encrypted file and delete the original; those deleted originals are frequently still present in free space, temp folders, the Recycle Bin, cloud caches and database sidecar files.
Cost / when: This is the highest-value step in the whole flow and it is time-critical: continued use of the machine overwrites exactly the free space the originals are sitting in.
--usnjrnlransomware
Add the change journal to --recover-originals when you need the original PATHS as well as the file contents.
--verdictransomware
The single command to run when you need one defensible answer for a client or an insurer: triage, identification and originals recovery fused into a stated outcome with a priority order.
--memoryransomware
Supply a memory image or pagefile with --verdict when the machine was captured while still running. Some strains leave key material in memory.
Cost / when: This only helps if memory was captured before shutdown. It is a reason to capture memory first at the scene.
--esxiransomware
Use for a hypervisor or Linux estate rather than a workstation. It produces the playbook for that family: descriptor rebuild, damage mapping, and what the specific strain leaves recoverable.
--rebuild-vmdkransomware
Use when the flat VMDK holding the virtual machine's data survived but its small descriptor file was encrypted. Rebuilding the descriptor makes the intact data readable again.
Cost / when: Requires the exact byte size of the flat file. A wrong size produces a descriptor that opens and misreads the disk.
--flat-sizeransomware
The exact size in bytes of the -flat.vmdk, taken from the file itself, not from the datastore listing.
--nas-snapshotsransomware
Enumerate NAS snapshots from the volume metadata. On QNAP, Synology and LVM estates these are frequently the fastest complete recovery and are missed because the attacker deleted the visible backups.
--lotlransomware
Scan recovered scripts, registry exports and memory strings for the recovery key or archive password that living-off-the-land ransomware left behind when it abused BitLocker, EFS or a bundled 7-Zip. The secret is often still present, so a ShrinkLocker case is not the unrecoverable AES it first looks like.
Cost / when: It recovers the key the abuse left, it does not break BitLocker or strong archive crypto; a case with no left-behind key is reported as such rather than pretended recoverable.
--reconstructransomware
Point at one INTERMITTENTLY-encrypted file - a document or a photo the ransomware only part-encrypted to save time. It pulls back the readable content left in the intact blocks between the encrypted ones. Use it when a large file is 'damaged' rather than fully scrambled.
Cost / when: This is surviving content, not a decryption: the parts that WERE encrypted are still gone, so the result can be partial. It is written only when something readable is actually found.
--exploitransomware
Point at one encrypted file to attempt a DOCUMENTED cryptographic weakness - a reused or repeating keystream, which some families leave. Use it when identification flags keystream reuse; it does nothing against a sound per-file key, and says so.
Cost / when: The recovery is a heuristic and is accepted only when it validates as no-longer-ciphertext, so a wrong key is refused rather than written. Always confirm the recovered file opens before relying on it.
--periodransomware
The keystream length in bytes, when you already know it from the family or from analysis; leave it at 0 to let the tool detect the period from the repeats in the ciphertext.
--outransomware
Where to write the reconstructed or recovered file. Choose a path off the affected drive; without it the result is only reported, not saved, so nothing is written until you ask for it.
Special file types

A database file that will not open

SQL Server, MySQL/InnoDB, PostgreSQL, Access, MongoDB, SQLite, rows out even when it will not attach.

A recovered database is a heap of bytes until something reads it. The database workspace opens the real formats, SQL Server MDF, MySQL InnoDB, PostgreSQL, Microsoft Access, MongoDB, SQLite, at the page-and-row level, so it pulls the tables out even when the server will not attach the file. Deleted rows come back flagged, and the answer is a file that opens (CSV), not one that only this tool can read.

Do
  • Work on a copy of the database file, never the live one.
  • Export the tables to CSV so the result opens anywhere.
  • Keep the deleted-row flags &mdash; they tell you what was removed.
  • Always work from a copy, with the engine stopped
  • Check the row counts against what the business expects before reporting success
  • Preserve the deleted-row flag through to whatever is handed over
  • Stop the server before copying the files
  • Recover the dictionary information along with the rows where it survives, or columns come back unnamed
  • Validate a sample of rows against something the business recognises
  • Stop use of the database immediately, and above all do not compact it
  • Work from a copy
  • Present recovered deleted records as recovered deleted records
  • Stop the server before copying
  • Check the document count against what the application expects
  • Where compression is not supported, the product reports it rather than returning approximate documents
  • Copy the -wal and -shm files with the database; they are part of it
  • Do not open the database in the application first: that can checkpoint the log and lose the very pages wanted
  • Keep the deleted flag through to the deliverable
Don’t
  • Do NOT run repair tools against the only copy of the file.
  • Do NOT assume 'will not attach' means gone &mdash; the rows are usually still there.
  • Do NOT run the vendor's repair with data loss allowed on the only copy. It works by DELETING what it cannot fix.
  • Do NOT keep restarting the server. Recovery attempts write to the file.

The steps, in order

Databases need care: a running server must not be read raw. We'll find out the situation first.

1Choose the file2What it is3The rows4Save them
  1. Is the database server running or stopped?

    safety

    If it's running, we must NOT read the live file - it would be inconsistent. We'll guide you to stop it or take a snapshot.

    StoppedStill runningIt's just a file / backup
  2. Which database is it?

    We can also detect this from the file. It sets how we read the pages.

    Detect it for meSQL ServerMySQL / MariaDBPostgreSQLOracleMongoDBRedisSQLiteAccessOther / legacy / mainframe
  3. What happened?

    This chooses the technique.

    Files deleted / drive formattedThe database won't open / is corruptA table was dropped or a bad DELETERansomware encrypted it
  4. Do backups exist?

    Always check first - restoring a good backup beats forensic extraction.

    Yes, I have backupsNo backupsNot sure
  5. Where should recovered data be saved?

    safety

    A separate drive. We save extracted rows to a NEW database or CSV and keep the damaged original.

  6. Recover

    We extract what's readable and tell you honestly what is validated versus lost - never a best-guess row.

In the app

The database workspace &mdash; point it at the file it will not attach.

In your words

“A database file will not attach or open”
What you see
  • SQL Server, MySQL, Postgres, Oracle, SQLite or Access
  • The server refuses to attach or start
  • You need the rows, not the server
Why it works

The rows are stored on pages inside the file, and those pages survive damage that stops the server. The rows can be read straight out of them - including rows that were deleted, which come back flagged so they can never be mistaken for live data.

Real example

A 40 GB MDF that SQL Server would not attach gave back 11.2 million rows across 63 tables, straight to CSV. 2,900 of them were deleted rows, marked as such in the export.

recoveryantra db --identify accounts.mdfIdentify it and say what can be extracted.
recoveryantra db --recover accounts.mdf --out D:\RowsWrite the rows out, deleted ones flagged.

Worked examples

SQL Server will not attach an MDF filedatabase

The database will not attach and the most recent backup has failed or is too old. The data file itself is present and the rows can be read out of its pages.

  1. Take the instance offline and copy the filesExtracting from files a running engine is writing to produces rows from a state that never existed.
  2. Identify the file before planning the workIdentification names the engine and the recovery method, which decides whether this is a short job.
  3. Extract the tables and rows to CSVThe rows are then loadable into a working instance.
recoveryantra db --identify E:\copy\accounts.mdfName the engine and the recovery method that applies.
recoveryantra db --recover E:\copy\accounts.mdf --out E:\Out\accounts.csvExtract records from the data file to CSV.
recoveryantra db --coverageReview which database families are covered and at what tier.
Options that matter here
--identifyAlways first. It decides the plan.
--recoverWork from a COPY, with the instance offline.
--outWrite to CSV whenever the rows are going to be reviewed or loaded elsewhere. Deleted rows are exported flagged; keep the flag.
--coverageUse when scoping or quoting; the tier matters more than presence in the list.
Honest limits
  • A live, running database is not repaired by this route
  • Pages that were never written to disk, or have been overwritten since, are not recoverable
  • This recovers data, not a complete server with its users, permissions and jobs
A MySQL InnoDB tablespace is orphaneddatabase

An .ibd file exists but the MySQL instance that owned it is gone or will not start, so the table cannot be attached in the normal way.

  1. Copy the tablespace files outWork from copies with the server stopped.
  2. Identify each fileIdentification confirms the engine and the format version.
  3. Extract the rowsThe table's own dictionary information is read where it survives, so columns come back named.
recoveryantra db --identify E:\copy\orders.ibdConfirm the engine and the recovery route.
recoveryantra db --recover E:\copy\orders.ibd --out E:\Out\orders.csvExtract the rows to CSV.
Options that matter here
--identifyFirst, as always.
--recoverFrom a copy, with the server stopped.
--outCSV for loading into a working server.
Honest limits
  • A tablespace whose pages have been overwritten cannot be fully recovered
  • Foreign keys, indexes and permissions are not reconstructed; this recovers data
Records were deleted from a Microsoft Access databasedatabase

Rows were deleted from an .mdb or .accdb and are needed back. Access marks records deleted rather than removing them until the file is compacted.

  1. Copy the file and stop anyone using itContinued use, and above all a compact operation, removes the deleted records permanently.
  2. Identify the formatJet 4 and ACE differ, and identification settles which applies.
  3. Extract the records, including deleted onesDeleted records come back flagged as deleted.
recoveryantra db --identify E:\copy\contacts.accdbConfirm the format and the route.
recoveryantra db --recover E:\copy\contacts.accdb --out E:\Out\contacts.csvExtract records, deleted rows marked.
Options that matter here
--identifyDistinguishes Jet 4 from ACE.
--outCSV keeps the deleted flag as a column.
--memoRequired for a dBASE file with a memo side-file; without it long text fields come back empty.
Honest limits
  • A compacted database has genuinely removed the deleted records
  • An Access database protected with a password needs that password
A MongoDB collection will not loaddatabase

A WiredTiger collection file is present but the server will not start or will not read it, and the documents are needed.

  1. Copy the data directory with the server stoppedAs with any database, extract from copies.
  2. Identify the collection fileIt confirms WiredTiger and the compression in use.
  3. Extract the documentsDocuments are read out of the pages and written out for reload.
recoveryantra db --identify E:\copy\collection-0-123.wtConfirm the engine and compression.
recoveryantra db --recover E:\copy\collection-0-123.wt --out E:\Out\docs.csvExtract the documents.
Options that matter here
--identifyConfirms WiredTiger and reports the compression, which decides whether the pages can be read here.
--outWrite the extracted documents out for reload.
Honest limits
  • A page compressed with a codec the build cannot decode yields nothing rather than approximate content
  • Indexes and server configuration are not recovered
Deleted rows are needed from an application's SQLite databasedatabase

An application stores its data in SQLite and rows have been deleted. SQLite frequently leaves deleted rows in the page or in the write-ahead log.

  1. Copy the database AND its -wal and -shm files togetherThe write-ahead log frequently holds the page that still has the deleted row. Copying the .db alone loses it.
  2. Identify and extractDeleted rows are recovered from free blocks, unallocated space and superseded pages in the log.
  3. Report deleted rows as deletedThey are flagged, and the flag has to survive the export.
recoveryantra db --identify E:\copy\app.dbConfirm the format and the recovery route.
recoveryantra db --recover E:\copy\app.db --out E:\Out\rows.csvExtract rows including recovered deleted ones.
Options that matter here
--identifyConfirms SQLite and reports what is present.
--outCSV, with the deleted flag preserved as a column.
Honest limits
  • A vacuumed database has genuinely removed the deleted rows
  • Where only fragments of a row survive, the text is reported as recovered text rather than reassembled into a row that was never seen
Options & why, every switch, in plain words
--identifydb
Run this first on any database file. It names the engine and the recovery method that applies, which decides whether this is a ten-minute job or a specialist one.
--coveragedb
Use when quoting or scoping. It lists every database family the build covers and the tier of recovery available for each.
Cost / when: A family listed at identify-and-route tier is not row-level recovery. Quote against the tier, not the presence in the list.
--recoverdb
Point at a copy of the data file when the server will not start or will not attach it, and the most recent backup is unusable.
Cost / when: Work from a COPY. Take the instance offline first: extracting from files a running engine is writing to produces rows from a moment that never existed as a consistent state.
--memodb
Required with a dBASE .dbf whose text fields live in a side file. Without it the long text fields come back empty.
--outdb
Write to CSV whenever the rows are going to be reviewed, handed to a client, or loaded into a working server.
Cost / when: Deleted rows are exported flagged. Preserve that column: an un-flagged export presents recovered deleted rows as live data.
Special file types

A mailbox that will not open (PST, OST, mbox, EDB)

Outlook says the file is damaged, the messages are salvaged straight out of it anyway.

“Outlook says the file is damaged” means its internal structures are gone, and a reader that trusts those structures answers zero. This engine sweeps the store for the messages themselves, validates each by content, and exports them as .eml plus an index. It reads PST and OST (healthy, then salvage), mbox, Maildir, EML and Exchange EDB. Salvaged mail is marked as salvaged everywhere it travels, because a salvage and a clean read differ in what they can give you.

Do
  • Copy the mailbox file first and work on the copy.
  • Export to .eml plus the index so the result is a mailbox someone can actually use.
  • Work from a copy and keep the original untouched
  • Tell the client whether the read was clean or salvaged: they differ in what they can deliver
  • Deliver an index alongside the messages; loose .eml files are not a mailbox anybody can use
  • Secure the OST before the machine is reissued or wiped
  • Confirm with the business who is authorised to read a former employee's mail before opening it
  • Deliver with an index
  • Hash the source store before and after; it must not change
  • Record whether each message came from a clean read or a salvage
  • Produce the index with the messages
  • Preserve directory structure when copying a Maildir or a profile: it carries the folder layout
  • Confirm character encoding on a sample of messages before delivering the whole set
Don’t
  • Do NOT run Outlook&rsquo;s scanpst against your only copy of the store.
  • Do NOT trust an extension &mdash; a renamed JPEG is refused; a crashed store is still read.
  • Do NOT run scanpst.exe on the only copy. It WRITES to the file, and on a badly damaged store it can make things worse.
  • Do NOT work on the original. Copy it first and work on the copy.

The steps, in order

A mail store that Outlook will not open is the case people actually turn up with. We read the healthy structures first and, when those are gone, sweep the file for the messages themselves.

1Choose the mailbox2What is in it3Save them
  1. Which mail store?

    A .pst or .ost, an mbox, a Maildir folder, loose .eml files, or an Exchange .edb. If it came off a drive you are recovering, point us at the recovered copy, not the drive.

  2. What is in it, and is it healthy?

    We report how many folders and messages we can see. A store Outlook calls damaged has lost the structures a normal reader depends on, so we sweep for the messages directly - anything found that way is marked salvaged everywhere it travels, because a salvage and a clean read differ in what they can give you.

  3. Where should the messages be saved?

    safety

    A folder on a different drive. Messages are written as .eml with an index.csv, because two thousand loose files is not a mailbox anybody can use.

  4. Save them

    Exported as .eml so they open in Outlook, Thunderbird and any review platform.

    recoveryantra mail <file.pst> -o <folder>

In the app

The mailbox workspace &mdash; a file or a folder of mail.

In your words

“Outlook will not open the mailbox file”
What you see
  • 'The file is not an Outlook data file'
  • Outlook reports it as damaged
  • A .pst or .ost that used to work
Why it works

Outlook calling a file damaged MEANS the structures a normal reader depends on are gone. So the file is swept for the messages themselves, and each candidate is validated by its own contents rather than by an index that no longer exists.

Real example

A store whose header and both index pages had been zeroed returned 0 messages to a normal reader. Sweeping it recovered 6 of 6 messages with their subjects, dates and attachments. The same sweep against a renamed JPEG returned nothing, which is what makes the result trustworthy.

recoveryantra mail archive.pst --listSee what is in it before writing anything out.
recoveryantra mail archive.pst -o D:\MailOut --format emlRead it if it is healthy, sweep it if it is not.

Worked examples

Outlook reports that the file is not an Outlook data filemail

Outlook refuses to open a .pst. That message means the header or the index structures are damaged, which is exactly the case the structured reader alone cannot handle.

  1. Copy the store and work from the copyRepair tools rewrite the original. Preserve it before anything runs.
  2. List what the store contains before exportingThe listing says whether the store read cleanly or had to be salvaged, which changes what you can promise.
  3. Export the messages to a format that will openThe deliverable is readable mail, not a repaired container.
recoveryantra mail E:\copy\archive.pst --listShow what is in the store and how it had to be read.
recoveryantra mail E:\copy\archive.pst -o E:\Out --format emlExport one file per message, ready to drag into Outlook.
recoveryantra mail E:\copy\archive.pst -o E:\Out --format mboxExport as a single mbox container for another client or a review platform.
Options that matter here
--listAlways run first. A salvaged read recovers messages but may not recover the folder structure.
--formateml for individual review or reimport into Outlook; mbox for Thunderbird, Apple Mail and review platforms.
-oNever the folder holding the store being read.
Honest limits
  • The product extracts messages; it does not write back a .pst that Outlook will reopen
  • Where the folder hierarchy is lost, messages are still recovered but their folder placement may not be
  • A PST password is a check Outlook makes before opening; it does not encrypt the store
A member of staff has left and only their OST remainsmail

The mailbox has been removed from the server and the only copy is the offline store file on the machine they used. Outlook will not open an OST without its original account.

  1. Copy the OST off the machineThe machine may be reissued, which destroys it.
  2. Read the store on its ownThe OST is read directly, without the account that created it.
  3. Export to a format the business can useUsually .eml for reimport, or mbox for review.
recoveryantra mail E:\copy\user.ost --listShow what the offline store contains.
recoveryantra mail E:\copy\user.ost -o E:\Out --format emlExport the messages.
Options that matter here
--listEstablish what is there before promising it.
--formateml for reimport into a mailbox; mbox for a review platform.
Honest limits
  • An OST that was never fully synchronised only holds what it had downloaded
  • The container is not rebuilt; messages are extracted
A mailbox has to be produced for review or disclosuremail

A mailbox is required in a form a review platform or another party can load, with a record of what was produced.

  1. Copy the store and record its hashThe production has to be traceable to the source.
  2. List the contents and record the countThe count is part of the production record.
  3. Export in the requested format with an indexThe index is what makes the production usable and checkable.
recoveryantra mail E:\copy\custodian.pst --listRecord what the store contains before producing anything.
recoveryantra mail E:\copy\custodian.pst -o E:\Production --format mboxProduce as a single mbox container.
recoveryantra mail E:\copy\custodian.pst -o E:\Production --format emlProduce as individual messages where that is what was asked for.
Options that matter here
--formatMatch what the receiving side asked for. mbox for a single container; eml for per-message production.
--listThe count and the read method belong in the production record.
-oA clean production folder, separate from the working copy.
Honest limits
  • Where an evidential chain of custody is required, that is RecoverYantra Forensics rather than Mail
  • Salvaged messages may lack folder placement, and the production should say so
Mail files came from a Mac or a Linux machinemail

Mail has arrived in a format nothing on the Windows bench will read: an Apple Mail store, a Thunderbird profile, or a Maildir tree.

  1. Point at the store or the folder holding itA directory of stores is processed as a set.
  2. List before exportingThe listing confirms the format was recognised.
  3. Export to a standard formatmbox or eml, depending on where the mail is going next.
recoveryantra mail E:\copy\Maildir --listConfirm the format and show what is in it.
recoveryantra mail E:\copy\Maildir -o E:\Out --format mboxExport the mailbox as a single mbox container.
Options that matter here
--listConfirms the store was recognised before you commit to a full export.
--formatmbox keeps the mailbox as one container; eml gives one file per message.
Honest limits
  • Encrypted or password-protected profiles need their credentials
  • The container is not rebuilt in its original format
Options & why, every switch, in plain words
<path>mail
Point at the mail store itself, including one the mail client refuses to open. Take a copy first and work from the copy.
-omail
Where the exported messages go. Never the folder holding the store being read.
--listmail
Run first. It shows what is in the mailbox, and whether the store read cleanly or had to be salvaged, before you commit to a full export.
Cost / when: A salvaged read recovers messages but may not recover the folder structure. Knowing which you have changes what you promise.
--formatmail
Choose eml when the messages are going back into Outlook or being reviewed individually; each message is a separate file. Choose mbox when the mailbox is going into Thunderbird, Apple Mail or a review platform as a single container.
Cost / when: Neither format is a .pst. The product extracts messages; it does not rebuild an Outlook store file.
Special file types

A recovered video that will not play (or plays sound only)

Sized from its own index, not a broken header, so the picture comes back, and finalised to play everywhere.

A recovered phone or camera video often plays sound with no picture, or will not open at all, the length field the phone finalises last is wrong. The engine sizes the video from its index (the tables that say where every frame sits), not from that broken header, so the picture comes back, and then finalises the file so it opens in every player. Where a fragment was genuinely overwritten, it tells you plainly rather than handing back a file that will not play.

Do
  • Run the video repair over the folder of recovered clips after a scan.
  • Keep the originals &mdash; repair works on a copy.
  • Repair the copy, never the original recovery output
  • Confirm the repaired file plays before reporting it as recovered
  • Sound-but-no-picture almost always means the index survived and the media was cut short; check the recovery for a size warning
Don’t
  • Do NOT re-encode a broken clip in another tool first; that can lose the frames.
  • Do NOT assume a silent-picture clip is lost &mdash; the index usually rebuilds it.
  • Do NOT re-encode the file with a converter. That bakes the fault in and loses quality permanently.
  • Do NOT overwrite the original. Repairs always work on a copy.

The steps, in order

A recovered video whose index is damaged plays sound with no picture, or will not open at all. Where the bytes are there, this rebuilds what points at them.

1Choose the videos2A working sample3Repairing4Done
  1. Which videos?

    safety

    The recovered files that will not play. Originals are never modified - we always work on a copy.

  2. A working video from the same camera

    Optional but it is what makes the difficult cases work: a healthy file from the same device supplies the structure the damaged one has lost.

    recoveryantra fixwith <good.mp4>
  3. Repairing

    We rebuild the index and correct the container header. What we CANNOT do is invent picture data that was overwritten - where frames are genuinely gone, the result says so rather than reporting a repair that changed nothing.

    recoveryantra fixvideos -o <folder>
  4. Does it play?

    Each repaired file is checked for a real video track and an index that points inside the file, before it is called repaired.

In the app

Repair recovered videos &mdash; point it at the folder of recovered clips.

In your words

“A recovered video plays sound but no picture, or will not open”
What you see
  • The file is there and is roughly the right size
  • Audio plays, the picture is missing or frozen
  • VLC opens it but Windows Media Player does not
Why it works

A video's index says where every frame is. If it is damaged, or was written last and lost, players cannot find the picture even though it is all there. Rebuilding the index is enough - and where frames really are missing, it says so instead of claiming a repair.

Real example

A card of phone videos came back 90% unplayable. The container header disagreed with the video's own index in every case. Sizing from the index and rewriting the header made them play: 1 clip stored as 939 MB was correctly 296 MB of video.

recoveryantra fixvideos D:\RecoveredRebuild the index and correct the header, working on copies.
recoveryantra fixwith --file broken.mp4 --reference good.mp4 -o D:\FixedUse a healthy file from the same camera for the hard cases.

Worked examples

A recovered video will not playbench

The recovery listed a video as recovered, but the file will not open, or plays sound with no picture. This is normally a missing or inconsistent index rather than missing picture data.

  1. Run the video repair over the recovery folderIt rebuilds the index in the recovered COPY, which is what most players read.
  2. If that is not enough, repair using a healthy clip from the same deviceA reference file from the same camera donates structure only; the picture data comes entirely from the damaged file.
recoveryantra fixvideos D:\RecoveredRepair the index of every unplayable video in the folder.
recoveryantra fixwith --file broken.mp4 --reference good.mp4 -o fixed.mp4Rebuild a missing index from a healthy clip by the same device.
Options that matter here
--referenceMust be from the SAME camera or phone. A reference from a different device produces a file that opens and is wrong.
-oWrite the repaired copy separately when the original has to be preserved exactly as recovered.
Honest limits
  • Picture data that was overwritten on the source cannot be rebuilt by anything
  • A repaired file is reported as repaired, not as byte-exact
  • The repair workspace is in the Suite; the Imager extracts the file but does not repair it
Options & why, every switch, in plain words
<folder>fixvideos
Run over a completed recovery folder when videos are listed as recovered but will not play. It repairs the index in the recovered COPY.
Cost / when: It cannot restore picture data that was overwritten on the source. A clip whose media was partly lost stays partly lost.
Cameras & recorders

CCTV / DVR / NVR recorder footage

Open the recorder like the recorder does, cameras down the side, time across, then cut the clip you need.

A security recorder writes its own format, so the app opens it the way the recorder does: read its index in seconds, show the cameras down the left and time across the top, play straight from the disk, and cut one camera between two times, lossless, with a sidecar, before anything is recovered. Where the disk has no readable table, cameras are inferred from the stream itself and labelled honestly (“camera A/B”, “time unknown”), never with an invented channel number. It handles Hikvision, Dahua and H.264/H.265 recorders.

A security DVR recorder with dome cameras
The recorder&rsquo;s own view, before anything is recovered.
Do
  • Image the recorder disk first if it is failing, then work from the image.
  • Cut the exact camera and time range you need &mdash; it is lossless and fast.
  • Keep the sidecar with each clip; it carries the digest and the times.
  • Power the recorder down before removing the disk; a running recorder overwrites the oldest footage continuously
  • Identify first, extract second
  • Note the recorder's clock setting: recorder time is frequently wrong and the timestamps inherit it
  • Identify and index the recorder before choosing a clip, so the range asked for is the range that actually matters
  • Prefer the lossless cut; only re-encode when the exact frame range is required and say so in the handover notes
  • Keep the original clip and every cut's provenance sidecar; a re-encoded clip is a fair representation, not the recorder's bytes
Don’t
  • Do NOT let the recorder keep running and overwrite the footage you need &mdash; power it down and pull the disk.
  • Do NOT trust an invented channel number on a table-less disk; the honest labels are camera A/B.
  • Do NOT leave the disk in the recorder. It keeps recording, and it overwrites oldest first - which is exactly the footage you want.
  • Do NOT let the recorder initialise or repair the disk.
  • Do NOT carve the whole disk first when the index reads - that is hours, and the choice comes after. Carve when the table is gone, and the view says so ("inferred").
  • Do NOT trust a time the disk did not give: a table-less disk shows "time unknown", never an invented channel number or clock.
  • Do NOT zip up the whole extraction and send it - a customer or insurer asked for one clip, and sending everything else needlessly widens who sees the footage.
  • Do NOT re-encode by default. --reencode changes every pixel; the plain cut keeps the recorder's own bytes and says so on screen.

The steps, in order

We recover clips from an NVR/DVR disk or image, then give you the same player, download, cutting and enhancement tools a forensic examiner has.

1Recorder disk2Where to save3Finding video4Clips
  1. Point us at the recorder disk or image

    Choose the NVR/DVR disk or a copy of it.

  2. Read the disk's index first

    Cameras against time, read from the recorder's own table in seconds - nothing is written. A disk with no table shows cameras inferred from the video itself (labelled A/B/C, never an invented channel number) and says the times are unknown rather than guessing them.

    recoveryantra cctv index E:\dvr.dd
  3. Where should the clips be saved?

    safety

    A separate drive.

  4. Recover the clips

    We carve the video and mark any clip that may not play, so you aren't misled.

    recoveryantra cctv --image E:\dvr.dd -o D:\Footage
  5. Check a clip before deciding what to do with it

    Frame count, keyframes, picture size and time base - the same player a forensic examination uses.

    recoveryantra cctv play D:\Footage\clip_00000000.h264
  6. Copy one clip out, byte-exact

    The clip is copied as carved and verified against its own SHA-256 before you're told it's done.

    recoveryantra cctv download D:\Footage\clip_00000000.h264 -o D:\Handover
  7. Cut just the range you need

    Remuxed losslessly by default - the recorder's own compressed pictures, not re-encoded - unless you ask for the exact frame range and accept that every pixel becomes new.

    recoveryantra cctv custom D:\Footage\clip_00000000.h264 --from 100 --to 400 -o D:\Handover
  8. Pull out several clips at once

    Every clip, one channel, or the ones you pick - copied byte-exact with a manifest of every hash.

    recoveryantra cctv extract D:\Footage --all -o D:\Handover
  9. Cut straight off one camera, without recovering first

    Point at the camera and the time you need and it comes straight off the disk - remuxed losslessly by default, using the same index you already read.

    recoveryantra cctv cut E:\dvr.dd --camera ch1 --from 1700000000 --to 1700000060 -o D:\Handover
  10. Sharpen a frame or a range for the report

    The enhanced picture is shown beside the ORIGINAL, never instead of it - the filter chain used is printed and both pictures are exported, so nobody has to take the enhancement on trust.

    StandardSWGDE Best Practices for Image Analysis and Forensic Video Enhancement
    recoveryantra cctv enhance D:\Footage\clip_00000000.h264 --frame 120 --chain "unsharp:amount=0.8;eq:contrast=1.1" -o D:\Handover
  11. Capture stills for the report

    A small pack of frames - no case is needed for this one, it's a plain still, not an evidence pack.

    recoveryantra cctv frames D:\Footage\clip_00000000.h264 --from 100 --to 106 -o D:\Handover
  12. Produce the media report

    Clips, channels, times, codecs and hashes, in the same report format a recovery job uses.

    recoveryantra cctv report D:\Footage -o D:\Handover

In the app

The recorder view &mdash; cameras and times &mdash; before recovery.
The recorder view &mdash; cameras and times &mdash; before recovery.needs a device, shown in its honest waiting state

In your words

“I need footage off a security recorder's hard drive”
What you see
  • A disk out of a Hikvision, Dahua or similar NVR or DVR
  • Windows says the disk is unformatted
  • The footage may have been overwritten by newer recording
Why it works

Recorders use their own layouts, which is why a PC calls the disk unformatted. The video is found by its structure instead, and each clip is written so it will actually play on its own.

Real example

A shop's DVR disk showed as unformatted. 412 clips were recovered covering 9 days, each written with the parameter sets it needs to open in an ordinary player.

recoveryantra cctv --device \\.\PhysicalDrive2 --identify-onlyConfirm it is a recorder disk before committing hours.
recoveryantra cctv --device \\.\PhysicalDrive2 -o D:\FootageFind and extract the clips.
“I only need one camera between two times off the recorder disk”
What you see
  • The recorder disk or its image is here
  • The incident is one camera and a known hour
  • Nobody wants nine days of every channel
Why it works

The recorder's own index is read in seconds and nothing is written: cameras down the side, time across, played straight from the disk. A cut of one camera between two times is remuxed losslessly with a sidecar naming the extent and the three times, so the whole disk is never carved for one hour of one channel.

Real example

A car park camera between 22:10 and 23:05 on a 4 TB Hikvision disk: the index of 20,000 entries took 1.8 seconds, the 55-minute cut on channel 3 was written in under a minute, and the other 15 channels were never touched.

recoveryantra cctv index \.\PhysicalDrive2List the cameras and their times from the recorder's own table (--json or --csv for a file).
recoveryantra cctv cut \.\PhysicalDrive2 --camera ch3 --from 2026-09-15T22:10:00 --to 2026-09-15T23:05:00 -o D:\FootageOne camera, one range, lossless, with its sidecar.
recoveryantra cctv download D:\Footage\ch3_c000412.mp4 -o E:\HandoverCopy a clip byte-exact with its digest.
“I need a clip off the recorder with the time on it, playable, and a still for the report”
What you see
  • The clips are already extracted from the recorder disk
  • One customer or insurer needs ONE exact clip, not the whole extraction
  • The report needs a still frame, and it has to be somebody's exact moment, not a screenshot
Why it works

The Suite carries the same player, clip download, custom-download and enhance the forensic family has (R-CCTV-PARITY) - because a recovery customer wants a playable, timestamped clip just as much as an examiner does. A custom cut is remuxed losslessly by default (the recorder's own compressed pictures, not re-encoded), and only becomes an exact-frame re-encode when you ask for it and the screen says every pixel is now new.

Real example

A retail customer needed 90 seconds of a till camera for their insurer. The recorder's own index gave 6 cameras and 340 clips; `cctv custom` cut frames 1200-3900 of camera 3 losslessly (2.6 MB instead of the 1.1 GB source clip) and `cctv frames` captured 4 stills for the claim form in under a second.

recoveryantra cctv index E:\dvr.ddSee the recorder's own camera x time table before extracting anything.
recoveryantra cctv cut E:\dvr.dd --camera 3 --from 1700000000 --to 1700000090 -o D:\HandoverCut straight off the disk, by camera and time, with no separate recovery step first.
recoveryantra cctv download D:\Footage\clip_00000000.h264 -o D:\HandoverHand over one clip exactly as carved, SHA-256 verified.
recoveryantra cctv custom D:\Footage\clip_00000000.h264 --from 1200 --to 3900 -o D:\HandoverCut the range that matters, losslessly by default.
recoveryantra cctv frames D:\Footage\clip_00000000.h264 --from 1200 --to 1206 -o D:\HandoverA few stills for the report or the claim form.
recoveryantra cctv report D:\Footage -o D:\HandoverA written report of clips, channels, times and hashes.

Worked examples

A CCTV recorder disk shows as unformatted in Windowsbusiness

A disk taken out of a security recorder shows no readable file system in Windows, because recorders use their own layout rather than NTFS.

  1. Identify the recorder before extracting anythingIt reports which recorder wrote the disk, which tells you whether the format is supported and how long the job will take.
  2. Image the disk if the footage may be needed as evidenceRecorder disks are large, so plan the storage first.
  3. Extract clips, then reviewRecorders overwrite continuously, so the oldest footage present is the boundary of what exists.
recoveryantra cctv --device \\.\PhysicalDrive2 --identify-only -o E:\ClipsEstablish which recorder wrote the disk, without extracting.
recoveryantra image --device \\.\PhysicalDrive2 -o E:\dvr.ddImage the recorder disk first where the footage matters.
recoveryantra cctv --image E:\dvr.dd -o E:\Clips --min-clip 262144Extract clips from the image, ignoring very short fragments.
Options that matter here
--identify-onlyAlways run first. It costs minutes and tells you whether the rest of the job is viable.
--min-clipRaise it when the sweep returns large numbers of very short fragments; lower it when the incident is only seconds long.
--max-clipsCap a sampling run on a very large recorder, and say in the notes that the run was capped.
Honest limits
  • Clips are recovered by content, so per-clip channel and start time are not always available
  • Footage the recorder has already overwritten is gone
  • A clip whose parameter sets were lost may not play, and is marked as such rather than listed as normal
A customer needs one exact clip off an already-recovered recorder extraction, playable and with a still for the reportbusiness

The clips are already extracted from a recorder disk, and one customer or insurer needs a single time range from a single camera - not the whole extraction, and not the raw carved file if a shorter, playable cut will do.

  1. Read the recorder's own camera indexCameras against time, read in seconds, nothing written - confirms which camera and time range you actually need before touching a single clip file.
  2. Play the clip firstFrame count, keyframes, picture size and time base - the same check a forensic examination runs before handing anything over.
  3. Hand over the whole clip, or cut a shorter rangeA full clip is downloaded byte-exact; a range is remuxed losslessly by default, so the recorder's own compressed pictures are kept rather than re-encoded.
  4. Capture a still and write the reportA still frame for a claim form, and a written report covering every clip's channel, time, codec and hash.
recoveryantra cctv index E:\dvr.ddSee every camera and its time range before choosing a clip.
recoveryantra cctv play D:\Footage\clip_00000000.h264Confirm the clip's own timeline before handing it over.
recoveryantra cctv download D:\Footage\clip_00000000.h264 -o D:\HandoverThe whole clip, byte-exact, SHA-256 verified.
recoveryantra cctv custom D:\Footage\clip_00000000.h264 --from 1200 --to 3900 -o D:\HandoverThe range that matters and nothing either side of it, remuxed losslessly by default.
recoveryantra cctv extract D:\Footage --channel 3 -o D:\HandoverEverything from one camera, once the index says which channel it is.
recoveryantra cctv frames D:\Footage\clip_00000000.h264 --from 1200 --to 1206 -o D:\HandoverA few stills for the claim form or report.
recoveryantra cctv report D:\Footage -o D:\HandoverA written report of every clip's channel, time, codec and hash.
Options that matter here
--unitGive --from/--to in seconds instead of frames when you are working from a timestamp rather than a frame number.
--reencodeOnly when the exact frame range matters more than keeping the recorder's own bytes - every pixel becomes new, and the screen and the sidecar both say so.
--channelNarrow `cctv extract` to one camera once `cctv index` or `cctv clips` has said which channel it is.
Honest limits
  • Channel and start time are only as good as the recorder's own table - a table-less disk's clips carry inferred camera labels and unknown times, never an invented channel number
  • A clip whose parameter sets were lost may not play in every viewer, and is marked as such rather than listed as normal
Options & why, every switch, in plain words
--devicecctv
Point at the recorder's disk when you have the disk itself and the recorder is unavailable or its export function is broken.
Cost / when: Reading a recorder disk directly is read-only, but the recorder must be powered down and the disk removed. A running recorder overwrites the oldest footage continuously.
--imagecctv
Preferred over --device for any matter that may be produced. Image the recorder disk once, then work from the image.
-occtv
A folder on the case store with room for the clips. Recorder disks are large and footage recovers as many separate files.
--min-clipcctv
Raise it when a sweep is returning large numbers of very short fragments and the incident you care about is minutes long. Lower it when the event of interest is only a few seconds.
Cost / when: Raising the floor discards short fragments permanently for that run. If the incident may be brief, run low first and filter afterwards.
--max-clipscctv
Cap the run when you are sampling a large recorder to establish what is on it before committing to a full extraction.
Cost / when: A capped run is not a complete extraction. Say so in the notes, and do not report the cap as the total footage present.
--identify-onlycctv
Run first on any unfamiliar recorder disk. It reports which recorder wrote the disk without extracting anything, which tells you how long the real job will take and whether the format is supported.
--forcecctv
Only after reading the objection. See the same switch on acquire.
Cost / when: Forcing past a same-drive objection can overwrite the footage you are extracting.
<cccmd>cctv
Read the recorder's camera index, play a clip's timeline, list a scan's clips, download or cut one out, extract several, enhance a frame or a range, capture a frame pack, or build a media report. Every subcommand is documented on its own line.
Cameras & recorders

How to recover a drone

The showcase: get the footage and the flight log, GPS track, home point and all, off the drone’s card.

A drone is not a live bus you plug into, it is an SD card with video on it and a flight log beside each clip. So recovering a drone is two honest jobs. First, get the footage back off the card with the ordinary card flow (browse first, or a full scan of the microSD). Second, read the flight record: the app reads a DJI app-side .txt, an aircraft-side .DAT, or the .SRT telemetry sidecar next to the video, pulls the GPS track, home point, altitude and time back out, plots the path offline, and can even sweep the card for a deleted sidecar. Nothing is invented, a time or a point the file does not carry is never made up.

A camera drone hovering above a microSD card
Footage on the card, the flight path in the log beside it.
Do
  • Recover the video off the card first with the ordinary card flow, then read the log.
  • Export the track as CSV, GPX or KML for a mapping tool.
  • Let the app sweep the card for a deleted .SRT sidecar if the log is gone.
Don’t
  • Do NOT expect to 'connect to the drone' &mdash; the data is on the card; read the card.
  • Do NOT trust a made-up timestamp &mdash; the app only reports the time the file actually carries.

The steps, in order

We read a DJI flight-record (.txt/.DAT) or a video's .SRT telemetry sidecar, pull the GPS track and home point back out, and can sweep a card for a deleted sidecar.

1Log or card2Parse the track3Save the track
  1. Point us at the log or the sidecar

    A DJI app-side .txt, aircraft-side .DAT, or the .SRT file beside the video. The format is read from the content, not the file name.

  2. Read the GPS track

    GPS points, home point, altitude and, where the sidecar carries it, the wall-clock time - never invented for a record the file does not have.

    recoveryantra drone parse D:\DCIM\clip.SRT --plot D:\Handover\track.svg
  3. Sweep the card for a deleted sidecar

    Only when the .SRT is gone from the card - swept by its own repeating content, not a magic number, and proven before it is written out.

    recoveryantra drone recover --device E:\ -o D:\Handover
  4. Save the track

    CSV for a spreadsheet, GPX or KML for a mapping tool, plus an offline flight-path plot with no network call.

    recoveryantra drone parse D:\DCIM\clip.SRT --gpx D:\Handover\track.gpx --kml D:\Handover\track.kml

In the app

The drone workspace &mdash; point it at the log or the .SRT sidecar.
The flight path, plotted offline from the GPS track &mdash; no network call.
Options & why, every switch, in plain words
<dronecmd>drone
Parse a flight log or telemetry sidecar, correlate a GPS point against a clip's own time, sweep a card/controller for a deleted .SRT sidecar, or write a report/manifest. Every subcommand is documented on its own line.
Cameras & recorders

Dashcam and vehicle footage

Clips and telemetry off a dashcam card, GoPro GPMF, Tesla, CarPlay/Android Auto artefacts.

A dashcam is another camera on a card: recover the clips with the ordinary card flow, then read the telemetry. The vehicle reader pulls GoPro/GPMF GPS out of the video stream, reads TeslaCam and Berla-style vehicle artefacts, and the CarPlay / Android Auto traces a phone left behind. As with the drone, times and positions come only from what the file really carries.

Do
  • Recover the video off the dashcam card first, then read its telemetry.
  • Keep the original clips &mdash; the telemetry is read from them, not added to them.
Don’t
  • Do NOT keep driving on the card after an incident &mdash; loop recording overwrites the clip.
  • Do NOT read positions the file does not contain into the result.

The steps, in order

We organize an already-recovered TeslaCam/Sentry USB export by event and camera, pull the GPS track out of a GoPro/Insta360 video's own telemetry, read the documented CarPlay/Android Auto phone-side files, and ingest a Berla iVe CSV export - we do not acquire vehicle hardware ourselves.

1Source2Read it3Save the result
  1. Point us at the export, file or folder

    A TeslaCam RecentClips/SavedClips/SentryClips root, a GoPro/Insta360 video or bare GPMF stream, a CarPlay/Android Auto extraction root, or a Berla iVe CSV export folder - the kind is read from the content/layout, not the file name.

  2. Organize a TeslaCam export by event

    Every RecentClips/SavedClips/SentryClips folder grouped by event, with event.json's city/street/reason/GPS when present - a 2026.20+ clip encrypted with a vendor-held key is named, never guessed at.

    recoveryantra vehicle teslacam D:\TeslaUSB --csv D:\Handover\events.csv
  3. Read the GPS/telemetry track

    GPS points, and on a real video file the richer decode a maintained parser gives; a bare or carved GPMF stream is read by content, never by a magic number alone.

    recoveryantra vehicle gpmf D:\DCIM\GOPR0001.MP4 --plot D:\Handover\track.svg
  4. Save the result

    CSV/GPX/KML for the GPS track; a forensic build also seals a SHA-256'd manifest of the source.

    recoveryantra vehicle report D:\TeslaUSB -o D:\Handover

In the app

Telemetry plotted from a clip&rsquo;s own GPS track (shared plotting).
Options & why, every switch, in plain words
<vehiclecmd>vehicle
Organize a TeslaCam/Sentry export, read a GoPro/Insta360 video's GPS telemetry, read the documented CarPlay/Android Auto phone-side files, ingest a Berla iVe CSV export, or write a report/manifest. Every subcommand is documented on its own line. This product does not acquire vehicle hardware - it parses media and exports something else already produced.
Phones

Get the data off a phone (Android & iPhone)

Photos, messages and contacts, from a working phone, a backup, or a locked/dead handset, honestly.

RecoverYantra Mobile identifies a connected phone, picks the method that actually reaches it, and pulls the data byte-exact under a recorded authority, then hands it to the Suite for deep recovery. A consenting, rooted or backed-up phone is straightforward. A locked or dead handset is where honesty matters: the app runs the public methods it really has (checkm8 for older iPhones, Qualcomm EDL, MediaTek BootROM, rooted ADB, backups) and, for each device, states the real ceiling, a modern locked iPhone or a recent Android before first unlock has no public route, and the app says so rather than pretending.

A smartphone with data streaming out of it
Photos, messages and contacts, streamed back off the phone.
Do
  • Stop using the phone the moment you notice the loss &mdash; new photos and chats overwrite old ones.
  • Use an existing iTunes/Finder or Google/WhatsApp backup if you have one; it is the safest source.
  • Record the authority or consent for a locked-device job &mdash; the app asks for it.
  • Scope with --areas before quoting, not after
  • Prefer an existing backup over touching the handset
  • Record consent for the handset in writing
  • Take a copy of the databases and work from the copy
  • Keep the deleted flag on every record through to the export
  • Record who authorised access to the handset
Don’t
  • Do NOT expect a modern locked iPhone or recent Android (before first unlock) to open &mdash; there is no public method, and the app says so.
  • Do NOT keep taking photos on a phone whose camera roll you are trying to recover.
  • Do NOT trust a 'scan phone' claim from any tool that cannot actually read the device &mdash; this one refuses to fake it.
  • Do NOT expect a locked phone to be readable. Files stay encrypted until the first unlock after a restart, so a phone that lists fine can still read nothing.
  • Do NOT keep using the phone if something was deleted. It writes constantly.

The steps, in order

We copy what a connected phone will give us, read-only. Some steps require you to confirm you're authorised.

1Connect2What to copy3Copying4Your files
  1. Android or iPhone?

    This decides how we connect.

    AndroidiPhone / iPad
  2. Confirm lawful, authorised use

    safety

    Phone acquisition is only lawful with the owner's consent or proper authority. This acknowledgement is recorded and cannot be skipped.

  3. Connect and unlock the phone

    Plug in the phone, unlock it, and approve the trust/USB-debugging prompt on its screen. We check we can actually read it.

  4. Which methods may we use?

    Read-only copy is always available. Advanced methods (backups, supported BootROM/EDL paths) are opt-in per case.

  5. Where should the data be saved?

    safety

    A separate drive with enough space. We check first.

  6. Copy the data

    We copy what's exposed, verify each file's size, and report honestly what could and couldn't be read.

In the app

RecoverYantra Mobile &mdash; connect, or 'try everything'.
RecoverYantra Mobile &mdash; connect, or 'try everything'.needs a device, shown in its honest waiting state
The method picker: each method with the devices it reaches and its ceiling.
The method picker: each method with the devices it reaches and its ceiling.needs a device, shown in its honest waiting state
Create a phone image &mdash; the honest 'no rooted/consenting phone' state.
Create a phone image &mdash; the honest 'no rooted/consenting phone' state.needs a device, shown in its honest waiting state

In your words

“I need the photos and messages off a phone”
What you see
  • The phone works and unlocks
  • You want the camera roll, chats or call history
  • Nothing has been deleted, or something was deleted recently
Why it works

A phone cannot be read like a disk, so this copies what the phone itself will hand over, and reads the app databases where deleted rows often still sit.

Real example

A parent needed 8 months of a child's messages after a device was replaced. The camera roll copied over intact, and the messages database gave back 1,100 live messages plus 76 that had been deleted and were still in the file's free space.

recoveryantra phoneWhat can be recovered from which app, before you start.
recoveryantra phone messages.dbRead one app's store and show the rows that were deleted.

Worked examples

A phone was reset and the photographs were not backed upeveryday

A handset was reset, or an application was removed, and photographs or messages that were never backed up are wanted. What is possible depends almost entirely on the handset and whether it is rooted.

  1. Establish what this specific handset allows before promising anythingA modern handset encrypts storage, so deleted data is not recoverable by reading the device unless it is rooted.
  2. Check for an existing computer backup firstAn iTunes or Finder backup, or an Android backup, is frequently the complete answer and takes minutes.
  3. Copy what the handset does exposePhotographs still present can be copied off directly, read-only.
recoveryantra phoneList what is recoverable per application, including what is honestly not recoverable locally.
recoveryantra phoneThe same question by data type: contacts, messages, photographs.
recoveryantra recover --ios-backup "C:\Users\me\Apple\MobileSync\Backup\xxxx" -o D:\PhoneRecoveryRecover from an existing iOS backup folder.
recoveryantra phone msgstore.dbRecover deleted messages from a database already pulled off.
Options that matter here
--areasRun first when scoping, so the quote matches what is actually possible on that handset.
--deleted-onlyUse when the live data is already available and only the deleted records are wanted.
--keyRequired for an encrypted store such as WhatsApp. Without the key file the store cannot be read at all.
Honest limits
  • A locked handset cannot be read. It must be unlocked and must trust the computer
  • On an unrooted modern handset, deleted photographs are not recoverable by any software
  • Applications listed as not locally recoverable are ephemeral or server-side
Deleted messages are needed from an Android handseteveryday

Messages, call history or contacts have been deleted from an Android handset and are needed back. Whether this is possible depends on whether the database can be reached.

  1. Establish what can be reached on this handsetWithout root, only what the handset exposes can be copied. With root, the databases themselves can be read.
  2. Read the message database, including deleted rowsA deleted row frequently survives in the database's free space or in its write-ahead log.
  3. Report recovered deleted records as recovered deleted recordsThey are flagged as such, and the flag must survive into whatever is handed over.
recoveryantra phoneWhat is reachable on this handset.
recoveryantra phone mmssms.dbRecover only the deleted rows from the SMS database.
recoveryantra phone D:\PulledPhoneMine a whole pulled phone folder for deleted material.
Options that matter here
--deepUse when deleted material matters and you have a full pulled folder. It takes considerably longer than reading one store.
--appForce the profile if auto-detection picks the wrong one.
--keyRequired for WhatsApp and other encrypted stores.
Honest limits
  • A locked handset cannot be read at all
  • Where the database has been vacuumed, deleted rows are genuinely gone
  • Some applications are ephemeral or server-side and are not recoverable locally; those are named rather than attempted
Options & why, every switch, in plain words
--storephone
Point at a single database pulled from a handset when you already know which application's data you need.
--acquire-allphone
Acquire a phone automatically: try every method that reaches the device in order (checkm8, Qualcomm EDL, MediaTek BootROM, rooted ADB, backup) until one succeeds, when you want the tool to work down the options rather than picking one by hand.
Cost / when: It runs real acquisition methods against the device and writes the image to the destination; the operator's stated authority is recorded, and a device no public method reaches is refused, never faked.
--leveldbphone
Point at a LevelDB folder or a single .log file when the data lives in a key/value store rather than SQLite, which is what Chrome, Electron chat apps and browser Local Storage use.
Cost / when: Only the write-ahead log (.log) is read; data already compacted into .ldb table files is a stated limit, not everything the store held.
--breadthphone
Point at an already-acquired extraction folder to run the signed toolpack (iLEAPP or ALEAPP) over it and widen coverage past our own parsers, when a case needs the long tail of apps.
Cost / when: It does nothing when the toolpack is not installed, and its rows are labelled as the tool's, shown under our own parsers as corroboration.
--platformphone
Choose which breadth tool runs on the extraction, ios for iLEAPP or android for ALEAPP, since the two read different artefact layouts.
--deepphone
Run against a whole pulled phone folder when deleted material matters: trash folders, deleted database rows and thumbnails of photographs that are no longer present.
Cost / when: Deep mining takes considerably longer than reading one store, and recovered deleted rows are reported flagged as such.
--appphone
Force a profile when auto-detection picks the wrong one, usually on a renamed or unusually located database.
--keyphone
Supply the key for an encrypted store: a WhatsApp key file, or a hex key for an SQLCipher database.
Cost / when: Without the key the store cannot be read. The product does not attempt to break the encryption and will say so rather than returning partial output.
--deleted-onlyphone
Narrow the output to recovered deleted records when the live data is already available from the handset or a backup.
--areasphone
Use when scoping. It lists what is recoverable per application and media type, including the areas that are honestly not recoverable locally.
Cost / when: Applications listed as not locally recoverable are ephemeral or server-side. Scope them out of the quote rather than promising them.
--typesphone
The same scoping question asked by data type: contacts, messages, calls, photographs, and where each comes from.
--ffs-dfuphone
Establish whether a full-filesystem acquisition is possible for a specific iPhone before promising one, from the device's own DFU identifiers.
Cost / when: The answer for a modern handset is often no, and the plan says so. An unknown chip is never assumed to be vulnerable.
--android-ffsphone
The same question for Android, from the device descriptor. Produces a plan gated on what that specific device actually allows.
--methodsphone
List every mobile-acquisition method the engine carries: in-house protocol, detected external tool, or licensed capability package; the state it yields, whether it works before first unlock, and its certification (proto-proven vs needing a device to certify).
--planphone
Rank the methods that actually apply to a described device (an iOS DFU serial or an Android descriptor) - honest about what THIS build offers, and, when nothing reaches the device, which method WOULD and exactly what it needs.
Cost / when: A recovery build lists a physical method as NOT offered rather than hiding it; only the Forensic Suite may run one.
--acquire-methodphone
Run one named method from --plan's device against --dest. Behind the same lawful-use gate as every forensic acquisition.
Cost / when: Refused by naming the PRODUCT when the build lacks full mobile acquisition, and refused structurally (never a fake success) when the physical device, tool or loader it needs was not provided.
--cloud-tokensphone
Scan a lawfully acquired artefact for cloud account tokens, and get the lawful route to the provider rather than to the account.
Cost / when: Finding a token is not authority to use it. The output is a lawful acquisition route, and it should be followed.
--operatorphone
As on acquire: the examiner asserting lawful authority.
--authorityphone
As on acquire: the lawful basis for touching this device.
--orgphone
The examining organisation, recorded against the acquisition so the custody record names the body accountable for it.
--casephone
The case reference, set consistently across every step.
--destphone
Where --acquire-method writes the image or the copied files, and the hashed manifest naming the method, its provenance and (for a licensed package) the authority.
--package-installphone
Install a signed capability package (.sypkg) - a vendor's licensed loader/exploit chain under counsel's agreement - after verifying its Ed25519 signature and re-hashing every payload file against the signed manifest.
Cost / when: A tampered, expired, or wrong-key package is refused outright and contributes nothing to the method registry; it is never partially installed.
--package-verifyphone
Check a .sypkg file's signature and payload hashes WITHOUT installing it - for auditing a package before it goes anywhere near a case machine.
--package-listphone
List the capability packages currently installed and still verifying (a package that no longer verifies is silently absent from this list, per the module's no-partial-trust rule).
--package-removephone
Remove an installed capability package by its package_id, and delete its extracted payload from disk.
Erase a drive

Erase a drive, and prove it (RecoverYantra Wipe)

Selling, returning or scrapping hardware, sanitise to NIST 800-88, verify it, and get a certificate.

The opposite job, done with the same care. Wipe overwrites a drive with zeroes, provable, because you can read it back and every byte is zero, then verifies the erase by running the recovery engine over it and finding nothing, and issues a signed certificate stating the level achieved (NIST SP 800-88 Clear) and its honest limits. The system disk, the disk this program runs from, and the disk the report is written to are refused outright, and you must type the drive’s own serial number to proceed.

A hard drive dissolving into particles
A drive zeroed, verified, and certified &mdash; provably clean.
Do
  • Recover anything you still need before you erase &mdash; this is irreversible.
  • Type the drive&rsquo;s serial to confirm you have the right disk.
  • Keep the certificate; it states the level achieved and verified.
  • Match the serial number to the disposal list before typing it
  • Store certificates centrally, indexed by asset tag
  • Erase before the drive leaves your physical control, not after
  • Record the level ACHIEVED, which is what the certificate states, not the level requested
  • Verify the audit trail for each batch
  • Keep certificates for the retention period the policy sets
  • Do not interrupt a firmware sanitise once it has started
  • Read the certificate's stated level rather than assuming the request was met
  • Where the drive does not support a firmware sanitise, escalate to physical destruction rather than over-claiming
  • Sanitise only after the client has accepted the deliverable
  • Do not use the unattended form interactively
  • Record the date the working copy was disposed of
Don’t
  • Do NOT expect an overwrite to reach an SSD&rsquo;s spare pages &mdash; use the firmware Purge where the drive offers it.
  • Do NOT believe any tool that says 'unrecoverable' &mdash; the certificate states what was actually achieved.
  • Do NOT try to erase the system disk; it is refused, with no override.
  • Do NOT rely on a quick format or on deleting the partitions. Everything is still there.
  • Overwriting cannot reach a flash drive's spare pages, so for an SSD holding something truly sensitive, physical destruction is the only complete answer. The certificate says this.

The steps, in order

This permanently erases a drive. Here the destination IS the target - the opposite of recovery - so we confirm very carefully.

1Which drive2Confirm3Erasing and verifying4Certificate
  1. Which drive should be erased?

    safety

    Pick carefully. The system disk, the drive this program runs from, and the report drive can never be erased.

  2. Type the drive's serial number to confirm

    safety

    Typing the serial back proves you picked the right drive. A simple 'yes' is too easy to click through.

  3. How thorough?

    One zero-writing pass meets the NIST 'Clear' standard and is provable (we read it back). We don't claim more than we can prove.

    Zero-write once (NIST Clear)
  4. Verify and issue a certificate

    safety

    We read the drive back with our own recovery engine to confirm nothing is left, and produce a certificate stating what was achieved and its limits.

In the app

Choose the drive to erase &mdash; the protected disks are refused in words.
The signed certificate: level achieved, verified, and the honest limits.
The signed certificate: level achieved, verified, and the honest limits.needs a device, shown in its honest waiting state

In your words

“I am selling, returning or scrapping a drive”
What you see
  • The drive leaves your control
  • It held personal or company data
  • You may need to show it was cleared
Why it works

Deleting and formatting leave the data in place. Overwriting every block does not - and this then runs the recovery engine over the result, so the certificate says what was actually achieved rather than what was intended.

Real example

40 laptops going back at the end of a lease were cleared to NIST SP 800-88 Clear, each verified by running the recovery engine over the erased drive and finding 0 files, each with a certificate naming the drive's serial number.

recoveryantra erase \\.\PhysicalDrive3 --confirm <serial> --examiner "A Sharma"Overwrite, verify with our own recovery engine, and issue a certificate.

Worked examples

Drives are leaving the organisation and must be provably eraseddisposal

Storage is being retired, sold or returned on lease, and the organisation needs a record that each drive was cleared before it left.

  1. Confirm the drive is the one on the disposal listThe serial number has to be typed back before anything is erased.
  2. Sanitise to the standard, then verifyVerification is what the certificate's central claim rests on.
  3. Keep the certificate with the asset recordA certificate stored only on the erased machine is no record at all.
recoveryantra erase \\.\PhysicalDrive3 --confirm WD-WCC4N1234567 --out E:\Disposal --examiner "A Sharma"Sanitise, verify with the recovery engine, and issue a signed certificate.
recoveryantra erase \\.\PhysicalDrive3 --confirm WD-WCC4N1234567 --firmware --out E:\Disposal --examiner "A Sharma"Also issue the drive's own firmware sanitise to reach NIST Purge where the drive supports it.
Options that matter here
--confirmThe drive's own serial number. There is no override; this is the step that prevents erasing the wrong disk.
--passesLeave at 1. NIST SP 800-88 Rev. 1 is explicit that one pass suffices on modern media.
--patternLeave at zero. A zeroed drive can be PROVEN clean; random fill cannot be distinguished from data that was encrypted.
--firmwareReaches Purge where the drive supports it, including remapped and spare blocks an overwrite cannot address.
--outThe records store, not the drive being erased.
Honest limits
  • No software reaches the standard's Destroy level; that requires physical destruction
  • On flash, the certificate records the level actually reached, which may be lower than requested where the controller does not expose the spare area
A compliance policy requires certified sanitisationdisposal

An auditor or a contract requires that sanitisation be to a named standard and evidenced, not asserted.

  1. Establish which level the policy requiresClear and Purge are different levels with different methods.
  2. Sanitise to that level and verify with the recovery engineThe verification is the difference between a certificate and a claim.
  3. File the signed certificate against the assetThe signature is what makes the record checkable later.
recoveryantra erase \\.\PhysicalDrive4 --confirm S3Z2NB0K123456 --firmware --purge-method crypto --out E:\Compliance --examiner "A Sharma"Sanitise using a named firmware method where policy specifies one.
recoveryantra audit E:\Compliance\audit_trail.jsonlVerify that the disposal record has not been altered.
Options that matter here
--purge-methodForce a specific firmware method when the policy names one. Forcing a weaker method than the drive supports lowers the level reached, and the certificate will say so.
--examinerThe person accountable for the disposal under your policy.
--no-verifyOnly for bulk passes over drives that will be physically destroyed anyway. An unverified certificate must never be presented to an auditor as a verified one.
<path>Verify the disposal audit trail at the close of each batch.
Honest limits
  • The certificate states the level reached and its limits; it does not assert that recovery is impossible by any means
  • Destroy level requires physical destruction and no software provides it
The drive is an SSD and an overwrite is not sufficientdisposal

Flash storage remaps blocks internally, so an overwrite issued by the host does not reach the spare and remapped areas. The controller has to do the work.

  1. Establish what the drive itself supportsThe strongest method the drive advertises is used unless one is forced.
  2. Issue the firmware sanitiseThe controller clears areas an overwrite cannot address.
  3. Verify and read the certificate carefullyThe certificate records the level actually reached, which may be lower than requested.
recoveryantra erase \\.\PhysicalDrive5 --confirm 1234567890 --firmware --out E:\Disposal --examiner "A Sharma"Firmware sanitise plus verification and certificate.
recoveryantra erase \\.\PhysicalDrive5 --confirm 1234567890 --firmware --purge-method block --out E:\Disposal --examiner "A Sharma"Force a specific firmware method where the strongest is known to be unreliable on that model.
Options that matter here
--firmwareThe route to Purge on flash. Some drives make this non-interruptible once started.
--purge-methodForce a method only when policy names one or the advertised strongest is known unreliable on that model.
--patternStill zero. Random fill would make the verification weaker, not stronger.
Honest limits
  • Where the controller does not expose the spare area, the certificate says the spare and remapped blocks are not guaranteed cleared
  • A drive that does not support firmware sanitise cannot reach Purge by overwriting
The working folder holds a client's recovered data after the jobdisposal

A completed recovery leaves the client's data on the bench. It should not stay there once the deliverable has been accepted.

  1. Confirm the client has the deliverable and accepted itSanitising the working copy before acceptance removes your only second chance.
  2. Sanitise the working folderOne pass, and the stated limits are reported every time.
  3. Record the disposal against the jobThe record is what answers a later question about retention.
recoveryantra wipe E:\Jobs\4471\workSanitise the working folder, with confirmation.
recoveryantra wipe E:\Jobs\4471\work --yesFor scripted end-of-job cleanup where the folder is chosen by the script.
Options that matter here
--passesLeave at 1. As on erase, more passes cost time and add nothing measurable.
--yesScripted cleanup only. Removing the confirmation removes the last check that the right folder was named.
<folder>On flash, copy-on-write file systems and anything backed up, overwriting a folder does not guarantee every copy is gone.
Honest limits
  • On flash and copy-on-write file systems, overwriting a folder does not reach every copy, and the limits are stated every time
  • Backups of the bench, if any, still hold the data
Options & why, every switch, in plain words
<target>erase
The drive being retired. Used when storage is leaving the organisation and a record of its sanitisation has to be retained.
Cost / when: This is the one command in the product that destroys data. The system drive, the drive the product runs from and the drive holding the report are refused outright.
--confirmerase
Type the drive's own serial number. This is the step that prevents erasing the wrong disk.
Cost / when: There is no override. If the drive reports no serial, its size in bytes is used instead.
--passeserase
Leave at 1. NIST SP 800-88 Rev. 1 is explicit that a single overwrite pass is sufficient on modern media. Raise it only where an internal policy or a contract demands a specific number.
Cost / when: Additional passes multiply the time on a large drive and add no measurable security. Do not cite them as stronger sanitisation.
--patternerase
Leave at zero. A zeroed drive can be PROVEN clean by reading it back; random fill cannot be distinguished from data that was already encrypted.
Cost / when: Choosing random makes the verification pass weaker, not stronger, and a carve over random data produces false candidates.
--outerase
The folder for the certificate and audit trail. Put it on the records store, not on the drive being erased.
--examinererase
The name that appears on the certificate. Use the person accountable for the disposal, as your policy defines it.
--firmwareerase
Add this to reach NIST Purge on drives that support it. The drive's own controller sanitises areas an overwrite cannot address, including remapped and spare blocks on flash.
Cost / when: Only used where the drive genuinely supports it; the certificate records the level ACHIEVED, not the level requested. A firmware sanitise on some drives is not interruptible.
--purge-methoderase
Force a specific firmware method when your policy names one, or when the strongest method the drive advertises is known to be unreliable on that model.
Cost / when: Forcing a weaker method than the drive supports lowers the level reached, and the certificate will say so.
--no-verifyerase
Only for a bulk pass over drives that will be physically destroyed afterwards anyway, where the verification time is not justified.
Cost / when: Skipping verification removes the entire basis for the certificate's central claim. Do not issue an unverified certificate to a client or an auditor as though it were verified.
Reference

The four products & how licensing works

What each product is for, and how each is licensed.

One engine ships as four separate products. The Suite is the whole recovery range. The Imager checks, copies and extracts, and is completely free. Wipe erases and certifies. Mobile acquires phones. A licence is bound to one machine (you provide a machine code, you get a key) and a use is charged per source, one drive or image, not per file, so a second look at the same source next week is free.

RecoverYantraSuite

Every RecoverYantra data-recovery capability in one place

The complete data-recovery platform: file, ransomware, database and mailbox recovery, recorder footage, imaging and secure erase. Phone acquisition is RecoverYantra Mobile; evidence work is the SakshyaYantra family's.

Free tier, then one key unlocks everything

RecoverYantra Imager

Check the drive, copy it safely, take the files you need

Imaging for data recovery and forensics. It first CHECKS the drive and says plainly whether recovery is realistic - how much is unreadable, what to expect back, as a PDF report - then makes a gentle sector-by-sector copy to a separate disk you choose, raw or compressed E01 for handing to a lab. It reads the drive's index in seconds and lets you tick the files and folders you want back, deleted ones marked with their chances. Phones have their own guided steps.

Free, no key, ever

RecoverYantra Wipe

Erase a drive, and prove it

Sanitise a drive to NIST SP 800-88 Clear or issue its own firmware Purge, then verify it and produce a signed certificate.

Licensed per machine; a use is one source

RecoverYantra Mobile

Get the data off the phone

Mobile acquisition for data recovery: identify a connected phone, pick the method that reaches it (checkm8, Qualcomm EDL, MediaTek BootROM, rooted ADB, backup), acquire byte-exact under a recorded authority, and read the app stores. Hands the image or extraction to RecoverYantra Suite for deep recovery.

Licensed per machine; a use is one source
Do
  • Copy your machine code from the Licence page when you request a key.
  • Use the free Imager to decide whether a drive is worth recovering at all.
Don’t
  • Do NOT expect a key for one product to open another; each product has its own.
  • Do NOT retype a machine code by hand &mdash; the page has a copy button.

In the app

The licence page &mdash; machine code, key history, and what a 'use' means.
RecoverYantra Imager opens straight on imaging &mdash; and is free.
Reference

The standards behind the steps

The published practice each part of the flow satisfies.

The step order in this book is not invented, it follows the practice the recovery and forensic worlds already agree on. These are the standards the app cites as you work.

NIST SP 800-86

['Guide to Integrating Forensic Techniques into Incident Response', 'The four-phase model this curriculum follows: collection, examination, analysis, reporting.']

NIST SP 800-88r1

['Guidelines for Media Sanitization', 'Defines Clear, Purge and Destroy, and states that a single overwrite pass is sufficient on modern media.']

ISO/IEC 27037

['Identification, collection, acquisition and preservation of digital evidence', 'The international handling standard: what a first responder does, and the order they do it in.']

ISO/IEC 27041

['Assuring suitability and adequacy of incident investigative method', 'Why a tool has to be validated for the use it is put to, and how that assurance is demonstrated.']

ASTM E2916

['Standard Terminology for Digital and Multimedia Evidence Examination', 'The vocabulary. Using the terms consistently is what makes a report reviewable by somebody who was not there.']

ASTM E3016

['Standard Guide for Establishing Confidence in Digital and Multimedia Evidence Forensic Results by Error Mitigation Analysis', 'Requires that the ways a result can be wrong are identified and addressed, rather than assumed away.']

SWGDE

['Scientific Working Group on Digital Evidence, best practice series', 'Practitioner-level best practice for acquisition, examination and reporting.']

NIJ Digital Evidence Guides

['US Department of Justice / National Institute of Justice', 'Field guidance for first responders and investigators.']

FRE 702

['Federal Rules of Evidence, Rule 702: testimony by expert witnesses', 'Requires reliable principles and methods, reliably applied to the facts of the case.']

FRE 902(14)

['Federal Rules of Evidence, Rule 902(14): self-authenticating certified data copied from an electronic device', 'A copy authenticated by a hash-based process, certified by a qualified person, is self-authenticating.']

NIST CFTT

['Computer Forensics Tool Testing programme', "The test specifications the product's own validation harness is modelled on. The harness is NOT a CFTT certification."]

Reference

Best practice & what never to do

The whole book’s Do and Don’t, in one place.

Every hard-won lesson, gathered. If you read nothing else, read this.

Always do
  • Stop using the drive the instant you notice the loss.
  • Read-only on the source, always &mdash; recovered files go to a different drive.
  • Image a failing or valuable drive first, then recover from the calm copy.
  • Look before you scan: browse the index and take only what you need.
  • Open a few recovered files before you trust the job is done.
  • Keep the original media until the customer has confirmed the result.
  • Record authority or consent on a locked-phone job &mdash; the app asks for it.
Never do
  • Machines that were asleep or unreachable are reported as NOT ASKED. That is not the same as no hits, and a sweep that covered 200 of 400 machines and read as clean is worse than no sweep.
  • A sweep returns paths and sizes, NEVER file contents. To read a file you acquire that machine, deliberately, and that is recorded.
  • Sweep before you acquire. Acquiring first and searching afterwards is the expensive way round.
  • Do NOT keep using the computer while you think about it. Every download, update and temporary file can land on top of what you are trying to get back.
  • Do NOT save the recovered files onto the same drive. The pre-flight refuses it, and this is why.
  • Do NOT do a FULL format if you are asked again. A full format writes over every block and there is nothing left to find.
  • Do NOT let the camera or phone write anything new to the card.
  • Do NOT expect a locked phone to be readable. Files stay encrypted until the first unlock after a restart, so a phone that lists fine can still read nothing.
  • Do NOT keep using the phone if something was deleted. It writes constantly.
  • Do NOT run a consumer unlocking tool on seized evidence - the acquisition method and every step it took have to be on the record.
  • Do NOT assume a locked flagship has no answer without checking --plan first: it names the licensed package that would actually reach it, rather than a guess.
  • Do NOT run a normal scan first. A scan reads the whole surface repeatedly and can be the thing that finishes the drive off.
  • Do NOT run CHKDSK or a repair tool. They WRITE to a drive that is already failing.
  • Do NOT keep power-cycling it hoping it will behave.
  • Do NOT buy recovery software until you know the drive is readable. No software reaches a drive the machine cannot see.
  • Do NOT open the drive. The platters need a clean room, and opening it ends any chance a lab has.
  • Do NOT run Windows recovery or 'reset this PC' first. Both write to the disk, and reset can delete the files you want.
  • Do NOT put the disk in another Windows machine without a write blocker - Windows writes to any disk it sees.
  • Do NOT click Format. That is the one action that makes this harder.
  • Do NOT run CHKDSK. It writes its repairs onto the very structures somebody may need to read afterwards.
  • Do NOT let the NAS rebuild onto a replacement disk before imaging the members. A rebuild with the wrong assumption overwrites parity and can destroy what was recoverable.
  • Do NOT change the disk order in the enclosure.
  • Do NOT run this against a Drobo. A Drobo uses BeyondRAID, a proprietary block-virtualisation layer with no mdadm-style striping - --auto will scan for hours and detect nothing. See the hardware-help entry for what to procure instead.
  • Do NOT keep trying to boot the guest. Each attempt writes to the disk.
  • Do NOT delete or merge snapshots to tidy up first - the data you want may only exist in one of them.
  • Do NOT try to recover from an encrypted volume without unlocking it first. Everything found will be meaningless.
  • WITHOUT the key or password there is no route. Encryption that could be worked around would not be encryption.
  • Do NOT run scanpst.exe on the only copy. It WRITES to the file, and on a badly damaged store it can make things worse.
  • Do NOT work on the original. Copy it first and work on the copy.
  • Do NOT run the vendor's repair with data loss allowed on the only copy. It works by DELETING what it cannot fix.
  • Do NOT keep restarting the server. Recovery attempts write to the file.
  • Do NOT re-encode the file with a converter. That bakes the fault in and loses quality permanently.
  • Do NOT overwrite the original. Repairs always work on a copy.
  • Do NOT leave the disk in the recorder. It keeps recording, and it overwrites oldest first - which is exactly the footage you want.
  • Do NOT let the recorder initialise or repair the disk.
  • Do NOT carve the whole disk first when the index reads - that is hours, and the choice comes after. Carve when the table is gone, and the view says so ("inferred").
  • Do NOT trust a time the disk did not give: a table-less disk shows "time unknown", never an invented channel number or clock.
  • Do NOT delete the encrypted files. A decryptor may be published later, and without the files it will be useless to you.
  • Do NOT reinstall or wipe the machine yet. It holds the evidence of how they got in.
  • Do NOT pay before checking. A good proportion is often recoverable for nothing.
  • Do NOT just copy the files with Explorer or robocopy. You get a collection of moments, not a copy of one.
  • Do NOT reboot to get a clean state. That destroys everything held only in memory and in open files.
  • Do NOT install the agent on a machine you already suspect. It announces the investigation and changes the machine.
  • Do NOT assume enrolled means reachable. A laptop on a home network appears on the roster and cannot be acquired until it is back on a network you can reach.
  • Do NOT examine the original machine. Work from a verified image, or every finding rests on something that has since changed.
  • Do NOT rely on one artefact. Corroborate across several - that is what makes a finding hold up.
  • Do NOT collect a whole mailbox when the authority covers a date range. That is over-collection, and you answer for it.
  • A token found on a seized device is NEVER used for this. That route is identify-and-report only.
  • Do NOT rely on a quick format or on deleting the partitions. Everything is still there.
  • Overwriting cannot reach a flash drive's spare pages, so for an SSD holding something truly sensitive, physical destruction is the only complete answer. The certificate says this.
  • Do NOT rely on 'the tool is read-only' as your answer. Measure it and put the measurement in the report.
  • Do NOT leave the audit trail unsealed. A chain cannot detect a tail that was cut off; the seal is what catches that.
  • Do NOT re-encode it with a converter first. The converter's frames are not the recorder's frames, and the overlay clock is the only clock the recorder gave you.
  • Do NOT play it from the pen drive it came on. Copy and hash it first; the intake does both.
  • Do NOT send a screenshot or a player's snapshot. It has no time base, no hash and no chain.
  • Do NOT write the overlay clock down as the time of the event. It is the recorder's clock, as text; the case time is a separate field with its own uncertainty.
  • Do NOT quote a model's verdict as the finding. A model output is an observation; the methods and the examiner make the finding.
  • Do NOT examine the only copy. Hash it, copy it, examine the copy.
  • Do NOT zip up the whole extraction and send it - a customer or insurer asked for one clip, and sending everything else needlessly widens who sees the footage.
  • Do NOT re-encode by default. --reencode changes every pixel; the plain cut keeps the recorder's own bytes and says so on screen.
  • Do NOT run a full scan on every attached drive in turn hoping to get lucky - each full scan can take hours and spends a use per source under the licence, while reading the index alone is free and takes seconds.
  • Do NOT judge a drive by its letter or its size alone. Two drives of a similar size look identical from the outside; only the index by name tells them apart.
  • Do NOT re-scan the drive narrowed to one file type to "search faster" - the product always recovers everything up front for exactly this reason, and a second scan costs another use under the licence for no benefit.
  • Do NOT open the first file that looks close and assume it is right - check the trust grade shown beside it first; a mismatched or empty file wastes the one look you get before you notice it is wrong.
  • Do NOT run CHKDSK, or any other repair tool, a second time hoping it does better - each run writes to the very structures being read from here.
  • Do NOT format the drive because it "looks empty" - an index that comes back with nothing is not the same as a drive with nothing on it.